
Pro: My husband and I now have a place to live in our new city. You know, together.
Con: It is NOT in the house we’re trying to buy. It’s a rental. You are KILLING me, Short Sale!
Pro: It’s a very nice rental. Possibly the nicest rental in the History of Rentals. Because I’m an expert on such things. And I’ve seen a lot of crappy rentals.
Con: Hi, I’m Expensive!
Pro: The movers moved everything in for us while we stood around.
Con: They won’t move it back out. (Well, they will. But it won’t be free.) Also, I can’t find the iron. Or the TV remote.
Pro: It’s immaculately clean with lots and lots of really white carpet.
Con: It’s immaculately clean with lots and lots of really white carpet.
Pro: Three words: Walk. In. Closet.
Con: The closet is in the bathroom. This leads to inefficient use of dressing time. Items in the closet in the bathroom, items in the dresser in the bedroom. The back and forth is exhausting. I’m telling you, I need a system. Help me. Please.
Pro: It has a sun room in the back with tons and tons of natural light. Hello, built in Blog Photo Studio!
Con: The view out the windows… Um. The blinds are closed most of the time.
Pro: There’s a delightful, brand new grocery store (that just happens to be my fave regional chain) like right around the corner.
Con: I don’t know where anything else is in this town. I can get to and from that store and that’s pretty much it. I tried to find the mall yesterday. I got amazingly turned around and lost coming back. It was epic.
Pro: I have my own kitchen again!
Con: I don’t know where I put ANYTHING. I am lost in there.
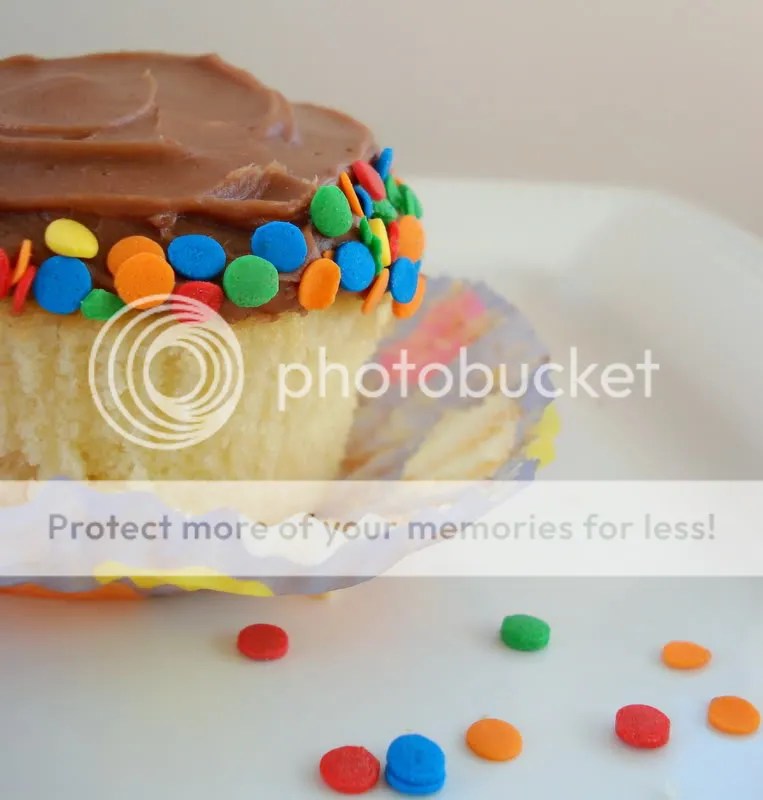
Pro: I made cupcakes.
Con: None at this time. Duh.

Yellow cake with chocolate frosting has always been a favorite combo of mine. It was my birthday cake of choice when I was younger. Coincidentally, It was also my breakfast of choice when I was in college. 😉 I may or may not have stood in front of the sink in our tiny apartment shoving week and half old cake and frosting into my face at 8:00 a.m. before running after the bus to get to campus. Breakfast of Champions, friends!
Of course, yellow cake and chocolate frosting always came from a box and a can. It was time to give making both from scratch a try.
Pro: These cupcakes are so good.
Con: I can’t keep my mitts off these.
Let’s talk about the cake. Now, after I made this particular butter yellow cake, I noticed my cupcakes weren’t super yellow. Even though I’m pretty sure the yellow box cake mix of my youth got it’s neon hue from dyes, additives and what not, I wanted to take a look at a few more recipes to see what kind of differences were out there.
To the Interwebs, Batman!
Right away I noticed that some recipes labeled yellow cake used whole eggs (as does the recipe I used) and some only the yolks. All of the recipes (including this one) used butter as the fat, not oil or shortening. I may have to try a yolk-only cake here in the future just to see the difference, but in the meantime, I like this recipe a lot. It’s buttery, moist, and puffs up in the cupcake pan instead of spreading out. The flavor is slightly sweet and almost creamy with just a hint of vanilla. It is the perfect vehicle for chocolate frosting.
Milk chocolate frosting. Boo-ya!
I get excited when I find a recipe that uses a technique I’ve never tried before to produce a product I’ve had many times before. I’ve had chocolate frosting before. In fact, I’m pretty sure I’ve eaten my weight in it over the course of my lifetime. Duh. But I’ve never made this particular way.
I’ll break it down for ya, real easy like.
Milk chocolate is chopped and dropped into the bowl of a food processor with corn syrup. While the machine is running, boiling cream is added and the whole thing is processed until smooth. Sounds a lot like ganache, doesn’t it? Well, then a bit of powdered sugar is added – only half a cup. Like nothing, right? Keeps the finished product from being teeth-achingly sweet. Once that’s all mixed in, super chilled butter is added, one piece at a time and it’s all whipped together.
Directly after processing, the frosting is too thin and runny and to use, but after an hour at room temp on the counter? Hello. Silky, creamy, dreamy, chocolate heaven. It’s milk chocolate so it’s got a sweet bite, but it’s not TOO sweet. Really, all you taste here is the flavor of the chocolate made extra creamy with butter. Yep. It may be a sin.
Be forewarned, the finished texture of the frosting is much better suited for spreading rather than piping but I think it really fits here. How homey and comforting is a cupcake slathered with a rustic smear of frosting? These are truly made with love.
Pro: Now you get to try them too!
Con: Mine will be gone soon. 😦
BUTTERY YELLOW CUPCAKES WITH MILK CHOCOLATE FROSTING (Cake and frosting both from: America’s Test Kitchen Family Cookbook – pgs. 561 & 563)
*A little note to confuse you*: This cake recipe makes two 8 or 9-inch cake layers, a 9×13-inch sheet cake, or about 24 cupcakes. The frosting recipe does have a note that it’s not the best for layer cakes and that it will frost a 9×13-inch or about 12 cupcakes. I made 12 cupcakes and used the rest of the batter in a different pan that I baked and put in the freezer. I had a tiny bit of frosting leftover after doing 12 – I probably could have layered it on a bit thicker on some. 😉 Now, to the recipes!
For the cake:
- 2-3/4 cups cake flour
- 2-1/2 teaspoons baking powder
- 1/4 teaspoon salt
- 1 cup (2 sticks) unsalted butter, softened
- 1-3/4 cups sugar
- 4 large eggs at room temperature
- 1 tablespoon vanilla extract
- 1-1/2 cups whole milk, at room temperature
- Adjust oven rack to middle position and preheat the oven to 350 degrees. If making layer cakes or sheet cake, grease the pans with cooking spray and line the bottoms with parchment paper. If making cupcakes, line two 12-cup muffin tins with paper liners.
- In a large bowl, whisk the flour, baking powder and salt together and set aside.
- Cream together the butter and sugar in a large bowl with an electric mixer until light and fluffy. Add eggs one at a time, beating after each addition until incorporated. Beat in vanilla.
- Reduce the speed to low and beat in one-third of the flour mixture until combined. Add half the milk. Repeat with half of the remaining flour mixture, then remaining milk, and finally the remaining flour mixture.
- Stir the batter one last time with a rubber spatula to make sure it is fully incorporated. Pour the batter into prepared pans. Bake until a toothpick inserted the center comes out with a few crumbs attached, 15 to 20 minutes for cupcakes, 20 to 25 minutes for layer cakes, 25 to 30 minutes for sheet cake. Rotate the pans halfway through baking.
- Let the cakes cool in the pan on wire racks for 10 minutes, then remove to wire racks to cool completely before frosting.
For the Frosting:
- 10 ounces milk chocolate, chopped (Go with a better quality chocolate to keep the frosting from being too sugary – I used Ghirardeli)
- 1 tablespoon corn syrup
- Pinch of salt
- 1/2 cup heavy cream, boiling
- 1/2 cup confectioners sugar
- 1/2 cup (1 stick) unsalted butter, cut into 8 pieces and chilled
- Put the chocolate, corn syrup and salt into the bowl of a food processor fitted with the steel blade. With the machine running, gradually pour the boiling cream through the feed tube and process for 1 minute.
- Add the confectioners sugar and continue to process until combined, about 30 seconds. With the machine running, add the butter through the feed tube, one piece at a time and process until smooth, about 30 seconds.
- Transfer the frosting to to a medium bowl and let cool to room temperature, stirring frequently until thick, about 1 hour.
ENJOY! 🙂
One Year Ago: Guacamole
Two Years Ago: Lemon-Scented Mini Cheesecakes with Mixed Berry Topping


