Monthly Archives: June 2008

The whole enchilada!

Love love LOVE Mexican food. It’s a recent thing for me too. I mean, I’ve always liked it, but I didn’t really start making it at home or requesting to go out for until about a year ago. Enchiladas are my absolute fave and this is my absolute favorite recipe I’ve found so far. I like it because it has a really flavorful red sauce and doesn’t involve any kind of creamy/sour cream based filling (ick). The cinnamon adds an interesting flavor that I love. It’s an easy and yummy recipe and it’s one of Eric’s absolute favorite meals. My changes are in italics.

CHICKEN ENCHILADAS (Recipe Source: Rachael Ray)

INGREDIENTS:

  • 8 soft flour tortillas
  • 3 cups chicken broth
  • 1 bay leaf, fresh or dried
  • 2 sprigs fresh oregano
  • 1 medium to large onion, quartered
  • 4 boneless, skinless chicken breasts (6-8 ounces each)
  • 2 cups tomato sauce
  • 2 teaspoons hot cayenne pepper sauce (several drops)
  • 1/4 teaspoon ground cinnamon (2 pinches)
  • 2 teaspoon chili powder, divided
  • 2 tablespoons tomato paste
  • 1 teaspoon ground cumin
  • Salt
  • 2 1/2 cups Monterey Jack shredded cheese (I use a Colby Jack blend)
  • 1/4 cup cilantro leaves, roughly chopped (optional) (I don’t love the flavor of raw cilantro, so I chop up some scallions to toss on top.)

DIRECTIONS:

Wrap tortillas in foil and warm in the oven, or wrap in a damp cloth towel and warm up in the microwave. (I’m a fan of the warming tortillas by “grilling” them on my stovetop burner, about 15 seconds on each side, just to get some color to them. I wait and do this step when I’m ready to assemble my enchiladas.)

Place a medium size skillet on the stove over high heat. Add chicken broth, bay leaf, oregano and onion, and bring up to a bubble. Add chicken breasts and bring back to a bubble, then cover with a lid and reduce heat to medium. Poach chicken in broth 10 minutes or until cooked through. Remove the cooked chicken from the stock and let it cool a bit so that you can handle it. Reserve broth and set aside.

While the chicken is poaching, make the enchilada sauce: in a sauce pan, combine the tomato sauce, hot sauce, cinnamon and one teaspoon of chili powder. Bring up to a simmer over medium heat and then reduce heat to low, keeping sauce warm until you are ready to use it.

Shred the cooled chicken into small strips using two forks or your fingers. Transfer the shredded meat to a bowl and add 1/2 cup of reserved broth, tomato paste, one teaspoon chili powder and one teaspoon cumin; season with a little salt and pepper

Remove tortillas from oven and switch broiler on high. (I’ve never broiled in my oven. Frankly, it makes me nervous. I know I should just get over it, but I haven’t yet! I heat my oven to 400 degrees)

Pour a little of the enchilada sauce, about 1/4 cup, on the bottom of a casserole or baking dish. (I also grease my dish, they have a tendancy to stick.) Divide chicken mixture equally between the warm tortillas by piling it up on the bottom half of each tortilla and rolling into a tube.

Place enchiladas seam side down on top of the sauce in the baking dish. Once all the enchiladas are in the pan, pour remaining hot tomato sauce over them and top with cheese.

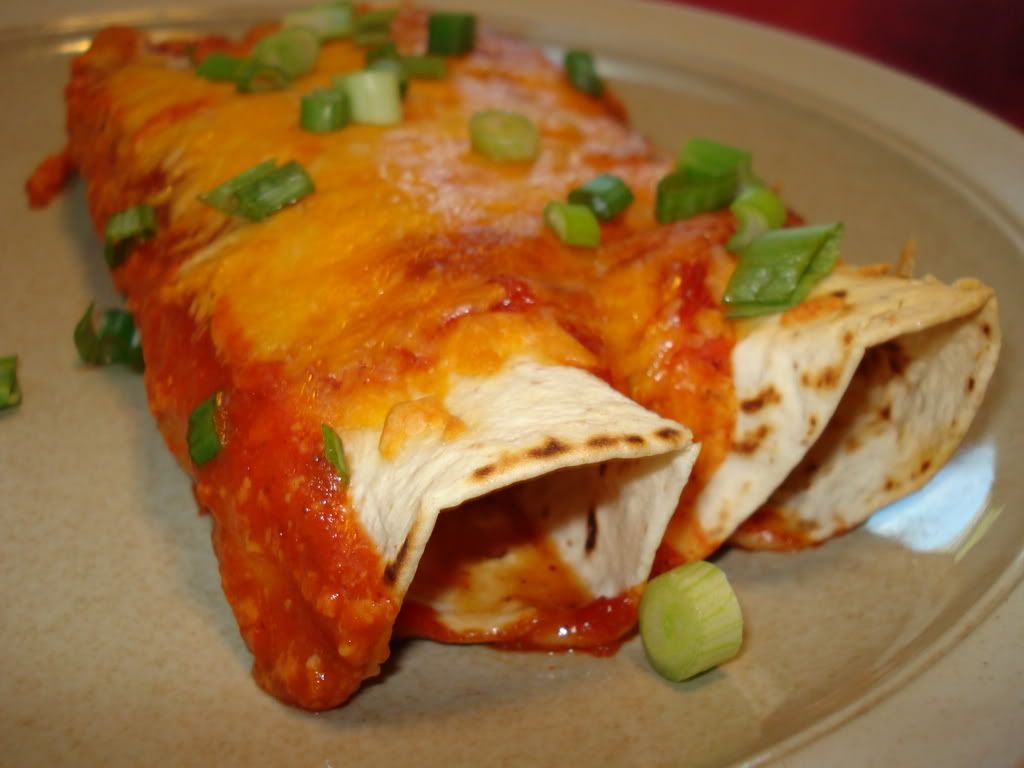
Place enchiladas in hot oven six inches from broiler and broil five minutes to melt cheese and set enchiladas. (I bake for 20-25 minutes until cheese is melted and enchiladas are heated through.) Sprinkle with the chopped cilantro (scallions) and serve. (I let mine set for about 5 minutes before serving, keeps them from falling apart.)

ENJOY! 🙂

5 Comments

Filed under chicken

Reason #52,006 why I love FOOD! :)

I am right-brained person by nature. I like feelings and emotions, colors and shapes, words and music and pretty pictures. I go with my gut, think with my heart, cry at the movies…or an especially touching Hallmark card commercial. Math, logic, reasoning and all that complicated stuff and I just don’t get along. Never have, never will.

My love of food and being in the kitchen totally compliments that part of my personality. I love standing in the store, picking up something that looks especially fresh and delicious that day and just imagining the possibilities. They are endless. It’s such a rush, it’s such a high…it totally fulfills that little part of me that is always longing to be creative. Even if it’s simple. Even if it’s obvious. And even if it’s a flop! It makes me so happy! And best of all, it makes others happy too! 🙂

After spending the last three weeks living out of a dorm-sized mini fridge in Eric’s basement Man Room, our new one finally came on Friday! YAY! Oh man…was I excited. Once it was in place, I gave it a hug. No really…I did. See? Ha ha!

I immediately ran out to the store and stocked up on the all the fresh food I’d been missing out on the last few weeks. I’ve found that I am much more likely to get my daily veggie intake if I make an effort to wash, cut and make something with my produce right away that I can munch on all week long. I almost always prefer the taste and crunch of fresh, raw veggies to any cooked veggie so I am always looking for a way to get my fix.

This simple pasta salad uses a bottled salad dressing. I know that a homemade vinaigrette would be much more impressive BUT….this is real life. And sometimes that just ain’t in the cards. I am not adverse to the semi-homemade way of life….let’s get real. Sometimes you just want to eat. Now. This is an easy and healthy way to curb your hunger. I love it because the whole wheat pasta and nuts keep me feeling full. A small serving of this at lunch time keeps me going until dinner.

ASIAN-INSPIRED MACARONI SALAD WITH CHOPPED CASHEWS (Recipe Source: Me)

INGREDIENTS:

  • 1/2 box of whole wheat elbow macaroni
  • 1/2 cup shredded carrots (I used pre-shredded matchstick carrots)
  • 1 medium red bell pepper diced
  • 2 scallions diced (include the greens)
  • 1/3 of cup of roasted cashews, chopped
  • 1/2 cup of Newman’s Own Low Fat Sesame Ginger salad dressing (this is the best bottled salad dressing in the world, btw.)

DIRECTIONS:

  1. Cook pasta to al dente, drain and rinse with cold water
  2. Combine veggies, pasta and nuts in a large bowl. Toss.
  3. Add salad dressing and toss again, coating all ingredients thoroughly. Chill 1 hour in fridge. Stir one more time before serving.

ENJOY! 🙂


2 Comments

Filed under pasta, salads, sides

Slow Southern Style…

Well, it just so happens there was a big argument (ahem, discussion) on the cooking board I frequent about what qualifies as “BBQ” today. Some concluded that BBQ implies cooking outside on the grill…hamburgers, hot dogs and the like. Other thought BBQ referred specifically to certain meats slow cooked with rubs and sauces. I fall into the later category. Hamburgers and dogs on the grill is “grilling out.” As in, we’re having people over tonight and grilling out. But true BBQ is a whole different ball game.

Here in the Midwest, it’s not like there are BBQ places on every corner like in other parts of the country. I sure do love it though. Of course, I can’t actually make anything that even comes close to authentic BBQ here at home, but I thought I would try to bring in some of those yummy flavors that are such a treat. Eric isn’t a big fan of thick, goopy, tomato-based BBQ sauces so I wanted try a vinegar-based Carolina-style sauce with pork. We both really enjoyed this! And I had a blast making my own sauce!

ROOT BEER PULLED PORK WITH CAROLINA BBQ SAUCE (Pork Recipe adapted from AllRecipes.com)

  • 1 2lb. Pork Loin Ribeye Roast (I buy this cut over the tenderloin because it’s cheaper, and since it cooks in the crockpot, it ends up nice and tender)
  • 1 12 oz. can of rootbeer
  • Salt & Pepper to taste
  • Carolina BBQ Sauce (recipe to follow)

Directions:

  1. Season the pork with salt and pepper. Coat a heavy skillet or dutch oven with olive oil and sear each side of the meat to get some color to it. Place in a slow cooker with root beer and cook on low for 4 to 5 hours. Drain root beer and chop or shred pork. Stir in BBQ. Serve over sandwich buns, if desired.

CAROLINA BBQ SAUCE (Recipe Source: Allrecipes.com)

**WARNING!** This sauce is SPICY! For me, there’s no such thing as too spicy, but I know some might find the kick to be a bit too much. To knock back the spice, I would decrease the amount of Cayenne and leave out the hot sauce completely.

INGREDIENTS:

  • 1 1/2 cups prepared yellow mustard (I knocked this back 3/4 cup per some suggestions from reviewers)
  • 1/2 cup packed brown sugar
  • 3/4 cup cider vinegar
  • 3/4 cup beer
  • 1 tablespoon chili powder
  • 1 teaspoon freshly ground black pepper
  • 1 teaspoon freshly ground white pepper
  • 1/2 teaspoon cayenne pepper
  • 1 1/2 teaspoons Worcestershire sauce
  • 2 tablespoons butter, room temperature
  • 1 1/2 teaspoons liquid smoke flavoring
  • 1 teaspoon Louisiana-style hot sauce, or to taste

Directions:

  1. In a heavy non-reactive saucepan, stir together the mustard, brown sugar, vinegar, and beer. Season with chili powder and black, white, and cayenne peppers. Bring to a simmer over medium-low heat, and cook for about 20 minutes. DO NOT BOIL, or you will scorch the sugar and peppers.
  2. Mix in the Worcestershire sauce, butter, and liquid smoke. Simmer for another 15 to 20 minutes. Taste, and season with hot sauce to your liking. Pour into an airtight jar, and refrigerate for overnight to allow flavors to blend. The vinegar taste may be a little strong until the sauce completely cools.

ENJOY!

4 Comments

Filed under pork, sauces

Laugh-a-doodle!

Because a “snicker” just doesn’t do them justice! A snicker is just a small, appreciative chuckle. These cookies deserve a big hearty, hold your side because it hurts, belly laugh! To quote Eric, “These cookies are like…perfect.” A bit of crunch around the edges, perfectly soft and chewy in the center. Mmmm…heaven.

I posted on the cooking message board I frequent that I was looking for a Snickerdoodle recipe. They are one of Eric’s faves and I had never made them before. And of course, those fabulous ladies did not disappoint! After browsing a variety of Nestie suggestions, I decided to go with this one from Bridget’s blog – The Way the Cookie Crumbles. I loved her ideas of adding a bit of brown sugar to the dough and upping the cinnamon to sugar recipe for rolling. The results were spectacular! An absolutely perfect cookie. I will be making these again for sure!

SNICKERDOODLES (Recipe Source: The Way the Cookie Crumbles – originally adapted from Betty Crocker’s Big Red Cookbook)

Ingredients:

2¾ cups (13.75 ounces) unbleached flour (I used regular all-purpose flour because that’s what I had on hand…and by the time I realized the recipe called for unbleached, it was too late!)
2 teaspoons cream of tartar
1 teaspoon baking soda
½ teaspoons salt
1½ cups granulated sugar minus 1 tablespoon (10.35 ounces total)
1 tablespoon light brown sugar
16 tablespoons (2 sticks) unsalted butter, softened
2 large eggs
¼ cup (1.75 ounces) granulated sugar (for rolling)
2 tablespoons cinnamon

Directions:

1. Adjust oven rack to middle position and heat oven to 375 degrees. Whisk the flour, salt and baking soda in a medium bowl; set aside.

2. Beat butter and sugars (except the ¼ cup granulated sugar for rolling) until creamy; add eggs and beat until combined. Add flour mixture and mix until just combined.

3. Mix ¼ cup sugar and the cinnamon in a shallow bowl. Roll approximately a tablespoon of dough into a 1-inch ball; roll ball in cinnamon sugar mixture. Repeat with remaining dough, placing balls 2 inches apart on ungreased baking sheet.

4. Bake until cookies are just set and turning golden brown at edges, 8-9 minutes. Cool cookies on baking sheet for 2 minutes; then, using a wide metal spatula, transfer cookies to a wire rack and cool to room temperature.

ENJOY! 🙂


3 Comments

Filed under cookies

Peachy Keen, Jelly Bean!

Peaches. I have a love/hate relationship with peaches. I would never just pick up a peach out of a fruit bowl and eat it. If someone offered me a choice of fruit pies, I would never choose peach. And anything peach-flavored, like candy or jelly. Blech! Not a fan at all!

But there is a way I enjoy peaches. More like adore. More like willing to smack my own husband to get. And that is: peach ice cream. When I was a kid, my dad and I used to take peach ice cream pilgrimages. We’d drive around to every ice cream shop we could think of in search of it. It’s not easy to find here in the Midwest. Once we found it, we’d go back at least once a month during the summer to have some, even if it was a half hour away. It’s our absolute favorite flavor!

So, I bought the KA ice cream maker attachment last week, let Eric pick the first flavor, which was all well and good. But, my motivation behind the purchase was only one thing: homemade peach ice cream. Yum.

The results: The texture was perfect, the color perfectly peachy…BUT my peaches were just not quite sweet enough. It’s still good (oh, I’ll still eat it. All of it. In a matter of days, most likely) but it would be downright SPECTACULAR if I had really really good peaches. I’m not sure you can even buy really really good peaches here in Iowa…I’ve never shopped for peaches before! If you are blessed with good peaches in your area, I recommend this recipe. If you’ve never had peach ice cream, get some. Now. Run, don’t walk!

PEACH ICE CREAM(Recipe Source: The Ultimate Ice Cream Book by Bruce Weinstein)

Ingredients:

  • 3 large, sweet peaches, peeled and pitted
  • ¼ cup peach nectar (found in the Mexican foods aisle at the supermarket)
  • Juice ½ lemon (since my peaches weren’t all that sweet, I may knock this back next time.)
  • ¼ tsp. salt
  • 2/3 cup sugar
  • 2 large eggs
  • 2 tbs. all purpose flour
  • 1 cup milk
  • 1 cup heavy cream

Directions:


Slice the peaches in eighths and place in a blender with the peach nectar, lemon juice, and slat. Blend until the peaches are pureed. Set aside.


In a medium mixing bowl, beat the sugar into the eggs until they are thickened and pale yellow. Beat in the flour. Set aside.


Bring the milk to a simmer in a heavy medium saucepan. Slowly beat the hot milk into the eggs and sugar. Pour the entire mixture back into the pan and place over low heat. Stir constantly with a whisk or wooden spoon until the custard thickens slightly. Be careful no to let the mixture boil or the eggs scramble. Remove from the heat and pour the hot custard through a strainer into a large, clean bowl. Allow the custard to cool slightly, then mix in the peach puree and cream. Cover and refrigerate until cold or overnight.

Stir the chilled custard, then freeze in 1 or 2 batches in your ice cream maker according to manufacturer’s instructions. When finished, the ice cream will be soft but ready to eat. For firmer ice cream, transfer to a freezer-safe container and freeze at least 2 hours.

**Note: I like chunks of fruit in my ice cream, so I cut up an additional peach and added it to the ice cream after about 15 minutes of mixing. This is just a personal preference.

ENJOY! 🙂


3 Comments

Filed under fruit, ice cream

A True Classic

Well, I have good news and bad news. Let’s do the bad news first, get that out of the way. Bad news: I don’t have a job. I was let go. It makes me sick. It makes me want to scream. It was the worst feeling I have ever felt in my life. Whew. Okay, bad news over. Now, the GOOD news. The good news is…I truly adore being at home all day. I have a nice clean house. I have lovely flowers and herbs growing outside. For the first time in a long time, I am stress-free. Eric is doing…exceptionally well at work and just received a promotion. I collect a portion from the state in unemployment. There’s not a lot of pressure, you know? For that, I am really and truly grateful. Blessed. Lucky. So even though getting axed from a job you love makes you feel really really crappy, there is still a silver lining.

For me, that silver lining is getting into the kitchen and tackling all the things I’ve never had the courage to tackle before. First on the list: Fresh baked bread.

I choose a basic white bread recipe to start out. I was pleased with the way it came out. My biggest concern was never having worked with a yeast dough before, I didn’t know exactly what the dough was supposed to feel like and how long to work it. Much to my surprise, after adding flour about a half cup at a time, I had a lovely dough that rose beautifully, baked up golden and tasted delicious! I admit my loaves weren’t the perfect shape, but you’ll have that. I’ll just call them…rustic loaves. Problem solved. I made a few changes while working with the dough. They are in italics.

CLASSIC WHITE BREAD (Recipe source: Better Homes and Gardens Cookbook)

Ingredients:

5 ¾ to 6 ¼ cups all-purpose flour (I ended up with 6 cups total)
1 package dry active yeast
2 ¼ cups milk
2 tablespoons sugar
1 tablespoon shortening, butter, or margarine
1 teaspoon salt

Directions:

Combine 2 ½ cups flour and the yeast in a large mixing bowl. Heat and stir milk, sugar, shortening, and salt until warm (120 to 130 degrees); butter will almost melt. Add to flour mixture and beat with electric mixer on low for thirty seconds (scrape bowl constantly). Beat on high three minutes more. Stir in as much of the remaining flour as you can with a spoon. (I just couldn’t do this with a wooden spoon. It was not happening. I went back to my mixer (with dough hook), beating in the extra flour a half a cup at a time on a low speed until the dough was elastic enough to knead.)

Turn dough onto lightly floured board and knead in remaining dough until smooth and elastic dough is formed (six to eight minutes). Shape into a ball and place in a greased bowl. Turn once to grease dough surface. Cover and rise in warm place until double (approximately forty-five minutes).

Punch down dough and turn again onto floured surface. Divide into two even balls. Cover and let rest for ten minutes. Shape each dough half into bread loaves by patting or rolling.

Place dough loaves into greased bread pans (8x4x2). Cover and rise in warm place until double (about thirty to forty minutes). Bake in 375 degree oven 40 minutes or until done. Loaves can be covered with aluminum foil the last ten minutes of baking to prevent over browning if necessary.

Remove immediately from pans and cool on wire racks.

ENJOY! 🙂

4 Comments

Filed under bread

Light and Flavorful

I have found in all my adventures in cooking (and eating) that I am drawn to dishes that are relatively light and made flavorful with ingredients other than salt. Things like fresh herbs, garlic, crushed red pepper…and, of course, wine. 🙂 It is very rare that I will make a rich/heavy main dish at home, and I’m pretty unlikely to order something like that out too. Dessert, on the other hand, that’s a completely different story!

This is one of my absolute favorite go-to meals at home because it satisfies both my main requirements: light and flavorful. It’s served with pasta, which we all know I adore, and it goes together lightening quick. Oh, and Eric enjoys it too. I guess that’s one of my criteria too (if I it has to be…)

CHICKEN MARSALA (Recipe Source: Better Homes and Garden Cookbook)

Ingredients:

  • 1/4 cup flour
  • 1/2 tsp. dried marjoram, crushed
  • 4 boneless, skinless chicken breasts
  • 2 cups sliced fresh mushrooms
  • 1/4 cup sliced green onions
  • 3 tbs. butter
  • 1/2 cup chicken broth
  • 1/2 cup dry Marsala wine

Directions:

  1. In a shallow bowl stir together flour, marjoram, 1/8 tsp. salt and 1/8 tsp. black pepper. Place chicken breast between 2 pieces of plastic wrap. Using the flat side of a meat mallet, pound the chicken lightly to about 1/4 inch thick. Remove plastic wrap. Repeat with remaining chicken breasts. (Or you can do what I do…buy the already thin cut breasts!) Lightly coat chicken pieces on both sides with flour mixture, shake off excess.
  2. In a 12-inch skillet cook mushrooms and green onions in 1 tbs. of butter over medium-high heat until tender; remove from skillet. In the same skillet cook chicken in remaining 2 tbs. butter for 5 to 6 minutes, turning to brown evenly.
  3. Remove skillet from heat. Return mushrooms and green onions to skillet. Carefully add broth and Marsala to skillet. Bring mixture to boiling; reduce heat. Simmer, uncovered, for 2 minutes, stirring occasionally. Season sauce to taste with additional salt and pepper. Transfer chicken to a serving platter. Spoon mushroom mixture over chicken. If desired, serve over pasta.

Enjoy! 🙂

2 Comments

Filed under chicken, pasta, veggies

I don’t just scream…I jump for joy…

For ICE CREAM that is! Last week sometime, I mentioned in passing to Eric that I would really like to get an ice cream attachment for my KitchenAid mixer. I was not expecting to purchase one anytime soon. It was just an “I wish” kind of thing.

Ha ha…Eric. I am so on to you, my man! So he encouraged me to go ahead and buy it. Such a guy thing to do, I know exactly what he was thinking. He was thinking, “Hey, if she buys this thing that means she’ll make lots of ice cream and I get to eat it. That’s good for me. If I keep telling her to go buy it, she’ll think it was my idea and she will love me forever and will probably reward me in other ways. That’s also good for me! YES! A KA ice cream maker is a GREAT idea!!”

Well, it worked. I bought it and I am so glad I did. Since it was, of course, all Eric’s idea, I bought a book of ice cream recipes and brought it home so he could choose the first flavor. He choose Oreo Cheesecake ice cream.

It is pretty damn amazing…if I do say so myself!! 🙂

OREO CHEESECAKE ICE CREAM(Recipe Source: The Ultimate Ice Cream Book by Bruce Weinstein)

Ingredients:

  • 1 cup sugar
  • 4 oz. cream cheese at room temperature
  • 1 large egg
  • 1/2 tsp. vanilla extract
  • 3/4 cup milk
  • 1 1/2 cups heavy cream
  • 10 Oreo cookies, crumbled

Directions:

  1. Beat the sugar and the cream cheese together until smooth and creamy. Beat in the egg and vanilla. Set aside.
  2. Bring the milk to a boil in a heavy saucepan. Slowly beat the hot milk into the cheese mixture. Pour the entire mixture back into the pan and place over low heat. Stir constantly with a whisk until the custard thickens slightly. Be careful not to let the mixture boil or the egg will scramble. Remove from the heat and pour the hot cheese custard through a strainer into a large, clean bowl. Allow the custard to cool slightly, then stir in cream. Cover and refrigerate until cold or overnight.
  3. Stir the chilled custard, then freeze in your ice cream machine, adding the crumbled cookies to the machine when the ice cream is semi-frozen. Allow the machine to mix in the cookes. For firmer ice cream, transfer to a a freezer-safe container and freeze at least two hours.

ENJOY! 🙂

3 Comments

Filed under ice cream

Just Like Grandpa Used to…Order In.

Every other Saturday night when I was a kid, my mom and dad would pile my brother and me into the car and drive down to Cicero for supper at my grandpa’s house. Supper at Grandpa’s consisted of whatever he felt like ordering in on that particular evening…one of three things: pizza, White Castle (ew, couldn’t stomach then, can’t stomach them now), or Chinese.

Now, being the picky little girl I was (Dad is convinced if it weren’t for milk and cookies I wouldn’t have made it to my 18th birthday), I would fill my plate with only two things when it was Chinese night. The first was fried rice. What’s not to like about fried rice?! The other were these pan-fried noodles. I can’t even remember what they were called…and I haven’t had anything like them since, but they were crunchy on the outside, chewy on the inside and I could seriously eat the entire container myself.

When I saw this on the FN recently, I immediately thought of Saturday suppers at Grandpa’s and knew I just had to try it! There is something about crunchy pasta that I just can’t resist! I clamour for the edge pieces of lasagna, I scrape off the top of the baked ziti…I love the crispy, crunchy goodness. It’s technically a side dish, but side dishes as main dishes are a staple in our house! HA! Plus, we had kind of a big lunch, so this was a quick, simple supper. My changes are in italics!

FRIED VERMICELLI AND GREEN ONIONS (Recipe Source: Rachael Ray – Food Network)

1 pound vermicelli (I used about half the box, per some of the reviews who mentioned that they had a hard time getting an entire box to brown up good)
Salt
3 tablespoons extra-virgin olive oil, 3 turns of the pan
3 tablespoons butter, cut into small pieces
3 cloves garlic, crushed away from skins
6 scallions, whites and greens, cut into 3-inch pieces then shredded lengthwise (I used 4, I was worried Eric might think it was two onion-y with 6)
Pepper
20 leaves fresh basil (1 cup), shredded into a chiffonade (I halved the basil too, and added a bit more chopped green onion on top)


Cook vermicelli in salted water to al dente; drain. Heat extra-virgin olive oil and butter with garlic over medium heat and cook garlic until it begins to soften, about 4 to 5 minutes. Remove garlic and raise heat. Fry the scallions in the seasoned oil for 3 to 4 minutes. Add well-drained pasta to the pan and season with salt and pepper. Toss the pasta liberally with the scallions and seasoned oil. Place a plate smaller than the pan down over the vermicelli and weight it with a few cans or a heavy skillet. Let the vermicelli brown and crisp up a bit. Remove the skillet and plate and invert onto a serving platter. Garnish with basil.

I had some difficulty inverting the pasta onto my serving platter, probably because my platter wasn’t quite big enough. I got olive oil EVERYWHERE. And, of course, I had a momentary lapse in sanity and tried to do this at the kitchen table over my placemat. Soooo, needless to say, my placemat is probably ruined. It’s soaking now…but I’m not holding out much hope! 🙂

Enjoy! 🙂
 

3 Comments

Filed under pasta, sides

Old-Timey Tropical Treats

For Christmas this past year, Eric’s grandmother (Grannie) gave me a really neat gift that I put in a drawer and sort of forgot about. Until now.  I sure am glad I found it! I can’t wait to dive into this bad boy more. 🙂

It’s an original 1963 Betty Crocker “Cooky Book” cookbook. It’s so cute! It has a ton of old-fashioned cookie recipes in it and all sorts of tips and tricks for baking the very best for your family. Some of the recipes are a little TOO old-fashioned for the 21st century newlywed (in my humble opinion) but I just can’t resist this book!

One recipe that jumped out at me right away was for Pineapple Bars. Looked easy, sounded yummy…what the heck…I’ll give it a try!

I love pineapple. What I love even more is the combo of pineapple and strawberry. And since I had some fresh strawberries just begging to be used, I changed the recipe up a bit and made a pineapple/strawberry filling. My changes are below in italics. The result is an old-timey tropical treat! Yummy!

PINEAPPLE-STRAWBERRY BARS (Recipe Source: Betty Crocker’s 1963 “Cooky Book” Cookbook)

  • Pineapple-Strawberry Filling (below)
  • 3/4 cup shortening (I used butter)
  • 1 cup packed brown sugar
  • 1 3/4 cups of flour
  • 1/2 tsp. baking soda
  • 1 tsp. salt
  • 1 1/2 cups rolled oats

Directions

  1. Prepare filling, let cool. Preheat oven 400 degrees
  2. Mix shortening and sugar thoroughly. (I used my mixer, of course!)
  3. Stir in flour, soda and salt together; blend in. Mix in rolled oats.
  4. Press and flatten half of the mixture over bottom of greased 13×9 inch pan. Spread with cooled filling. Top with remaining crumb mixture, patting lightly.
  5. Bake 25 to 30 minutes or until lightly browned. While warm, cut into bars and remove from pan.

Pineapple-Strawberry Filling

  • 1/2 cup canned crushed pineapple with juice
  • 1/2 cup chunky strawberry puree (I just threw some strawberries in the food processor and pulsed a few times until I had a 1/2 cup of liquid with some chunks of fruit left)
  • 1 cup of sugar (this seemed outrageously high to me, I cut it back to 1/2 cup and I’m glad I did!)
  • 2 1/2 tbsp. corn starch
  • 1 tbsp. butter
  • 1 cup of water

Combine all ingrediants in a saucepan, cooking and stirring until thickened. Let cool.

(If doing just pineapple, up the amount of canned pineapple to 1 cup)

Enjoy! 🙂

3 Comments

Filed under bars, fruit