Monthly Archives: August 2009

Hidden Potential

Sometimes you try a recipe and think, hey, this is pretty good…but it could be better. It’s tasty enough, but immediately on the first bite, those foodie gears start turning and you can’t help but think of ways to improve it. It’s a recipe with hidden potential.

That’s what happen this recipe. A couple weeks back, my grocery store had a great sale on boneless country style pork ribs. It’s not a cut a typically buy, mostly because I worry about them being tough. But since it was a such a great deal, and I’m always up for something new a different, I snatched them up and then searched out a way to prepare them in the crockpot. Turning tough cuts of meat into tender morsels of yumminess is what the crockpot does best! πŸ™‚

I loved the flavor combo in the sauce for these ribs, sort of sweet and spicy with a bit of an Asian flair. But IΒ  found adding all the sauce at the beginning of cooking resulted in a dryer texture at the end. I like my ribs wet an’ saucy, I guess. Heh. Next time, I’ll reserve half the sauce to add to the crockpot just before serving. Also, you’ll notice there’s no real cooking liquid added to the crock. I think this is a mistake. There needs to be a least a tiny bit of liquid to keep the meat from drying out. I didn’t find the meat to be overly dry without the liquid, but the ribs did not get as tender as I think the would have if there was a bit of liquid. Next time, I’ll add just a bit of beef broth to bottom of the crock, not enough to cover the meat, but just enough to keep the cooking environment moist. I made both of these changes to the recipe below.

Hidden potential…UNLOCKED!

SLOW COOKED SESAME COUNTRY STYLE RIBS (Recipe adapted from: About.com)

INGREDIENTS:

  • 3/4 cup packed brown sugar
  • 3 tablespoons honey
  • 1/2 cup soy sauce
  • 1/2 cup ketchup
  • 2 tablespoons vinegar
  • 2 large cloves garlic, minced
  • 2 teaspoons grated fresh ginger, or 1 teaspoon ground ginger
  • 1 teaspoon salt
  • 1/4 teaspoon ground red pepper
  • 3 to 4 pounds boneless country style pork ribs (I only used about 1.5 pounds. This was enough for two with a some leftovers. I would still make all the sauce though)
  • 1/2 cup of water or low-sodium beef broth
  • 1 medium onion, sliced
  • 2 tablespoons sesame seeds, toasted
  • 1/4 cup chopped green onion, with green

DIRECTIONS:

  1. Combine the first 9 ingredients in a large bowl. Pour about half the mixtured into an airtight container, refrigerate until ready to use.
  2. Line bottom of slow cooker with onions. Add water or broth. Place ribs in sauce and turn to coat. Add to slow cooker on top of onions and pour sauce over ribs.
  3. Cook on low for 6 to 7 hours. Pour reserved sauce over ribs and cook until just heated through. Place ribs on serving platter and sprinkle with sesame seeds and green onion.

ENJOY! πŸ™‚

One year ago: Tomato Soup with Pasta and Basil – This is delicious! Use up those summer tomatoes and fufill that fall soup craving all at the same time!

10 Comments

Filed under pork

Make Mine Spicy

There are two different kinds of people in this world:

1. The ones that live for anything spicy. The hotter the better, they say, bring it on. The most firey hot sauce, the buffalo-iest (ha) buffalo wing, the zestiest salsa. They can handle ANYTHING.

And 2. The wimps who won’t touch it. (Sorry wimps. Time to man up…. πŸ™‚ I kid, I kid. If you don’t like spicy food, that’s okay…but you probably won’t be real interested in the recipe below. So fair warning!)

I guess I fall somewhere between person #1 and person #2, which, really, if you want to get technical, totally negates the argument that there are only two kinds of people in this world. Hm.

Moving on!

I really do enjoy spicy food. Most likely because it was always around when we were growing up. My mom and dad like spicy, so that’s what we ate. Once upon a time, I thought I was pretty tough when it came to handling the spicy stuff. Then came The Day I Accidentally Ate the Pepper in the Kung Pao.

There’s a fabulous Mandarin restaurant in Schaumburg, IL called Yu’s. It.is.so.good. Now, I’m no world traveler (I’m not even much of a US traveler, to be honest) but Yu’s is the best Chinese food I’ve ever had and it was right in our backyard! Everything is so fresh and delicious – big chunks of meat, crunchy veggies, homemade noodles, perfectly flavored sauces. Oh, yum. I need a napkin over here! I’m drooling all over myself. I haven’t been there in forever. Need to think about making a stop when I go back home sometime soon.

The Shrimp Kung Pao is one of my favorites there. It sure does pack a punch! WOWEE! Super spicy and delightful. However, you must, at all costs, avoid the skinny little red peppers that are in there. Unless you are some kind of spicy food eating champion, those peppers will knock you right on your butt. I always make sure to pick them out and push them to the side.

One day I dug into the leftovers from dinner the night before, thinking all the peppers had been picked out. Oh, how wrong I was. A stray had been left behind. I crunched down on that thing on my very first bite. HOLY CRAP. I have never felt a fire in my mouth quite like that. It was so intense, I immediately lost my appetite. Even long after the burn subsided, I really didn’t feel like eating. I was sure my tongue had been permanently seared.

I have recovered from the infamous Kung Pao Pepper incident, and I still enjoy a good kick of spice every now and then. It did not sour me for life. πŸ™‚ I was craving some really fresh, tasty, spicy salsa this week so I hunted down some ingredients at the farmer’s market. I already had the onions and garlic on hand so I picked up some great looking tomatoes and jalapenos and went to town chopping and dicing.

I looked around a variety of different recipes. The best thing about salsa is it’s pretty customizable – it can be spicy or mild, red or green, super chunky or a little thinner. I like a fresh tomato salsa, with some well defined chunks and a big old kick of spice. I have to admit – I leave out the cilantro. I know, I know…Β  I just don’t care for cilantro. I kept trying to like it. I felt like I HAD to like it – like I had to give up my Foodie License because I didn’t like it . I’ve given up on that. I just can’t like it. My salsa is a cilantro-free zone. πŸ™‚

This recipe contains two jalapenos. For less spice, cut out all the ribs and all the seeds. That’s where the heat lives. For more spice, of course, chop the whole pepper. I removed all the seeds from both peppers, removed the rib from one and left some of the rib of the other. It’s plenty spicy that way. It’s not too spicy for me, but it’s got a kick for sure. If you are nervous, don’t leave in any ribs or seeds – it will make it much more mild. Or knock back the jalapenos from two to one.

SPICY HOMEMADE SALSA (Recipe inspired by a whole slew of recipes – especially this one at Dinner & Dessert and this one over at Annie’s Eats)

INGREDIENTS:

  • 1 pound of fresh tomatoes, diced
  • 2 jalapeno peppers, seeded and diced
  • 1 medium onion, finely chopped
  • 2 cloves of garlic, minced
  • 1 tablespoon chili powder
  • 1/2 tablespoon cumin
  • 1 teaspoon kosher salt (or to taste)
  • The juice of one lime

DIRECTIONS:

  1. Combine all ingredients in a large bowl, stir to combine.
  2. Customize it. You can either leave it as is, puree the entire mixture in a blender or food processor for a smooth consistency, or you can do what I did and puree about half the mixture and leave the other half chunky.
  3. Place in an air tight container and refrigerate at least two hours before serving.

ENJOY! πŸ™‚

8 Comments

Filed under appetizers, sauces, veggies

Confidence? What Confidence?

Have you ever had those moments where you have absolutely no confidence that the outcome of any given situation will end favorably? You have accepted defeat. Failure is imminent. You just want to get it over with already so you can shake it off and move on. It’s one of those things that happens to everyone at one time or another. Nobody’s perfect, after all.

Example: Let’s say you are cramming hard for finals in a crowded university library. You’re jamming to some Matchbox Twenty on your Sony Discman (no iPods yet!) and highlighting away in a textbook with your favorite purple highlighter. You are in the zone. You’ve got this in the bag. You are surrounded by at least a hundred of your closest friends doing the exact same thing. It’s been a long evening, so you decide to take a break. You put down your highlighter and take off your headphones. You stretch out your legs and pull your arms up over your head. Ahhh. That feels good. But those legs need just a bit more stretching. You tip your chair back a bit to really get at those muscles.

Then it happens. You realize there is no stopping it. It’s going to end badly. You realize you have absolutely ZERO confidence in your ability to stop yourself from falling backwards in your chair. In the library. In front of everyone. CRASH! A nanosecond later, you are on your back staring up at the ceiling.

Ah, crap.

Another example: Let’s say for three to five months of every year, your lovely Midwestern state with it’s miles of lush farmland and pefect glowing sunshine becomes a terrible, arctic wasteland of wintery doom. The snow flies, the wind blows, the ice builds up so much on your driveway you could go there and start training for Olympic speed skating events. It’s bad enough when you are standing in front of a window in your pj’s inside your nice, warm cozy house looking outside at it. It’s quite another to be out in it. But life must go on. You feel that little pang of jealousy toward your brothers in southern states where entire cities shut down just because three inches of snow falls. But, alas, you’ve lived in the Midwest for nearly thirty years and you know that it’s business as usual when winter weather strikes.

So you’re driving down a fairly busy residential street one evening after the snow’s been falling all day. You inch along slowly, careful not to make any sudden moves. Your eyes are wide with panic, your knuckles white with the fear that can only come from trying to navigate a particularly hairy snow covered street. Behind you, giant SUVs and pick up trucks are piling up, irritated to be stuck behind one THOSE people who won’t just move her ass already. You see another car approaching the road from a side street in front of you. It’s moving way, WAY too fast.

The car tries to slow down but slides out into your path. You are helpless. You have absolutely ZERO confidence that you will be able to avoid hitting that car. You move your foot to the brake and brace yourself. You are about to get into an accident.

Oh no!

A third example: Let’s say you have a bag of lemons on hand that’s just begging to be turned into lemon bars. You find a recipe that looks tasty and sounds easy so you go to work measuring, mixing and beating things into a crust and a filling. Your recipe calls for beating four eggs until thick. You turn on your trusty KA mixer and let it go to town. After 5 or 6 minutes, you take a look and decide that said eggs are not really thick. Well, maybe they are kinda thick. Thicker, maybe, than they were? You can’t really tell. Meh. Good enough, you decide, and off you go adding the rest of the ingredients.

When it’s all said and done, you realize your lemon bar filling is thin. Like really, REALLY thin. Hm. So you beat it some more, even going as far as to switch out your paddle attachment for your beater attachment. It is clear that your lemon filling is not going to get any thicker. You decide to press forward. Panic sets in as you pour your filling onto your par-baked crust. It flows like water, with definite splashback. The evidence is on your shirt. Maneuvering the pan to the oven prooves challenging, as you try not to spill this awful, runny filling all over the floor.

This can’t be good. There’s NO WAY this right. Where did you go wrong? What happened? You have absolutely ZERO confidence that these lemon bars are going to turn out. What a waste of time and ingredients.

Dang it!

Ah! But a wait a minute! Things are not always as bad as they seem. Tsk, tsk, tsk, Oh Ye of Little Faith, for assuming the worst.

Fall backwards in your chair at the library? No worries. Everyone around you is so focused on the task at hand that not one person notices. Not a soul looks up and sees you sprawled on the floor like a rag doll. You are either extremely lucky…or you are a really quiet faller. πŸ™‚

About to hit a crazy driver who slides into your path on cold winter’s night? No problem. You some how manage to slow down just enough to let the guy get his bearings in your lane and move forward. WHEW! Thank goodness! You are either extremely lucky…or you are quite the tactful and alert winter driver.

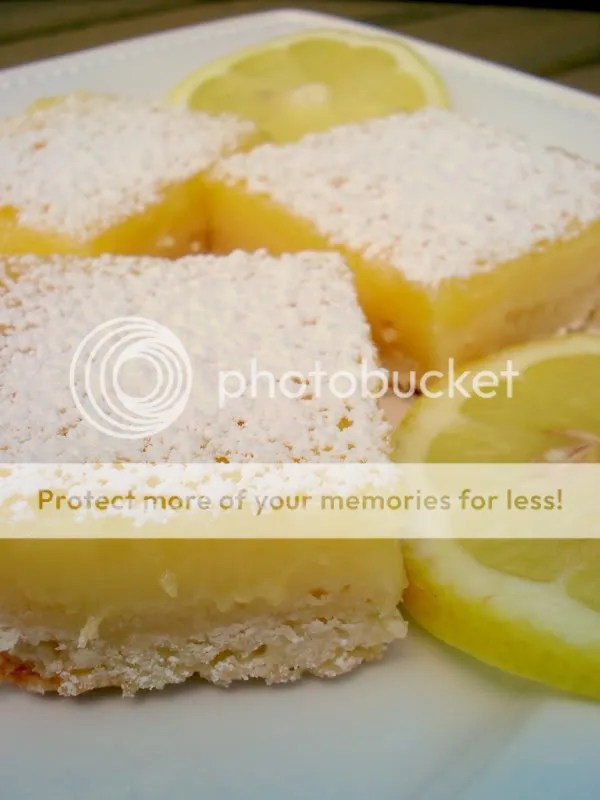
Lemon bars looking like a huge, embarrassing failure? It’s okay, because after 20 minutes in the oven, they have set beautifully with not even the slightest quiver of runniness in the center. And after cooling and chilling, they cut like a dream with a perfectly tart, smooth, creamy filling that’s just makes you want to run screaming down the street proclaiming your Kitchen Greatness to your entire neighborhood. You are either extremely lucky…or… Oh, heck with that, you knew they’d be okay from the start, right? There’s no way you’d mess up a recipe for lemon bars, for goodness sake. I mean, really….. πŸ˜‰

In case you haven’t figured it out yet, you can change all the “yous” in the stories above to “me, mine, I, my,” etc. etc. All three of those are true stories that did in fact happen to yours truly. πŸ™‚ The Great Lemon Bar Saga of 2009 being the most recent, of course.

I really honestly thought these weren’t going to turn out. I had trouble from the get go. Right off the bat, I overpulsed the butter for the crust mixture in my food processor. Let’s just say I did not have coarse crumbs. I had what looked, well, flour. I was sure I wasn’t going to be able to press it into my pan with any kind of positive result. I was wrong! Crust came together wonderfully despite my error. πŸ™‚ And then, of course, there was the filling fiasco. I was so sure I had a stinker on my hands, I was already rummaging around to see what else I could bake today to fill the void left by the loser Lemon Bars.

I was so pleasantly surprised at how wonderful they are! They held up great after being cut into squares and the filling is wonderful. Sometimes I find lemon bars to be too sweet…I want to taste LEMON for crying out loud! I want that tiny bit of pucker on the inside of my cheeks. These are perfect. Smooth, creamy and sweet without being too sweet.

Oh, the only thing…I did end up with tiny bubbles all over the tops of my bars probably because I beat the snot out of the egg mixture before pouring it into the pan. All worked out great though, because they’re dusted in powdered sugar! Bubbles? What are these bubbles you speak of? I see no such thing, be gone with you! πŸ™‚

Give these a try today! And DO NOT, I repeat, DO NOT panic when your filling looks too thin. They’ll be fine. I promise! πŸ™‚

LEMON BARS (Recipe Source: Martha Stewart, Everyday Food)

FOR THE CRUST:

  • Non-stick cooking spray
  • 3/4 cup all-purpose flour (spooned and leveled)
  • 1/3 cup confectioners’ sugar, plus 1 tablespoon for sifting
  • 1/4 cup cornstarch
  • 1/4 teaspoon salt
  • 1/2 cup (1 stick) cold unsalted butter, cut into small pieces

FOR THE FILLING:

  • 4 large eggs
  • 1 cup granulated sugar
  • 2/3 cup fresh lemon juice (about 4 medium lemons)
  • 1/4 cup all-purpose flour
  • 1/2 teaspoon baking powder
  • 1/2 teaspoon salt

DIRECTIONS:

  1. Preheat oven to 350 degrees, with rack in center. Coat a 9-inch square baking pan with cooking spray; line pan with two crisscrossed rectangles of parchment paper, leaving a 2-inch overhang on all sides.
  2. Make the crust: In a food processor, pulse flour with confectioners’ sugar, cornstarch, and salt. Add butter; pulse until mixture resembles coarse crumbs. Press into bottom and 3/4 inch up sides of prepared pan. Refrigerate 15 minutes.
  3. Bake until crust is lightly browned 20 minutes. Let cool slightly in pan. Reduce oven heat to 325 degrees.
  4. Meanwhile, make the lemon filling: In a bowl, beat eggs with an electric mixer until thick. Beat in granulated sugar, lemon juice, flour, baking powder, and salt. Pour over warm crust. Bake until set, about 20 minutes. Cool to room temperature; refrigerate about 1 hour.
  5. Using paper overhang as an aid, lift square from pan. Sift remaining tablespoon confectioners’ sugar over the top. Cut into 16 squares.

ENJOY! (with confidence) πŸ™‚

One year ago: I wasn’t doing much cooking because Eric and I were enjoying a long weekend in St. Louis! Check out all the fun we had! πŸ™‚

10 Comments

Filed under bars, fruit

Ch-Ch-Changes

This blog needs a makeover. Bad. If Stacey and Clinton from What Not to Wear were here, they’d be massacring this blog’s lack of style in the 360 degree mirror. πŸ™‚

I’d like to change up the look, which is, of course, a massive undertaking. And considering I have ZERO computer ability (really, I’m lucky I figured out how to put a picture in my posts. Ha.) you’ll need to bear with me while I figure it out. Before I dive into all that. I need to do some reorganization, clean up and make sure I have all the information I want on my page.

First on the reorganization/clean up list is to fix the categories list. Somewhere in the last year and a couple months, I got really lazy when it came to tagging my entries. Oops. Stuff was all over the place. I had a brownie recipe tagged as just “cookies.” Um, yeah. That’s pretty inaccurate. Ha. If you clicked on a tag, it’s very unlikely you would find everything that should be there. Not cool.

I’ve come to the conclusion that less is more when it comes to tags. A huge list of every single possible ingredient you have ever cooked with is distracting. What I did was keep it simple and narrow down the categories to make them more broad. I picked out one item that best categorizes the recipe (example: Cookies) and then added one other main ingredient in the recipe (example: chocolate, fruit, peanut butter). I think this just makes everything easier for everyone. I have removed most of the more specific ingredients and made them broader (example, I tagged everything apple, banana, blueberry as simpley fruit.) It’s pretty obvious, that if I’m looking for a blueberry recipe I can click on fruit and find it there. πŸ™‚

In all honesty, if you are looking for something specific, you are much better off navigating the Recipes tab at the top of the page. Every recipe I make is added there, with a quick clicky link to get to the post. They are arranged by category and in alphabetical order. Easy-peasy. See, the thing is, even though every recipe is tagged, you may find that clicking the tag doesn’t help you. At all. Two reasons. 1. I never title my posts with the name of the recipe. Ha. Sorry, you gotta look for that. And 2. It’s very unlikely you’ll have any clue what the recipe actually is from the first couple sentences that are shown when you click a link to a tag. πŸ™‚ I have to tell my story first.

What can I say? I’m a rotten, mean food blogger…making you read my pointless dribble before you get to the food. I can actually hear the masses shouting “SHUT UP, WINDBAG, AND GET TO THE DAMN RECIPE ALREADY!”

I can very safely say, that with all the changes I have planned, THAT (the pointless dribble, that is) is the one thing that WILL NOT change. Take or leave it, my friends.

I hope you’ll take it. πŸ™‚

Leave a comment

Filed under blog upgrades

Grocery Anxiety

I don’t know about you guys, but when I go out of town for the weekend, I always come back stressed and annoyed. Maybe it’s because being away is like being on vacation. No obligations, no chores, there’s usually something fun planned with family or friends, someone’s mom is doing the cooking (LOL) But the time flies by so quickly and as soon as we get there, we have to turn around and come right back. Suddenly all those obligations and chores you left behind on Friday are looming ahead. The house is dirty, the fridge is empty and the laundry basket is full. And going back to work is a mere 12 hours away.

Scowl, grumble, curse, whine.

We’ve traveled A TON this summer and while it’s always fun while we are away, I’ve grown to loathe coming back. This weekend was no exception. We came back on Sunday, I decided to tackle laundry instead of running right out to the grocery store for the week. I put off the store until Monday. Well, time got away from me and I never had a chance to plan my menu and make my list for the week.

That’s right, Iwent in blind. No list, no plan, no clue.

Yeah…never again. That was the most stressful trip to the store EVER. Plus, it was crazy crowded for a Monday afternoon. And I thought I was beating the after work crowd too, seeing as my work day was shortened thanks to a dentist appointment (Look Ma, No cavities! YAY!) No such luck.

So there I am, wandering aimlessly around the store, picking up things and putting them down, anxiety and panic slowly settling in. When it was all said and done, I had no idea if I had anything that would even come close to producing meals for the week. Some random meat, some random veggies and fruit. I had no idea what I had.

When I got home, I surveyed the damage and tried to plan my meals around what I bought. Totally backwards, and not recommended. Among my random purchases I had frozen raw shrimp, turkey kielbasa, fresh sweet corn (Local even! That got me all excited since I missed the Farmer’s Market this weekend! Love living in the Midwest!), and small red potatoes. Well, well, well, somehow I managed to pick up all the ingredients for a Shrimp Boil. Whatta ya know?! The only thing I didn’t have was Old Bay, so I ran out at lunch today to grab some. Then I boiled up a delightful pot goodies for dinner that totally hit the spot! Something different and simple. Not bad for no plan for the week!

I adapted a recipe from allrecipes.com and scaled it back to serve two. I guess, if you want to technical, it serves three because I had one lunch size portion left over (sans corn). I added a beer because some of the other recipes I looked at included it and I thought it sounded like a nice addition. Let’s be honest, beer just makes everything better. This was really easy and had great flavor. I loved all the different textures. I will be making this again for sure! πŸ™‚

SHRIMP AND SAUSAGE BOIL FOR TWO (OR THREE) – Recipe Adapted from: Allrecipes.com

INGREDIENTS:

  • 12 ounces beer
  • 1 lemon, halved
  • 1 onion, quartered
  • 4 cloves garlic, crushed
  • 1/4 cup Old Bay β„’ Seasoning
  • 1 teaspoon salt
  • 1/2 pound small red potatoes (cut into chunks for faster cooking)
  • 1/2 pound kielbasa sausages, cut into about 2-inch chunks (I used turkey kielbasa)
  • 2 ears corn, husked and halved
  • 1/2Β  pound unpeeled large shrimp (I’m sure unpeeled shrimp would add great flavor, but raw peeled shrimp works fine too, just thaw in cool water before adding to pot.)

DIRECTIONS:

  1. Fill a large stockpot with 2 to 3 quarts of water. It should come up the sides of pot so that it will cover all the ingredients. Add beer, onion, garlic, salt and Old Bay. Squeeze the juice from the lemons into the water and add the lemon halves. Bring to a boil.
  2. Place potatoes and sausage in the pot, and return to a boil. Simmer, partially covered, until potatoes are just tender, about 10 minutes. Add the corn; cook until tender, about 10 minutes longer. Add shrimp and simmer 3 to 4 minutes more, until shrimp are pink and cooked through. Drain off liquid before serving.

ENJOY! πŸ™‚

One year ago: Chocolate Crispy Cookies – YUM! These are SO good. Chopped up Crunch Bars and Rice Krispies are what make them crispy. A must try!

5 Comments

Filed under sausage, shrimp, veggies

Don’t Photograph Your Food…

Eat it!

I have a love/hate relationship with blog photos. I love them, of course, when I take good ones. I squeal with delight and strut around my kitchen, camera in hand like some sort of big shot, my foodie blogger ego growing like a summer tomato.

I hate them…pretty much the rest of the time.

Photos are what make food blogs different from other blogs. They are imperative to communicating the yummy, drool-worthiness of your recipe. Without ’em, you’ve nothing but a pile of word vomit. That said, there are probably more people taking time out of their busy travel schedule to read the instructions on the air sick in their front seat pocket than there are people reading a food blog with no photos. They are a necessary, groan inducing, cloud and night cursing, swear word slinging, camera smashing evil.

Now, when I got started with this blogging thing, I never claimed to be a photographer by any means. I just use our Sony P&S to to take pictures. I don’t feel the need to make excuses for my lack of abilities or apologize for craptastic photos.

However.

I too work full time like most folks and for a good chunk of the year it’s dark by the time dinner rolls around. I can’t always make the stars align just so. Clearly, I was absent the day they handed out super powers. Even if I hadn’t been, I probably wouldn’t have chosen controlling the weather or slowing down the earth’s rotation. NERD ALERT and YAWN! I could do WAY better than that!

And sometimes, well, I just want to eat. Now. And I want it to be hot and delicious and not have to sit through a 30 minute photo session to make it my mouth. If I’m plating food it’s for one of two reasons – 1. I’m artfully arranging food and garnishes and making sure I have the best light so I can get a great shot. or 2. It’s dinner time, I’m hungry, and I just want to freakin’ eat already. If you read my blog regularly it is so completely and totally obvious what kind of day I’m having, it’s almost embarrassing. I should be ashamed of myself.

Let’s look at the evidence. Witness Exhibit A: The “I Have Some Free Time so I’m Actually Trying to Take a Nice Picture” Photos.


Absolutely irresistible Rosemary Lemon Sandwich Cookies. You want one.


Pasta + Parsley = PERFECT. Oooo. Ahhhhh.


You are so ready for your close up, Mini Cheesecakes.

And Witness Exhibit B: The Chris Farley Gap Girls “LAY OFF ME, I’M STARVING” Photos.


This piece of chicken clearly chose a pile of rice to curl up and die on. Ha.


Berry pie or cow pie? Yeah, I can’t tell either.

And this…um. Yeah. Just….. Ew.

Now let’s play a game. Where does the photo of the dinner below belong? Exhibit A or Exhibit B? You’ll NEVER guess. Ha. Okay, you will.

Grilled Apple and Apricot Stuffed Pork Tenderloin is absolutely delicious. It’s also a bit time consuming. And it looks quite delightful while it’s resting and by the time you slice it you want dive in face first. I had to FORCE myself to take a picture before I dug in. I may or may not have wimpered and whined a’la Randy in A Christmas Story as I took my meal’s photo instead of eating it.

In the end, the photo was worth it because it means I get to share it with all of you! Even if the photo sucks, you can still kinda sorta see what it’s supposed to look like!

On to the pork! I found the most time consuming part to be pounding the pork out thin so it could be rolled. I don’t have a meat mallet, so I used a small frying pan. When that didn’t work, I pounded at it with the back of my hand. That worked. The pork is then stuffed, rolled and grilled for about 30 minutes over indirect heat. I decided to wrap my tenderloin in bacon because, well, everything’s better with bacon and I thought it would help keep everything moist.

So.Good. I served it up with crashed potatoes and roasted broccoli. Mmmmmmm.

APPLE AND APRICOT STUFFED PORK TENDERLOIN (Recipe adapted from: About.com)

INGREDIENTS:

  • 1 1lb. pork tenderloin
  • 1/2 cup peeled, diced apple
  • 3 dried apricots, snipped into small pieces
  • 1/2 cup Parmesan cheese
  • 1/2 tablespoon olive oil
  • 1/2 teaspoon dried sage
  • salt & pepper to taste
  • 3 stripes center cut bacon

DIRECTIONS:

  1. Slice the pork down the center lengthwise to butterfly it, do not cut all the way through. Place between two sheets of plastic wrap and pound to about 1 inch thickness.
  2. Mix together the apple, apricots, cheese and sage. Spread over the pork. Roll tightly and secure with toothpicks or kitchen twine. (If using toothpicks, soak them in water first). Wrap the bacon around the tenderloin, season with salt and pepper and rub with the olive oil. Let sit about 15 minutes.
  3. Preheat grill to medium heat. Place the tenderloin on to the direct heat for a minute or two on each side to sear it and get some color to it. Transfer to the indirect heat and grill for about 30 minutes, turning once. Allow meat to rest for 5 minutes before serving.

ENJOY! πŸ™‚

One year ago this week:
Loaded Sweet ‘n’ Salty Chocolate Ice Cream – So rich, it should be illegal
Beef and Rice Enchiladas with Red Sauce – AKA, that slop you saw above. πŸ™‚
T is For Turtle Bread – The cutest bread on the block!

4 Comments

Filed under fruit, pork

No Fear

So, I’m probably one of thousands and thousands of food bloggers out there who ran right out to see Julie & Julia this weekend. Eric even agreed to come with me. Way to take one for the team, babe! That’s why I love ya! I absolutely adored this movie – I think I had a smile on my face the entire time. Meryl Streep was fantastic as Julia and I loved learning about her fascinating life. (My Life in France is on my mile long to-be-read list but I haven’t gotten to it yet. I may have to move it up in the rotation!) I even heard Eric chuckle a few times.

I first picked up Julie Powell’s book Julie & Julia after seeing a preview for the movie earlier this summer. I had heard good things about the book in the past but it always slipped my mind when it came to deciding what to read next. When I saw the preview, I knew I had to get my hands on it right away. Off I ran to my public library to grab it.

This is going to sound off-the-wall bizarre and probably a bit nutty but…this book spoke to me. This book changed me. This book truly inspired me in a way that I’ve never been inspired before. Yeah, yeah roll your eyes, lean over and whisper to your friend that this Milkman’s Wife chick is all kinds of crazy. Go ahead…I won’t be offended. πŸ™‚

I saw myself in Julie. I saw my life in parallel with her’s before she started her blog project. Frankly, it scared me. Some of the criticism I’ve read about the book is about Julie as a person. “How can she be nearly thirty and still be floating aimlessly through life?” The Cool, Confident, In-Complete-Control Masses argued. “Who gets that far into their adult life with so little sense of purpose. She is infuriating, childish and unambitious. She should quit whining and do something.”

Whoa. Back the truck up. This is the part where I hyperventilate and panic. Where I need to breathe into a paper bag and sit down with my head between my knees for a moment as I wonder, much to my horror, if that’s what people see…when they look at me.

I am a 27 year old college educated secretary. That is my actual job title. I didn’t even know anyone still used that word anymore (aren’t we all admin assistants now? Much more PC, right?) Apparently, they do. I’m one of them. I make the pennies to prove it too. I didn’t plan on making this my career (not there’s anything wrong with it. Honestly, I’m grateful anyone hires me to do anything at all. I’m pretty worthless.) It just kind of happened. Now I’m feeling rather…well, stuck with it, if I’m being perfectly honest. Just like Julie. I’ve spent the last five years since college just bouncing around from here to there, not ever really finding my place. Just like Julie. I find myself looking around at everyone else doing something spectacular with their life and I wonder how did I get so far behind? Why don’t I have anything to offer like everyone else? What’s the point of my life? Just like Julie.

If you haven’t figured it out from blog already, let me fill you in a little secret. I LOVE words. I love written words. The written word is a carefully crafted masterpiece, a true hidden talent. It’s deeper and more profound than speech. I don’t have much to say, but I have plenty to write. I’ve always been that way. Ever since I was little girl and I first picked up a pencil and began to write stories and poems littered with charming first grade mispellings, I’ve felt drawn to words. Back in high school, when English teachers were fawning over me and handing out A’s like candy and reading my stuff aloud as if to say “why can’t the rest of you do it this way?” I thought maybe I wanted to BE a writer.

At 18, they make you decide what you want to do with the rest of your life. You have decide what you want to be when you grow up so you can go off to college and study it and then come out on the other side ready to do it. Forever. This is ri-freakin’-diculous, if you ask me. How is a mere child, without a fully developed brain, supposed to make such a drastic and life changing decision? Even at the time, when most teenagers think they know it all, I thought the entire thing was completely laughable.

And I was different from other 18 year olds. I was mature. And wise. And smart. I was practical. I was going to have a good, sucessful life. A career. You don’t make a career out of writing, I thought. That’s like saying I want to be a rockstar, or an actress, or a professional athlete. EVERYONE (and their mom, brother, and second cousin twice removed) wants to be writer. Sure, sure, I stood out in my high school English classes (and then my college classes too, when I got there) but that’s not the real world. That’s just pure, dumb luck. And I, being the mature, wise, and smart 18 year old I was, was NOT going to jump head first into thousnads of dollars worth of student loans only to put my future in the hands of pure, dumb luck. I shelved the idea of studying creative writing and got a marketing degree instead.

All aboard the Practical Train! Toot Toot! Next stop, Careersville!

After reading Julie’s book, I realized I’ve been riding the Practical Train for way, way, WAY too long. Fellow passengers include Fear, Doubt and What If. I’m still waiting for the Careersville stop. Meanwhile, LIFE is whizzing by outside the window.

I’m surrounded by incredibly supportive and encouraging people in my life. My parents, my family and my friends. My husband is my biggest cheerleader and my biggest fan. His gentle encouragement has become outright pushing. Just like Julie’s husband. (coincidence that my husband is also Eric? Hm. I’m thinking it’s a sign. Ha.) He wants me to do this. To WRITE!

At the end of the movie, as Julie gets ready to tackle her very last recipe in the Mastering the Art of French Cooking – she whispers to her DVD of an old Julia Child television show…”No Fear, Julia.” Well, this is it for me. No more fear. It’s time to take a serious look at this writing thing. It’s time to see if I can make it happen. I’m going to see if I can pursue freelance opportunities. I’m going to work up the courage to share my other blog (Oh, that’s right – I have a second blog. It doesn’t have much in it yet, but that will change) I’m going to jump right in and do NaNo again and see if I can actually get something workable out of 50,00o words.

I have to try. I, like Julie, am not content with where I’m at. It’s up to ME to change it. Can’t just sit around and wait. I want to do this. I think I CAN do this. Congratulations, Self. I think you just figured out the reason you were put on this earth.

I’d like to thank my husband, Eric, all my family and friends, all those high school teachers and college professors that handed out A’s like candy, and fellow food blogger Julie Powell, for helping me realize there’s more to life than just being a secretary. Stay tuned for more from me!

And now the reason you are here…a recipe! Here, have a cookie for being a good sport and sitting through this post where I explain my sudden life epiphany. Peanut Butter Blossoms. The true, unadulterated classic. Perfectly chewy and kissed with chocolate, these are destined to improve your life in just one bite. Savor the flavor, my friends. πŸ™‚

PEANUT BUTTER BLOSSOMS (Recipe source: Hersheys.com)

Makes about 4 dozen

INGREDIENTS:

  • 48 HERSHEY’S KISSES Brand Milk Chocolates
  • 1/2 cup shortening (I used butter)
  • 3/4 cup REESE’S Creamy Peanut Butter
  • 1/3 cup granulated sugar
  • 1/3 cup packed light brown sugar
  • 1 egg
  • 2 tablespoons milk
  • 1 teaspoon vanilla extract
  • 1-1/2 cups all-purpose flour
  • 1 teaspoon baking soda
  • 1/2 teaspoon salt
  • Granulated sugar
DIRECTIONS:

1. Heat oven to 375Β°F. Remove wrappers from chocolates.

2. Beat shortening and peanut butter in large bowl until well blended. Add 1/3 cup granulated sugar and brown sugar; beat until fluffy. Add egg, milk and vanilla; beat well. Stir together flour, baking soda and salt; gradually beat into peanut butter mixture.

3. Shape dough into 1-inch balls. Roll in granulated sugar; place on ungreased cookie sheet.

4. Bake 8 to 10 minutes or until lightly browned. Immediately press a chocolate into center of each cookie; cookie will crack around edges. Remove from cookie sheet to wire rack. Cool completely. About 4 dozen cookies.

ENJOY! πŸ™‚

One year ago this past week:
Chicken Fried Rice – Tastes just like takeout…only better!
Pizza Margarita – This is one my favorite posts in my entire blog. Check out my story about hating homemade pizza. You get a good sense of “writer me” in this post. I think it’s where I found my voice for the blog.
Banana Cupcakes with Honey Cinnamon Frosting – Oh, these are insanely delicious.
Skillet Bruschetta Chicken – Simple and easy weeknight meal.

15 Comments

Filed under cookies, peanut butter