Monthly Archives: February 2009

Bet I Can’t Make Just One!

When we get together with our friends, it’s almost always an informal, everyone brings a snack to share, BYOB type of event. I love it, because then no one can say not to bring anything. LOL. I always go overboard, I just have to bring something savory and something sweet. I physically cannot stop myself from bringing two yummy plates to share.

For our get together with friends over the weekend, I wanted to keep it simple, since I was already doing the cheescakes. A cold dip that’s whipped up in the food processor without much effort sounded perfect!

I’m not a huge dip person normally. Why is “dip” synonymous with white, creamy ickiness? I’ll never understand that. I went out in search of the anti-dip-dip. Preferably using my fave convenience product from the store – the jarred roasted red pepper! LOVE those things. I use them in everything…salads, sandwiches, pasta….they go with everything.

I found a tasty looking Smokey Red Pepper Dip recipe out on the Cooking Light website. It’s a really simple to throw together. It sure does pack a punch though! Wowee! Very potent stuff. (Ya know, I thought two cups of sliced red onion and two cloves of garlic seemed like a lot, LOL) A little goes a long way…don’t chow down on too much of this before your big job interview. Tasty though! I wouldn’t serve  this as the ONLY choice of an appetizer, it’s way too strong, but it’s a nice addition to a heavy appetizer spread. I served it with toasted pita chips.

SMOKEY RED PEPPER DIP WITH TOASTED PITA CHIPS (Recipe Source: Cooking Light)

INGREDIENTS:

  • 2  medium red bell peppers (I subbed one large–ish jar of roasted red peppers, drained and blotted dry. If you do this, ignore the first step of the recipe. I left the recipe as is in case you want to try roasting your own peppers!)
  • 2  cups  sliced red onion
  • 2  garlic cloves
  • 1/4  cup  dry breadcumbs
  • 1/4  cup  plain fat-free yogurt
  • 1  tablespoon  red wine vinegar
  • 2  teaspoons  olive oil
  • 1/8  teaspoon  salt
  • 1/8  teaspoon  hot sauce

DIRECTIONS:

  1. Cut bell peppers in half lengthwise; discard seeds and membranes. Place pepper halves, skin sides up, on a foil-lined baking sheet; flatten with hand. Arrange onion and garlic around peppers on baking sheet. Broil 10 minutes or until blackened. Place in a zip-top plastic bag; seal. Let stand 15 minutes; peel.
  2. Place peppers, onion, and garlic in a food processor; process until finely chopped. Add remaining ingredients; process until smooth. Serve with toasted pita triangles.

For the Pita Chips:

  • 6 whole wheat pitas
  • Olive oil
  • Salt and Pepper to taste

Cut each pita into 8 triangles. Layer onto a large cookie sheet covered in foil. Drizzle with olive oil and toss to coat. Season with salt and pepper. Toast in a 400 degree oven until crisp, about 10 minutes. Cool and serve.

3 Comments

Filed under appetizers, veggies

The Perfect Little Bite!

I get a big kick out of Eric’s co-workers. If someone is having a party or if there something going on that they want others to know about, they send out MS Outlook meeting notices. Quick, easy, good way to see who can come and who can’t without tracking them down. Why, yes, I accept your meeting invitation for copious amounts of wine and food on Saturday night from 6 until 11. LOL. That’s just hysterical to me.

Eric informed me of such a meeting notice earlier this week. Hooray! A chance to make up some goodies and spend a nice evening with friends. Since we were doing a “wine” theme (I say “wine” because, yes, we were drinking wine, but there was no rhyme or reason to what we were drinking, no structured tasting or anything, it’s more like lets pop a bunch of bottles and see how many we can kill over the next six hours.) so I decided a nice bite-sized dessert would go well with the spread of appetizers we chowed down on. Eric wanted me to do the Oreo truffles, but….as much as love those….they’ve been done! Time for something a little bit more sophisticated….it was a wine night, after all. Heh…

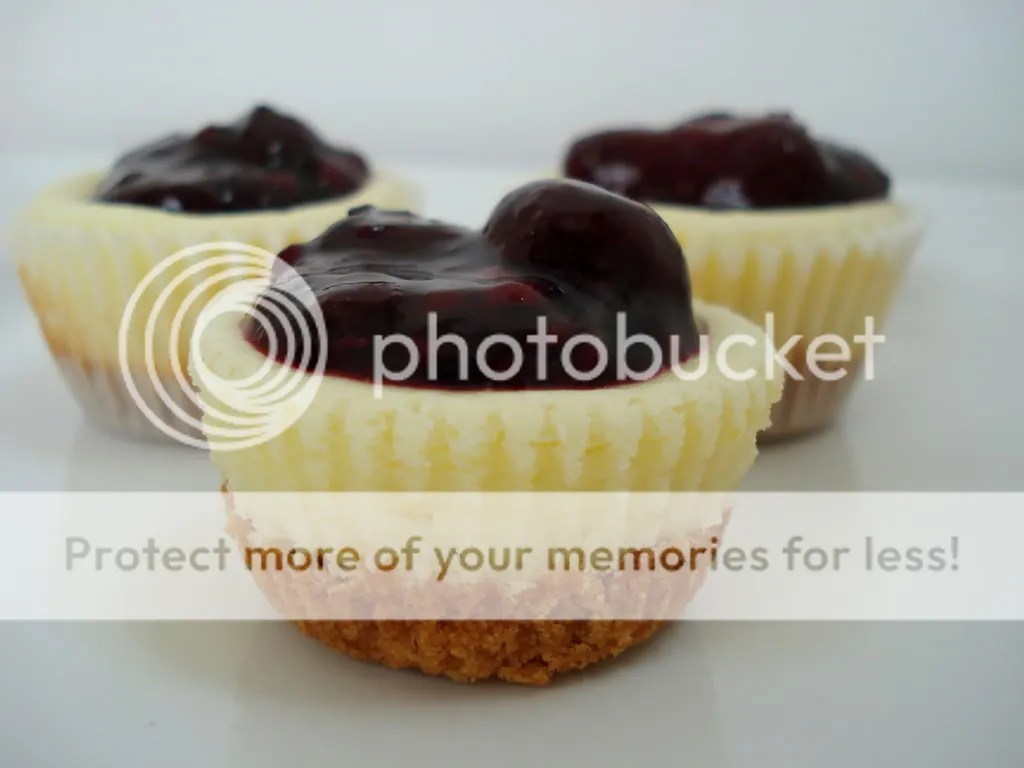
I decided to go with bite-sized, mini-cheesecakes. Easy, creamy, always a crowd pleaser! I did a lemon-scented cheesecake with a mixed berry topping. They came out perfect! Light and refreshing. The perfect little bite. Easier to transport and even easier to eat! Big hit at the party. I even kept a few behind at home so we had a couple to snack on.

I found a basic mini-cheesecake recipe and modified it some. I decided to stick with the standard graham cracker crust and thought that worked out well in my mini muffin tins. YUM!!

LEMON SCENTED MINI-CHEESECAKES WITH MIXED BERRY TOPPING (Recipe inspired by: Allrecipes.com)

Makes 48 cheesecakes

Cheescakes:

  • 1 sleeve honey graham crackers, crushed to fine crumbs
  • 3 to 4 tablespoons of butter, melted
  • 2 (8 oz) packages cream cheese, softened
  • 3/4 cup granulated sugar
  • 2 eggs
  • 1 teaspoons lemon zest
  • 1 tablespoon freshly squeezed lemon juice
  • small splash of vanilla
  • Mixed berry topping (recipe follows)
  1. Preheat oven to 350 degrees. Line two 24 tin mini muffin tins with paper liners.
  2. In a small bowl, mix the graham cracker crumbs with melted butter, stir with a fork until just moistened. Spoon about 1/2 teaspoon of crumbs into each liner and pack down (a shot glass is a useful tool for this!) Bake the crusts for about 8 minutes.
  3. Meanwhile, cream together cream cheese, sugar, eggs, lemon zest, lemon juice, and vanilla until well combined. Top each crust with the mixture, filling the cups almost to the top. Bake for 15 minutes. Transfer to wire racks to cool completely. Top each cheesecake with about 1/2 teaspoon of the berry topping. Chill in the refrigerator for an hour before serving. Store leftovers covered in the fridge.

Topping:

  • 1 (16 oz) package frozen mixed berries (strawberries, blueberries, raspberries, blackberries)
  • 1 /4 cup granulated sugar
  • 1/2 cup water
  • 3 teaspoons of cornstarch
  1. Combine all ingredients in a medium saucepan. Bring mixture to a boil, reduce heat and simmer until the berries are reduced and the mixture thickens, about 15 minutes. Remove from heat and cool before using. Store leftovers tightly covered in the refrigerator.

ENJOY! 🙂

14 Comments

Filed under desserts, fruit

Love is…

A cupcake stuffed with cream and and covered in chocolate.

Am I right or what? Yeah….that’s pretty much love. And when you get to share with them with the most wonderful man in the world, that’s pretty much perfection.

I made these Boston Cream Pie Cupcakes from Martha Stewart as our Valentine’s Day dessert. I spotted them last weekend on Martha’s website and thought about making them but changed my mind at the last second. Later that same day, I spotted them in Erin’s blog Dinner & Dessert, and I just knew I had to try them! Isn’t that funny how that happens, you have something in your brain, you change your mind and then that exact same thing appears later. It’s like a sign. It’s meant to be. I was meant to make these cupcakes. LOL. They were kind of labor-intensive, but worth it in the end. Sweet, creamy, chocolate yumminess.

I had one minor setback that involved a trip to Bed Bath and Beyond for a new strainer and to the grocery store for more eggs. I went to strain my pastry cream without realizing that my stupid cheapy strainer was completely rusted along the edge on the underside. I banged it on the side of my bowl, lifted it up and found my lovely vanilla cream dotted with flecks of rust. Nice. Ugh. So that got scraped into the trash and off I went to get myself a nice STAINLESS strainer and a dozen more eggs as I had cracked my last one into the first batch of cream.

After that, it was smooth sailing and cupcakes came out great! The cake had a great texture and the cream was delicious, the chocolate divine. The perfect end to a perfect date night at home with my hubby. 🙂

BOSTON CREAM PIE CUPCAKES (Recipe source: Martha Steward Living, February 2009. Also seen on Dinner & Dessert)

Makes 18

Cupcakes:

  • 1 1/2 cups all-purpose flour, plus more for tins
  • 1 1/2 teaspoons baking powder
  • 1/2 teaspoon salt
  • 1/2 cup whole milk
  • 3 ounces (6 tablespoons) unsalted butter, softened, plus more for tins
  • 3 large eggs
  • 1 cup sugar
  • 1 teaspoon pure vanilla extract
  1. Preheat oven to 350 degrees. Butter and flour standard muffin tins. Whisk together flour, baking powder, and salt in a small bowl. Warm milk and butter in a saucepan over low heat.
  2. Beat eggs and sugar with a mixer on high speed until thick and pale, about 5 minutes. Beat in dry ingredients.
  3. Bring milk and butter to a boil. With mixer on low speed, add milk mixture to batter, and beat until smooth. Add vanilla. Divide batter among muffin cups, filling each halfway. Bake cupcakes until light gold, about 15 minutes. Let cool in tins for 10 minutes, then transfer to wire racks. Let cool.
  4. Using a serrated knife, cut each in half horizontally. Spread 1 tablespoon vanilla cream on each cupcake bottom. Sandwich with top. Spoon glaze over each, and serve immediately.

Vanilla Cream:

  • 2 large egg yolks
  • 1/4 cup sugar
  • 2 tablespoons plus 1/2 teaspoon cornstarch
  • Pinch of salt
  • 1 cup whole milk
  • 1/2 teaspoon pure vanilla extract
  1. Whisk yolks until smooth. Mix sugar, cornstarch, and salt in a medium saucepan over medium heat. Add milk in a slow, steady stream. Cook, stirring, until mixture begins to bubble and thicken, about 5 minutes.
  2. Pour 1/3 of milk mixture into yolks, whisking constantly. Return mixture to saucepan, and cook over medium heat, stirring often, until thick, 2 to 4 minutes. Stir in vanilla.
  3. Pass vanilla cream through a fine sieve into a bowl. Press plastic wrap directly on surface. Refrigerate until cold, at least 1 hour, or up to 2 days.

Chocolate Ganache Glaze

  • 2/3 cup heavy cream
  • 6 ounces semisweet chocolate, finely chopped
  • 1 tablespoon light corn syrup

Heat cream in a saucepan over medium heat. Remove from heat, and add chocolate and corn syrup. Let stand for 5 minutes. Whisk until smooth. Transfer to a bowl, and let cool, stirring often. Use immediately.

ENJOY! 🙂

4 Comments

Filed under chocolate, cupcakes

Happy Valentine’s Day!

The last time Valentine’s Day fell on a Saturday was in 2004.  I had been dating Eric for a couple months at that point and I would say that by then we were pretty serious. We were seniors in college so when Eric said he wanted to take me out for dinner for Valentine’s Day, I wasn’t sure what to expect. We hit the swankiest place we could afford…the Red Lobster in Champaign, IL. Yeah!!!

We got there early…about quarter after 5. The line was out the door already! Everyone in the tri-county area decided Red Lobster was the perfect place to take their sweetie for a special night out. We sat at the bar for nearly two hours while we waited for a table, sucking down draft beers and shooting the breeze with the old, chain-smoking couple sitting next to us. I confiscated a couple of those red mardi gras bead things with the lobsters on them they’ve got there and wore them out to the campus bars later that night when we finally got back to campus. An appearance at the annual Bitterness Bash was still a given…who cares if we weren’t technically single. It was actually a really great night….for a couple of college kids. Now….um….fighting the crowds at Red Lobster and bar hopping has completely and totally lost it’s charm. Gee, I wonder why?? LOL.

We’ve had a number of great Valentine’s Day since then…not that we need an excuse to show each other how much we love each other, we do that everyday. But it is fun to have a little holiday to celebrate in the middle of the winter when it’s cold outside and there’s nothing to do. I laughed when Eric suggested we should stay in for Valentine’s Day. I think the conversation went something like this:

Him: “We should just stay home for Valentine’s Day”
Me: “That’d be fine”
Him: “You can cook for us.”
Me: “Oh really, can I? Wow, thanks!” ::insert sarcastic eye roll here::

LOL. I’m just kidding, of course! Staying in and cooking for Valentine’s Day sounded like a great idea to me! See, here in Waterloo, IA, our restaurant choices are pretty limited anyway and on a day like Valentine’s Day, unless you’ve made arrangements three months ago, forget about getting a table at one of the five (that’s right…five…that’s it) nice places. Can’t be done.

When I was deciding what to make, I wanted it to be something special that I probably wouldn’t make on a regular day, and I wanted it to be something we’d both enjoy. Eric is a red meat fan, so beef was a given. I am a sucker to anything pasta, so I knew I wanted to combine those two. I had been eying this Short Ribs with Tagliatelle recipe from Giada for quite sometime, but never got around to making it due to it’s long cook time – about 3 hours total. Since I was going for out of the ordinary for this special occasion, I decided to go for it.

I made a couple of changes to the recipe – I had to sub in fettuccine for the the tagliatelle, I can’t find specialty shapes like that in any of the stores around here. Worked out fine. And I subbed thick cut bacon for the pancetta. Again, it’s just not available. I’ve looked and looked. It’s a good thing bacon is a great sub! I had never bought or made short ribs before, so I really wasn’t sure what to expect. They scared me a little bit when I picked them up at the store…as they are kinda weird looking but I pressed on.

The end result, after a long slow afternoon on the stove top, was really very good. The meat got tender and pulled apart very easy and the flavor was very deep and rich. It’s extremely filling. I just served it up with a Ceasar salad and crusty bread. However, I feel I must point out, so it doesn’t surprise you if you try to make this, that an insane amount of grease and fat separates from the sauce and floats to the top of the liquid while it’s cooking. I guess that’s not a huge surprise, as it’s meat on the bone and marbled with fat. No need to worry though, skim it off and discard and your finished product will not be greasy at all. We popped a bottle of Gnarly Head Zin (one of our faves) and lingered over dinner and dessert in our pj’s. It was a great night! One of the more memorable Valentine’s Days we have had. Cheers to many more!

SHORT RIBS WITH TAGLIATELLE (Recipe Source: Giada de Laurentiis – foodnetwork.com)

INGREDIENTS:

  • 3 tablespoons olive oil
  • 2 ounces chopped pancetta (about 1/2 cup) (I subbed thick cut bacon)
  • 2 1/2 pounds short ribs (I used slightly less than 2 1/4 pounds and it was plenty)
  • Salt
  • Freshly ground black pepper
  • 1/4 cup all-purpose flour
  • 1 medium onion, chopped
  • 1 carrot, chopped
  • 1/2 cup fresh parsley leaves
  • 2 cloves garlic
  • 1 (14-ounce) can tomatoes (whole or diced)
  • 1 tablespoon tomato paste
  • 1 teaspoon chopped fresh rosemary leaves
  • 1 teaspoon dried thyme
  • 1/2 teaspoon dried oregano
  • 1 bay leaf
  • 2 1/2 cups beef broth
  • 3/4 cup red wine
  • 1 pound fresh or dried tagliatelle (I subbed fettuccini)
  • 4 to 6 teaspoons shaved bittersweet chocolate (I omitted. Would have been a nice touch for Valentine’s Day but I didn’t have bittersweet on hand. I sprinkled with parm cheese and parsley instead)

DIRECTIONS:

  1. Place the olive oil in a large heavy soup pot over medium heat. Cook the pancetta (bacon) until golden and crisp, about 4 minutes. Meanwhile, season the short ribs with salt and pepper, and dredge in the flour. Using a slotted spoon, remove the pancetta (bacon)  from the pan and set aside. Add the short ribs to the pan and brown on all sides, about 7 minutes total.
  2. Meanwhile, combine the onion, carrot, parsley and garlic in a food processor and blend until finely minced. Then add the tomatoes and tomato paste and pulse.
  3. Once the short ribs are browned, carefully add the mixture from the food processor to the pot. Return the pancetta (bacon) to the pot and stir. Add the rosemary, thyme, oregano, bay leaf, beef broth, and wine. Bring the mixture to a boil. Reduce the heat and simmer, covered, for 1 hour and 15 minutes. Remove the lid and simmer for another hour and a half, stirring occasionally. Remove the meat and bones from the pot. Discard the bones. Shred the meat and return it to the pot. Season with 1/2 teaspoon salt and 3/4 teaspoon pepper, or to taste.
  4. Bring a large pot of salted water to a boil over high heat. Add the pasta and cook until tender but still firm to the bite, stirring occasionally, about 8 to 10 minutes for dried pasta and 2 to 3 minutes for fresh. Drain the pasta, reserving 1 cup of the cooking liquid. Add the pasta to the pot and stir to combine. Add the reserved pasta liquid 1/4 cup at a time, if needed, to moisten the pasta. Transfer to serving bowls, top each bowl with 1 teaspoon of chocolate shavings. Serve immediately.

ENJOY! 🙂

3 Comments

Filed under beef, pasta

I Can’t Take the Pressure!!

I have the hardest time deciding what to bake. I pour over recipes on the internet and in cookbooks trying to decide. I literally get anxiety over it. I’m just afraid I’ll pick the wrong thing! It’s a tough job, I tell ya!

This happened to me yesterday morning. I was particularly anxiety-ridden because I slept a little later than I had intended and I was trying to finish up my grocery list before I went to the store. My “get the store before 10:00 a.m.” deadline was rapidly approaching and I just couldn’t make a decision on what I wanted to make this weekend! Argh! Frustrating! I was making one trip to the store….no second trips for special ingredients I forgot I didn’t have on hand. If I was going to bake something, I needed decide right away!

Finally, I’d had it and decided no special ingredients…that would solve the problem. I was going to bake something with what I had on hand. A plus considering this was a pricier trip to the store this time around with the laundry detergent, replacement Swiffer mop supplies and paper towels. Add about $25 (easy) with those non-food items. Ugh. No special ingredients would save my wallet.

After all that searching and wondering and worrying, I decided to go with an Orange Chocolate Chunk cookie. Mmmmm…orange and chocolate. I’ve said it before, one of my absolute favorite flavor combos. So good. Bright and rich at the same time. These cookies came together in no time and turned out great. Eric was skeptical at first but I got a rousing “Hey, these are really good!” when he tasted them so I guess I won him over. Heh… A yummy, chewy, citrus-y, chocolatey treat. Mmmm…. See my notes in italics for the changes I made…like I said, I only used what I had on hand!

ORANGE CHOCOLATE CHUNK COOKIES (Recipe Source: Mrs. Fields Best Cookie Book Ever)

INGREDIENTS:

  • 2 1/2 cups all-purpose flour
  • 1/2 tsp. baking soda
  • 1/4 tsp. salt
  • 1 tsp. grated orange peel
  • 1 cup granulated sugar
  • 1/2 cup (packed) light brown sugar (I used dark because that’s what I had, worked fine)
  • 2 sticks (1 cup) salted butter, softened
  • 2 large eggs
  • 1 tsp. orange extract (I didn’t have this on hand either, so I used the juice of half a large orange)
  • 8 oz semisweet chocolate bar, coarsely chopped (about 1 1/2 cups) (I subbed semisweet chocolate chips…again, what I had on hand!)

DIRECTIONS:

  1. Preheat oven to 300 degrees
  2. In a medium bowl, combine flour, soda, salt and orange peel. Mixw well with a wire whisk and set aside.
  3. In a large bowl, blend sugars with an electric mixer at medium speed. Add butter and beat to form a grainy paste, scraping sides of bowl if needed. Add eggs and orange extract, and beat at medium speed until light and fluffy.
  4. Add the flour mixture and chopped chocolate. Blend at low speed until just combined. Do no overmix.
  5. Drop by rounded tablespoons onto ungreased cookie sheets, 1 1/2 inches apart. Bake for 18 to 22 minutes until cookies are slightly brown along edges. Transfer cookies immediately to a cool surface with a spatula.

ENJOY! 🙂

5 Comments

Filed under chocolate, cookies, fruit

Me Time

Couch? Check.

Orange and Blue Chief Illiniwek sweatshirt blanket? Check.

Girlie movie? Check.

Alcoholic beverage? You betcha.

Homemade pizza? Check and check.

Everyone has a different idea of “me” time but that right there…that is ideal for me. Warm, cozy, comfy heaven right in my own living room. Eric went out of town for the weekend to stay with a friend. I could have gone with him but I just felt like staying home. That doesn”t mean I didn’t pout a little when he left, because I always do…that’s a given. Believe it or not, I really do miss him when he’s away. Even so, I couldn’t help but get a tiny bit excited about some quality me time, especially since we have been quite busy lately!

For me, time to myself for sure means time in the kitchen. Follwed by stuffing my face with my creation in front of the TV. LOL. I love it because there’s no timelines, no pressure, I can take my time and really enjoy it. I blast my tunes on our iPod dock and dance around the kitchen like nobody’s watching.  Well, I hope nobody’s watching….we don’t have window treatments on the kitchen windows yet so, really, it’s a free show once it’s dark outside. LOL. Eh, my neighbors shouldn’t be looking in my windows anyway, right? Right!

The other great thing about me time is getting to use all sorts of ingredients Eric won’t eat! That’s my favorite part. I like to pile them all on a pizza so it’s like maximum usage of said ingredients all at once. I can really get my fill when I pile them on top of a homemade crust. YUM!

This weekend’s Me Time Pizza featured a drizzle of olive oil, caramelized onions, sauteed mushrooms, artichoke hearts, roasted red peppers, and crispy, spicey capocollo. I came to enjoy capocollo after a co-worker at the department store I worked at when we first moved here turned me onto a tiny sandwich shop down the street from the mall. They made a totally yummy sandwich they called the Italian BLT with grilled capocollo, lettuce, tomato, and a totally yummy homemade Italian vinaigrette dressing on top. Yum, yum, yum!

Well, that place went out of business a couple years ago, OF COURSE. Probably because it was a little on the pricey side (those types of places just don’t seem to last around here) so when I saw capocollo while browsing the grocery store deli case yesterday, I thought of that sandwich and decided to add it to me pizza! Perfect!

Below is the recipe for my Me Time Pizza…but the absolute best part of Me Time Pizza is that it is 100% customizable. These ingredients don’t appeal to you? No problem. Top your pie with whatever you like, pour yourself the beverage of your choice, grab your favorite chick flick and hit the couch! Enjoy!

“ME TIME” PIZZA

For the crust: You can make the one I like to make. Or make your favorite. Not into making your own crust? Refigerated dough will work. Frozen too. Boxed, bagged or pre-made will all do just fine. This is YOUR pizza after all!

For the toppings I used:

  • 5 slices of spicy capocolla ham, cooked crisp and crumbled
  • 1 large onion thinly sliced
  • Olive oil
  • 1 cup sliced button mushrooms
  • Salt and pepper to taste
  • 1/4 cup chopped artichoke hearts (I used canned. Drain, rinse, chop and pat dry)
  • 1/2 cup chopped jarred roasted red peppers, patted dry
  • 1/2 cup grated Fontina cheese
  • 3/4 cup shredded pizza blend cheese
  1. In a large skillet, heat enough olive oil in the pan to cover the bottom plus about a tablespoon more. Add onion and stir to coat. Reduce heat to low and simmer the onions until deep golden brown, stirring occasionally. If onions begin to scorch, add a bit more oil and keep stirring. This whole process takes about 20 minutes.
  2. Add mushrooms to onions and cook until tender. Add salt and pepper to taste. Remove mushroom and onion mixture from pan with a slotted spoon, draining off as much oil as possible.
  3. Drizzle your dough with a bit of olive oil. Spread the onion/mushroom mixture  over the top. Top with the rest of the ingredients and cheese. When it comes to cheese and toppings, I like to alternate by adding some veggies, then some cheese, more veggies, more cheese and end with the meat on top. But that’s just me…top with remaining ingredients any way you like!
  4. Bake according to your crust’s directions. While it’s baking, put on pj’s and slippers, pour your drink, cue up your movie. When it’s ready, ENJOY your Me Time! 🙂

4 Comments

Filed under pizza, veggies

Bachelorette Bounty

My very very dear friend is getting married in March (can’t believe it’s almost here! Hooray!) and I am beyond thrilled and honored that she asked me to stand up with her. We have been buddies since college and she stood up for me, so I’m excited to be doing the same for her. Her fiance is a wonderful guy and I know they are going to have a blast enjoying their happily ever after together.

Her bachelorette party was last weekend and I just knew I had to jump right in with a fun treat. I got all cocky and big headed thinking I would make the ever popular “butt” cookies. I first saw these in a bio of a former nestie, MrsBowen, but I have seen them in multiple places since then. They are absolutely perfect for a bachelorette party, especially one that has a lingere theme. So cute!

Armed with a prayer and good intentions, I decided to go for it. Never mind the fact that I had never even touched royal icing before…how hard could it be, right? Right. Well, it took me pretty much the entire day the day before the party, but I have to say, I was extremely pleased with the way they turned out! I think these cookies are a great way to get the feel for working with royal icing because they incorporate very simple shapes and designs. I am the first to admit that they are far from perfect, but for my first try, they came out great! HUGE hit at the party!

I used a pretty basic sugar cookie recipe for the cookies. Click here for the one I used. You can use your favorite. All you have to do is cut out each cookie with a heart-shaped cookie cutter, turn them upside down and slice off the pointed end. Perfect little butts! 🙂 And then I got the recipe and technique for the royal icing from Annie over at Annie’s Eats. Thanks, Annie, for the easy to follow directions and tips!

Of course, I couldn’t do this without at least one screw up. LOL. I forgot to thin out portions of my icing for filling in after piping, so that’s why it looks pretty thick on each cookie. But, like I said, with such simple shapes, it really didn’t affect the finished product too much. I’m looking forward to giving royal icing a try again! It’s a lot of fun, and it’s great to see people’s eyes light up when they see the final result!

12 Comments

Filed under cookies