Category Archives: cupcakes

Timeless

When I was a kid my parents had a set of glass-topped coffee tables with brass accents. Oh, they were fancy and cutting-edge chic. So modern. They sat nestled there in our formal living room next to vanilla ice cream colored couches, speckled with peach, pink and sea foam green. On the wall hung a large painting of fish, abstract and watery. My favorite addition to the room was an oversized green vase dripping with glass that looked like shiny, purple candle wax and stuffed with fake plastic reeds.

That room was early 90s decorating at it’s best. Magazine perfect. Now? A time warp.

In the mid-90s, I insisted on wearing huge pants. I bought jeans that I had to cinch at my waist with a belt on the last notch to hold in place. They bagged around my (non-existent) hips and bunched at my ankles. Five seconds after I cut off the tags, I was using the same scissors to cut a slit up the side of the leg so they would drag on the ground under my chunky Doc Martin shoes. On top, assorted plaids. Maybe a vest. Or spaghetti strap tanks over baby doll tees. Hair long, loose and flat, parted down the middle, wispy bangs curled under.

EVERYONE dressed like that. Now? People would take one look at that getup and wonder if you were headed to a costume party dressed as Angela Chase. Maybe Jordan Catalano will be there. *90s swoon*

And then there are things that never go out style. Like red nail polish. No woman in history, from victory gardens and rivets to cosmos and clubs, has has ever stepped out into the world with a swash of crimson across her fingertips without feeling knock-your-socks-off beautiful. It’s confidence in a tiny glass bottle. Confidence is totally timeless.

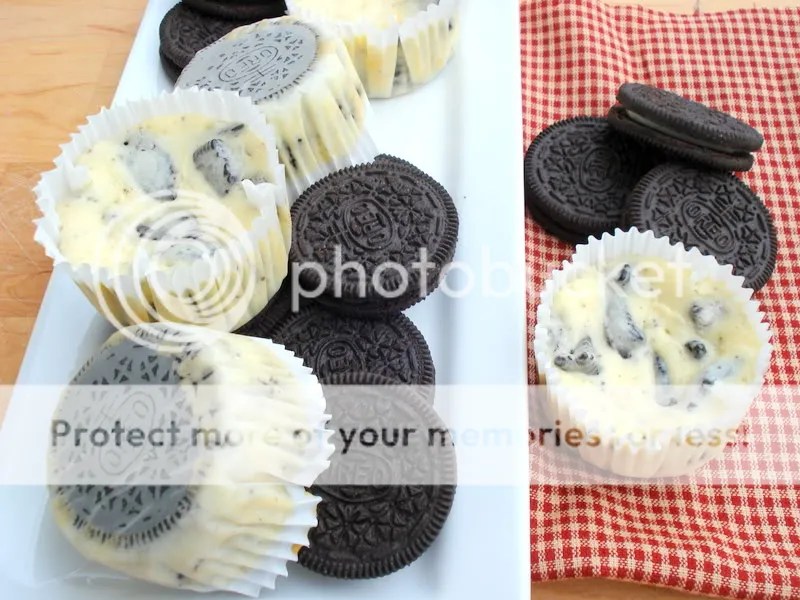
You know what else is timeless? Oreos. Oreos look and taste the same as they did when my parents had a pastel living room. Not that I was allowed to EAT Oreos in there. Or anything for that matter. They taste just the same as they did when a handful of friends sat around in too-big pants listening to grunge rock and scraping the middles out of them. There’s something comforting about that. In a world where as quickly as it’s in, it’s out, it is kind of nice to know that humble little cookie is still getting dunked in milk and tumbling crumbs down the front of shirts everywhere and probably always will.

I tend to forget about Oreos. They are not a usual addition to my grocery list and I rarely even take my shopping cart down the cookie aisle. But as I was wandering the grocery store last week picking up a few things for the weekend guests we were to be hosting, I tossed a bag into my cart on a whim. Eric loves Oreos though he rarely gets them. And since it was his friends that were coming to stay, I figured they probably loved them too. I’d find some way to jazz them up.

I decided to turn my bag of Oreos into these Cookies and Cream Cheesecakes for two reasons. 1). I’ve made them before and they are insanely easy to throw together. Ten minutes tops. 2). They are quite the tasty little treat! The whole Oreo as a crust at the bottom of the cupcake really makes that classic cookie taste shine through. The smooth, sweet creamy filling studded with chocolatey chunks of chopped Oreos takes a timeless classic and kicks it up a notch.

I’ll be making these when I need a quick dessert for years to come. Even as pastel living rooms and super baggy pants come and go again. 🙂 Oreos are forever.

COOKIES AND CREAM CHEESECAKES (Recipe Source: Martha Stewart’s Cupcakes)

INGREDIENTS:

  • 42 chocolate/cream cookies, such as Oreos – 30 left whole and 12 coarsely chopped
  • 2 pounds cream cheese, room temperature
  • 1 cup sugar
  • 1 teaspoon vanilla extract
  • 4 large eggs, room temperature and slightly beaten
  • 1 cup sour cream
  • Pinch of salt

DIRECTIONS:

  1. Preheat oven to 275 degrees. Line standard muffin tins with paper liners and place one whole cookie into the bottom of each cup.
  2. Beat cream cheese until smooth with an electric mixer, scraping down the sides of the bowl as needed. Gradually add sugar and beat until fully combined. Add vanilla and beat to combine.
  3. Drizzle in the eggs, a little at a time, beating until incorporated and scraping down the bowl as needed. Beat in sour cream and salt. Gently fold into chopped cookies by hand.
  4. Divide batter evenly among lined cups, filling each one nearly to the top. Bake, rotating the tins halfway through, until the filling is set, about 22 minutes. Transfer tins to wire racks to cool completely. Refrigerate in the tins at least 4 hours before serving. Makes 30 cheesecakes.

*Note:* I halved the recipe with no problems. Got exactly 15 cheesecakes! 🙂

ENJOY!

Leave a comment

Filed under cheesecake, cupcakes

First Fall

When we packed up and relocated earlier this year, we only moved about 150 miles from our previous location. Really, this is a drop in the bucket as far as moves go. A quick trip. Even so, it’s amazing what a difference a buck and half of distance can make in your surroundings.

In Iowa, our little house on the outskirts of town was surrounded by flat, endless fields of grain. Peppered with quaint, rustic farmhouses and sun scorched barns, it was the portrait of the plains. In the heat of the summer, stalks of corn grew tall along two lane country roads, stretching toward an uninterrupted blue sky. From those roads, the horizon looked like a destination – a tangible place you could step into if you just drove far enough to reach it. It was beautiful in it’s own simple, Americana kind of way, but certainly not what most would call a stunning view.

Our new house is tucked back just far enough from the Mississippi River in a small, waterfront town. It’s etched into rolling hills and sits squarely under a thick canopy of trees. In the summer, our backyard stayed cool and breezy as the forest brought sweet, shady relief from the blistering sun. A simple walk to Main Street felt like a vacation. Sitting on the patio next to the river at a local place with an ice cold beer watching boats go by, it was easy to forget we were only half a mile from home.

But summer has faded and the first hints of fall have officially arrived. Mornings are chilly and afternoons are just right for college hoodies and comfy cardigans. That thick canopy of green is now tinted with hints of amber, rust and plum. Leaves fall like snowflakes, a warning of things to come. Early in the morning, as the soft, hazy sunlight peeks out from behind the woods, it throws thousands of tiny sparkles onto the water where they bob for a split second before disappearing downstream with the current.

It’s official. This will be my favorite time of the year in our new house. It’s really very beautiful. Fall belongs to the river. I’m quickly realizing how lucky we are to be able to experience it this way.

Here’s another great way to experience fall – cinnamon roll cupcakes! All the spicy, nutty, cinnamony filling, all the smooth, creamy frosting, but none of the yeast. None of the waiting. None of the hassle. These are such a perfect bite to cozy up with on a chilly fall day. A basic buttery yellow cake is layered with a ribbon of cinnamon, brown sugar and pecans. More of that goodness is pressed into the tops of the cupcakes where it melts into a crunchy topping. Then each cake gets a generous portion of sweet vanilla buttercream. If you’re a cream cheese frosting fan, by all means. Do it. 🙂

I would have liked to have done a rustic smear of frosting across the top of each cupcakes to better mimic a cinnamon roll (no one PIPES frosting a cinnamon roll! Please…) but the cinnamon sugar mixture was a little too loose for that. I was worried about all the topping getting caught up in the frosting and looking not-so-pretty. I’m sure I’m the only one who would have been bothered by that, but…you know…

Anyway! Get yourself a cozy sweatshirt and piping hot cup of coffee and enjoy this dessert spin on a breakfast classic. They’ll warm you right up. 🙂

CINNAMON ROLL CUPCAKES (Recipe Source: BHG)

INGREDIENTS:

  • 2/3 cup butter
  • 2 eggs
  • 2-1/2 cups all-purpose flour
  • 2-1/2 teaspoons baking powder
  • 1/2 teaspoon salt
  • 3/4 cup packed brown sugar
  • 1/3 cup finely chopped pecans
  • 2 teaspoons ground cinnamon
  • 1-3/4 cups sugar
  • 1-1/2 teaspoons vanilla
  • 1-1/4 cups milk
  • 1 recipe Creamy Butter Frosting (recipe follows)
  • Additional cinnamon and pecans, for garnish (optional)

DIRECTIONS:

1. Allow butter and eggs to stand warm to room temperature for about thirty minutes. Meanwhile, line 2-1/2-inch muffin cups with paper liners. Stir together flour, baking powder, and salt in a medium bowl. In a small bowl  combine brown sugar, pecans, and cinnamon. Set aside.

2. Preheat oven to 350 degrees. In a large mixing bowl beat butter with an electric mixer on medium to high speed for 30 seconds. Add granulated sugar slowly, about 1/4 cup at a time, beating on medium speed until combined, scraping sides of bowl as needed. Beat on medium speed for 2 minutes more or until the mixture is light and fluffy. Add eggs, one at a time, beating to combine after each addition. Beat in vanilla. Alternately add flour mixture and milk to butter mixture, beating on low speed after each addition just until combined (batter may look curdled).

3. Spoon about 1 tablespoon batter into each prepared liner. Sprinkle about 1 teaspoon of the brown sugar mixture over batter in cups. Spoon remaining batter evenly over brown sugar mixture in cups. Sprinkle remaining brown sugar mixture over each cupcake.

4. Bake for 18 to 20 minutes or until a toothpick inserted in centers comes out clean. Cool cupcakes in muffin cups on wire racks for 10 minutes before removing from. Cool completely on wire racks before frosting.

5. Spread or pipe Creamy Butter Frosting onto cupcakes and sprinkle with additional cinnamon and pecans if using. Store cupcakes in an airtight container in the refrigerator. Makes about 26.

Creamy Butter Frosting: Allow 1 cup butter to stand at room temperature for 30 minutes. Beat butter with an electric mixer on medium to high speed for 30 seconds. Add 1 teaspoon vanilla and a dash salt and beat to combine. Gradually add 4 cups powdered sugar, beating well after each addition. Beat in 1/4 cup whipping cream or whole milk. Beat in 4 additional cups of powdered sugar. Beat in 2 to 3 tablespoons additional whipping cream or milk until frosting is light and fluffy and reaches a spreading or piping consistency. Makes about 4 cups.

ENJOY! 🙂

3 Comments

Filed under cupcakes

Pros and Cons

Pro: My husband and I now have a place to live in our new city. You know, together.
Con: It is NOT in the house we’re trying to buy. It’s a rental. You are KILLING me, Short Sale!

Pro: It’s a very nice rental. Possibly the nicest rental in the History of Rentals. Because I’m an expert on such things. And I’ve seen a lot of crappy rentals.
Con: Hi, I’m Expensive!

Pro: The movers moved everything in for us while we stood around.
Con: They won’t move it back out. (Well, they will. But it won’t be free.) Also, I can’t find the iron. Or the TV remote.

Pro: It’s immaculately clean with lots and lots of really white carpet.
Con: It’s immaculately clean with lots and lots of really white carpet.

Pro: Three words: Walk. In. Closet.
Con: The closet is in the bathroom. This leads to inefficient use of dressing time. Items in the closet in the bathroom, items in the dresser in the bedroom. The back and forth is exhausting. I’m telling you, I need a system. Help me. Please.

Pro: It has a sun room in the back with tons and tons of natural light. Hello, built in Blog Photo Studio!
Con: The view out the windows… Um. The blinds are closed most of the time.

Pro: There’s a delightful, brand new grocery store (that just happens to be my fave regional chain) like right around the corner.
Con: I don’t know where anything else is in this town. I can get to and from that store and that’s pretty much it. I tried to find the mall yesterday. I got amazingly turned around and lost coming back. It was epic.

Pro: I have my own kitchen again!
Con: I don’t know where I put ANYTHING. I am lost in there.

Pro: I made cupcakes.
Con: None at this time. Duh.

Yellow cake with chocolate frosting has always been a favorite combo of mine. It was my birthday cake of choice when I was younger. Coincidentally, It was also my breakfast of choice when I was in college. 😉 I may or may not have stood in front of the sink in our tiny apartment shoving week and half old cake and frosting into my face at 8:00 a.m. before running after the bus to get to campus. Breakfast of Champions, friends!

Of course, yellow cake and chocolate frosting always came from a box and a can. It was time to give making both from scratch a try.

Pro: These cupcakes are so good.
Con: I can’t keep my mitts off these.

Let’s talk about the cake. Now, after I made this particular butter yellow cake, I noticed my cupcakes weren’t super yellow. Even though I’m pretty sure the yellow box cake mix of my youth got it’s neon hue from dyes, additives and what not, I wanted to take a look at a few more recipes to see what kind of differences were out there.

To the Interwebs, Batman!

Right away I noticed that some recipes labeled yellow cake used whole eggs (as does the recipe I used) and some only the yolks. All of the recipes (including this one) used butter as the fat, not oil or shortening. I may have to try a yolk-only cake here in the future just to see the difference, but in the meantime, I like this recipe a lot. It’s buttery, moist, and puffs up in the cupcake pan instead of spreading out. The flavor is slightly sweet and almost creamy with just a hint of vanilla. It is the perfect vehicle for chocolate frosting.

Milk chocolate frosting. Boo-ya!

I get excited when I find a recipe that uses a technique I’ve never tried before to produce a product I’ve had many times before. I’ve had chocolate frosting before. In fact, I’m pretty sure I’ve eaten my weight in it over the course of my lifetime. Duh. But I’ve never made this particular way.

I’ll break it down for ya, real easy like.

Milk chocolate is chopped and dropped into the bowl of a food processor with corn syrup. While the machine is running, boiling cream is added and the whole thing is processed until smooth. Sounds a lot like ganache, doesn’t it? Well, then a bit of powdered sugar is added – only half a cup. Like nothing, right? Keeps the finished product from being teeth-achingly sweet. Once that’s all mixed in, super chilled butter is added, one piece at a time and it’s all whipped together.

Directly after processing, the frosting is too thin and runny and to use, but after an hour at room temp on the counter? Hello. Silky, creamy, dreamy, chocolate heaven. It’s milk chocolate so it’s got a sweet bite, but it’s not TOO sweet. Really, all you taste here is the flavor of the chocolate made extra creamy with butter. Yep. It may be a sin.

Be forewarned, the finished texture of the frosting is much better suited for spreading rather than piping but I think it really fits here. How homey and comforting is a cupcake slathered with a rustic smear of frosting? These are truly made with love.

Pro: Now you get to try them too!
Con: Mine will be gone soon. 😦

BUTTERY YELLOW CUPCAKES WITH MILK CHOCOLATE FROSTING (Cake and frosting both from: America’s Test Kitchen Family Cookbook – pgs. 561 & 563)

*A little note to confuse you*: This cake recipe makes two 8 or 9-inch cake layers, a 9×13-inch sheet cake, or about 24 cupcakes. The frosting recipe does have a note that it’s not the best for layer cakes and that it will frost a 9×13-inch or about 12 cupcakes. I made 12 cupcakes and used the rest of the batter in a different pan that I baked and put in the freezer. I had a tiny bit of frosting leftover after doing 12 – I probably could have layered it on a bit thicker on some. 😉 Now, to the recipes!

For the cake:

  • 2-3/4 cups cake flour
  • 2-1/2 teaspoons baking powder
  • 1/4 teaspoon salt
  • 1 cup (2 sticks) unsalted butter, softened
  • 1-3/4 cups sugar
  • 4 large eggs at room temperature
  • 1 tablespoon vanilla extract
  • 1-1/2 cups whole milk, at room temperature
  1. Adjust oven rack to middle position and preheat the oven to 350 degrees. If making layer cakes or sheet cake, grease the pans with cooking spray and line the bottoms with parchment paper. If making cupcakes, line two 12-cup muffin tins with paper liners.
  2. In a large bowl, whisk the flour, baking powder and salt together and set aside.
  3. Cream together the butter and sugar in a large bowl with an electric mixer until light and fluffy. Add eggs one at a time, beating after each addition until incorporated. Beat in vanilla.
  4. Reduce the speed to low and beat in one-third of the flour mixture until combined. Add half the milk. Repeat with half of the remaining flour mixture, then remaining milk, and finally the remaining flour mixture.
  5. Stir the batter one last time with a rubber spatula to make sure it is fully incorporated. Pour the batter into prepared pans. Bake until a toothpick inserted the center comes out with a few crumbs attached, 15 to 20 minutes for cupcakes, 20 to 25 minutes for layer cakes, 25 to 30 minutes for sheet cake. Rotate the pans halfway through baking.
  6. Let the cakes cool in the pan on wire racks for 10 minutes, then remove to wire racks to cool completely before frosting.

For the Frosting:

  • 10 ounces milk chocolate, chopped (Go with a better quality chocolate to keep the frosting from being too sugary – I used Ghirardeli)
  • 1 tablespoon corn syrup
  • Pinch of salt
  • 1/2 cup heavy cream, boiling
  • 1/2 cup confectioners sugar
  • 1/2 cup (1 stick) unsalted butter, cut into 8 pieces and chilled
  1. Put the chocolate, corn syrup and salt into the bowl of a food processor fitted with the steel blade. With the machine running, gradually pour the boiling cream through the feed tube and process for 1 minute.
  2. Add the confectioners sugar and continue to process until combined, about 30 seconds. With the machine running, add the butter through the feed tube, one piece at a time and process until smooth, about 30 seconds.
  3. Transfer the frosting to to a medium bowl and let cool to room temperature, stirring frequently until thick, about 1 hour.

ENJOY! 🙂

One Year Ago: Guacamole
Two Years Ago: Lemon-Scented Mini Cheesecakes with Mixed Berry Topping

2 Comments

Filed under chocolate, cupcakes

Trick or Cupcake Treats!

I liked the idea of Halloween as a kid. Spray on hair color? Awesome. Eyeliner kitty-cat whiskers? Yes, please. Freeeeee Caaannnnnddy! Check and check.

But when push came to shove, it turns out that…well…I was kind of a wuss.

It wasn’t the thoughts of ghost and goblins and things that go bump in the night that had me shaking. It was the cold. The COLD.

Maybe you grew up in a place where it didn’t get cold. You could put on your little princess dress and sashay your pretty little self up and down the block bare arms and all. Well, bless your little heart. 😉

In the Midwest, on October 31, it is cold. Always. It might be rainy cold. Or perhaps windy cold. In some not-so-alternate universe there is slim chance it could even be SNOWY cold. I’m sure it’s happened. Or maybe it’s just plain cold.

Any way you slice it, you’re wearing a coat over your princess dress. Halloween costume FAIL.

I’d get around the neighborhood, collect a bit of loot. Then the nose would start to run and the fingers would get icy. It would start to feel like 15 miles up hill both ways to next house as the wind slapped me straight in the face.

Okay. Candy’s cool and all but…I was lucky if I lasted an hour out there. Even the promise of an Snickers or two couldn’t bribe me into toughing it out. I can just hear my 8-year-old self: I’m COOOOOLLLLLDDDD. I wanna go HOOOOMMMMME.

Yo! Wimpy wuss over here! I am not one for being out in the cold. Not much has changed there (says the girl who will be putting on her winter coat here shortly and not take it off until…April.) I’m more suited to stay in my nice warm, cozy house, only open the door when someone knocks, and keep the candy leftovers all to myself. 😉

Good thing I’m all grown up now. Clearly adults get the better deal on Halloween. 😉

Plus, I know another activity that doesn’t involve being out in the cold…baking! I can mark this Halloween by skipping the shivering outside in a skimpy costume and making a cute sweet treat instead.


Ignore the ghoulish glare on my ganache, please and thank you.

These little chocolate bites are fun on the outside and even more fun on the inside. They’re stuffed with delightful marshmallow cream! Think Hostess cupcakes, but better. Much, much better.

Filling and decorating these cupcakes is a little time consuming but the end result is well worth it. Rich chocolate cupcakes, sweet, creamy filling and chocolately ganache. They scare the pants off your standard candy. In addition to the Halloween designs above, I also did the classic seven-loop swirl. So much fun to make and eat!

HALLOWEEN CREAM-FILLED CUPCAKES (Recipe adapted from: Martha Stewart Cupcakes)

For the cake:
You can use any chocolate cake you like, but I would avoid one that’s too soft and crumbly. The filling is pretty stiff, and you need a cake that can stand up to it. The following recipe is still moist and delicious but somewhat dense. It worked well! Makes about 24.

  • 2 sticks unsalted butter
  • 3/4 cup unsweetened cocoa powder
  • 2 cups all-purpose flour
  • 1/2 teaspoon baking soda
  • 2 teaspoons baking powder
  • 1/2 teaspoon
  • 2 cups sugar
  • 3 large eggs, room temperature
  • 1 cup sour cream, room temperature
  • Marshmallow Cream Filling (recipe follows)
  • Shiny Chocolate Ganache Glaze (recipe follows)
  • 1/2 cup orange candy melts, melted
Preheat oven to 350 degrees. Line two standard muffin tins with paper liners. In a medium bowl, whisk together cocoa, flour, baking powder, soda, and salt.
Beat butter and sugar until light and fluffy with an electric mixer. Add eggs one at a time, beating well after each addition. With the mixer on low speed, add half the flour mixture, followed by sour cream, ending with remaining flour mixture; mix just until incorporated.
Divide batter among prepared muffin cups. Bake until a toothpick inserted in center of a cupcake comes out clean, 15 to 18 minutes, rotating pans halfway through baking time. Remove cupcakes to wire rack to cool completely.For the filling: 

  • 1 1/2 cups marshmallow cream
  • 1 stick unsalted butter, cut into pieces, room temperature
  • Orange food coloring, if desired
In a medium bowl, whisk marshmallow creme and butter until smooth. Add food coloring until you get your desired shade. Chill until slightly firm, 15 to 30 minutes. Transfer mixture to a heavy resealable plastic bag or piping bag. Cut off one corner of the bag to make a 1/8-inch opening.
To fill:

Using a paring knife, cut a small cone out of each cupcake. Reserve the cone (you will use this to plug cupcake after filling). Hollow out each cupcake a bit more, discarding crumbs.

Insert tip of plastic bag into each cavity, and squeeze to fill.

Replace the cones, pressing down lightly. Careful not to let the filling squeeze out!

Shiny Chocolate Ganache Glaze:
The recipe in the book calls for using two ounces of chocolate to 2/3 cup cream to make a smooth, dippable ganache. I tried it with two ounces and it was TOO thin. Ugh. I wasted perfectly good chocolate, dang it! I tried it again with four ounces and it was perfect. I’m using 4 in recipe below.

  • 4 ounces semisweet chocolate, finely chopped
  • 2/3 cup heavy cream
  • 1 tablespoon light corn syrup

Place chocolate medium heatproof bowl. Bring the cream and syrup just to a simmer in a small saucepan over medium-high heat. Pour mixture over the chocolate. Let stand 5 minutes before slowly whisking the mixture until smooth and combined.

Immediately dip the tops of each cupcake into the ganache, letting the excess drop back into the bowl. Return to wire rack to set slightly.

To decorate: Place melted candy wafers into a pastry bag fitted with a small round tip or a squeeze bottle. Pipe desired designs on each cupcake. Store finished cupcakes covered in the refrigerator. Bring to room temp before serving.

Note: To make the spiderwebs, pipe rows of circles on each cupcake starting in the center and working your way out. With a toothpick, pull the melted candy out from the center, marbling it slightly with the ganache.

ENJOY!

One Year Ago: Baked Shrimp Scampi
Two Years Ago: Easy Herb Fococcia

6 Comments

Filed under chocolate, cupcakes

Beautiful Disaster

HEY! Look what I have for you!

Cake, filling and frosting, piled into a fluted glass and garnished with fresh fruit. They are begging to be demolished by your spoon. Strawberry-lemony goodness in every bite. YUM!

I could say that when I got out my little muffin tin and flour and sugar and things that fateful Sunday morning a few weeks back that I intended THIS to be my desired outcome. You would never know, would you? Nope.

Well, that’s not how I roll.

Truth? This is actually what happens when cupcakes fail. I know. Shocking, right? These cute little individual desserts are looking mighty proud of themselves for being composed of a huge, embarrassing failure. 😉

The original goal? Lemon buttermilk cupcakes, filled with homemade lemon curd and topped with creamy strawberry frosting. Luckily, MOST of the pan turned out swimmingly. Only like four failed. One of which I just devoured all alone in the kitchen while standing over the sink with out even the faintest hint of shame. (Great cake, by the way). The other three I made trifles out of with the leftover frosting and filling. So really…win/win (win!)

So what went wrong? I overfilled my tins. Again. I always do this! Argh! So frustrating. I physically cannot stop myself for adding just a tiny bit more batter to each cup. This particular cupcake spread as opposed to puffed, so the cakes with too much batter stuck to the pan wouldn’t come out without breaking apart. Hence the huge embarrassing failure. Although…correct me if I’m wrong but when a recipe says it yields 24, I should be able to cut it in half and get 12, right?

I’m thinking yes.

ANYWAY! Enough about failure. Let’s talk about the SUCCESSFUL cupcakes.

Ooooo. Ahhhhh.

Mainly, I want to talk about the successful frosting. Oh. Em. Gee. The frosting. I’m still reeling from this creamy, dreamy strawberry frosting. This recipe from Martha Stewart is a unique Strawberry Swiss Meringue Buttercream made from combining egg whites and granulated sugar in a double boiler and cooking until the sugar dissolves. Then it’s beaten with a whisk attachment until stiff peeks form. Add butter and the strawberry puree and you’ve got something that’s really pretty amazing.

THIS is how frosting is SUPPOSED to be! Be gone, oh ye gritty, sickeningly sweet, leave the corner pieces cake frosting you are used to. This frosting…well, you may or may not want to sneak off for a private moment somewhere and lick your beater and bowl. It’s okay if you do. I won’t tell. 😉 It’s so smooth and decadent, it’s like biting into a sweet, pink cloud.

STRAWBERRY LEMON CUPCAKES (Cake, filling and frosting all from Martha Stewart Cupcakes)

This is just a slightly modified version of Martha’s lemon meringue cupcakes. Instead of topping the cupcakes with the lemon curd, I cut out a small, coned-shaped portion in the middle of each cake, and spooned about 1/2 teaspoon of the filling inside. I replaced the slightly torched 7-minute frosting with the swirly strawberry frosting instead. A delicious and addicting flavor combination with a wonderful presentation. I hope you enjoy! 🙂

Makes 24 cupcakes

First, make the filling:

LEMON CURD

  • 8 large egg yolks
  • Finely grated zest of 2 lemons
  • 1/2 cup plus 2 tablespoons freshly squeezed lemon juice (about 3 lemons)
  • 1 cup sugar
  • 1/8 teaspoon salt
  • 1 1/4 sticks (10 tablespoons) unsalted butter, cold, cut into pieces
  1. Combine yolks, lemon zest, lemon juice, and sugar in a heavy-bottom saucepan; whisk to combine. Cook over medium-high heat, stirring constantly with a wooden spoon (be sure to scrape the sides of the pan), until the mixture is thick enough to coat the back of the spoon, 8 to 10 minutes, and registers 160 degrees on an instant-read thermometer.
  2. Remove saucepan from heat. Add salt and butter, one piece at a time, stirring until smooth. Strain through a fine sieve into a medium bowl. Cover with plastic wrap, pressing it directly onto the surface of the curd to prevent a skin from forming. Refrigerate until chilled and set, at least 1 hour or up to 1 day.

Next, make the cake:

LEMON BUTTERMILK CUPCAKES

  • 3 cups all-purpose flour
  • 1 tablespoon baking powder
  • 1/2 teaspoon salt
  • 1 cup (2 sticks) unsalted butter, room temperature
  • 2 cups sugar
  • 4 large eggs, room temperature
  • Finely grated zest of 3 lemons (about 3 tablespoons), plus 2 tablespoons fresh lemon juice
  • 1 teaspoon pure vanilla extract
  • 1 cup buttermilk
  1. Preheat oven to 325 degrees. Line standard muffin tins with paper liners.
  2. Whisk together flour, baking powder, and salt.
  3. With an electric mixer on medium-high speed, cream butter and sugar until pale and fluffy. Add eggs, one at a time, beating until each is until incorporated, scraping down sides of bowl as needed. Beat in zest and vanilla. Add flour mixture in three batches, alternating with two additions of buttermilk and lemon juice, and beating until just combined after each.
  4. Divide batter evenly among lined cups, filling each three-quarters full (be careful here, start with 2/3rds full and see what you think…) Bake, rotating tins halfway through, until golden brown and a cake tester inserted in centers comes out clean, about 25 minutes. Transfer tins to wire racks to cool completely before removing cupcakes. Cupcakes can be stored overnight at room temperature, or frozen up to 2 months, in airtight containers.

Make the frosting and assemble:

STRAWBERRY SWISS MERINGUE BUTTERCREAM

  • 1 1/2 cups fresh strawberries (8 ounces), rinsed, hulled, and coarsely chopped
  • 4 large egg whites
  • 1 1/4 cups sugar
  • 1 1/2 cups (3 sticks) butter, cut into tablespoons, at room temperature
  1. Puree strawberries in a food processor. Combine egg whites and sugar in the heatproof bowl of a standing electric mixer set over a pan of simmering water. Whisk constantly by hand until mixture is warm to the touch and sugar has dissolved (the mixture should feel completely smooth when rubbed between your fingertips).
  2. Attach the bowl to the mixer fitted with the whisk attachment. Starting on low and gradually increasing to medium-high speed, mix until stiff (but not dry) peaks form. Continue mixing until the mixture is fluffy and glossy, and completely cool (test by touching the bottom of the bowl), about 10 minutes.
  3. With mixer on medium-low speed, add the butter a few tablespoons at a time, mixing well after each addition. Once all butter has been added, scrape down sides of bowl with a flexible spatula and switch to the paddle attachment; continue beating on low speed until all air bubbles are eliminated, about 2 minutes. Add strawberries and beat until combined. Stir with a flexible spatula until the frosting is smooth.*
  4. Using a small paring knife, cut a small cone shaped portion out of the middle of each cupcake. Reserve the cones. Spoon about a 1/2 teaspoon of the lemon filling into each cake. Top with reserved cone and press it down slightly into place.
  5. Pipe or spread the frosting on top of each filled cupcake. Garnish with a strawberry and a lemon wedge. Serve immediately. Store leftovers covered in the refrigerator but bring to room temp before serving again.

*The frosting can be made ahead of time. Just transfer to an airtight container and refrigerate up to 3 days or freeze up to 1 month. Before using, bring to room temperature and beat with paddle attachment on low speed until smooth again, about 5 minutes.  ***EDITED***: Beth over at Easy as Pie tried to make this frosting ahead of time and didn’t care for the result. Check out her post to see her experience. Make the frosting ahead at your own risk, I suppose! 🙂

ENJOY! 🙂

Two Years Ago: Banana Cupcakes with Honey Cinnamon Frosting – another Martha Stewart winner!

3 Comments

Filed under cupcakes, fruit

Happy (Official) St. Patrick’s Day!

As I was making these Guinness Cupcakes, I couldn’t help but think of St. Patrick’s Days gone by.

See, I never think of March 17 as the day for St. Patrick’s Day celebrations. The parties, the shamrocks, the green beer – all that happened well before the actual day on a charming little holiday known as Unofficial St. Patrick’s Day. Or more simply: Unofficial.

One word. One day. One extremely bad idea.

It all started back in the 90s when a tavern owner in the University town of Champaign, IL decided his establishments were missing out on a lot revenue when the drinking holiday to end all drinking holidays fell over spring break when the students were away from campus and spending their beer money in tropical paradises instead (or if you’re like me, you didn’t have any beer money, let alone tropical paradise money, so you likely spent your St. Paddy’s Day marking down clearance fleece at Old Navy.) So, he came up with a little event he dubbed Unofficial St. Patrick’s Day. The Friday before Spring Break (not the Friday everyone left campus for break, the Friday before that) he would open his bars at 8:00 a.m., dye his kegs green, encourage everyone to put their Irish game faces on, and come party.all.day.long.

Needless to say, the students liked this idea. A lot. So did the other bar owners. They joined in the fun, also opening their doors bright and early and slinging green beer. And so, Unofficial became the highlight of the UIUC social calendar. A full day of drinking, fighting, vandalism, property destruction, emergency room visits and stomach pumping! YES!

Where do I sign up?

In all seriousness though, I liked to have a good time as much as the next person in college, and I’m not saying I never did anything kinda stupid – sure I did! Who hasn’t? But I never actually participated in the Unofficial festivities in all their glory. My freshman year, I wasn’t old enough (have to be 19 to get in the bars in Champaign, I was still 18 at the time.) Sophomore year, I think I went home that weekend for some reason.

Junior year, I had a particularly difficult exam scheduled that day. Partying before exam = FAIL. Just ask the people who were kicked out of the test and given a zero. They’ll tell you ALL about it. Then senior year, I had a job interview. In St. Louis. So, needless to say, I missed out on most of what many UIUC students would say is the best day ever. Meh. My junior and senior year, I got to go have a green beer or two in the evening and that was all the Unofficial fun I needed, really. Those nights usually ended up pretty low key, as the people that had been at since 8 a.m. were no longer upright and/or conscious. Made for a nice evening with friends! 🙂

My green beer days have been replaced by days of cleaning and cupcakes. And that’s okay. I’m all old and responsible now so I can deal. Somewhere along the lines I just naturally transitioned from bars to bleach and from pints of beer to cups of cake. HA! It was so effortless, so seamless and quick, I didn’t even notice! How can that be?

I can still have a rockin’ good time though. Oh yes. And I still enjoy a few libations every now and then – nothin’ wrong with that! I’ve already declared my love for booze in cooking and baking – so St. Patrick’s Day is the perfect time to reminisce about those crazy college days, reach behind the bar and make a loaded cupcake.

These Chocolate Whiskey and Beer cupcakes from Smitten Kitchen would certainly fill the void left by the spilled green beer and wayward cigarette burns of party days gone by. And do a much better job at it too! I ended up taking a few shortcuts to make the process a bit quicker without sacrificing the flavor. Or the alcohol.

I decided to skip the whiskey ganache filling. As delicious as that sounded, I just wasn’t feeling the extra steps and extra ingredients. So instead, I made the Guinness chocolate cupcakes and piped on a chocolate Bailey’s Irish Cream frosting instead of the Bailey’s buttercream. All the taste, but a lot less prep! They turned out great! The cake was super moist and had a great warm, almost malty flavor we really enjoyed. The frosting was to-die-for! LOVED it. Chocolate and Bailey’s is a match made in heaven! All in all a great St. Patrick’s Day treat!

CHEERS! 🙂

GUINNESS CUPCAKES WITH CHOCOLATE BAILEY’S FROSTING (Cake Recipe from: Smitten Kitchen. Frosting inspired by Smitten Kitchen but adapted from Hershey’s.com)

INGREDIENTS:

For the Cake:

  • 1 cup stout (such as Guinness)
  • 1 cup (2 sticks) unsalted butter
  • 3/4 cup unsweetened cocoa powder
  • 2 cups all purpose flour
  • 2 cups sugar
  • 1 1/2 teaspoons baking soda
  • 3/4 teaspoon salt
  • 2 large eggs
  • 2/3 cup sour cream

For the Frosting:

  • 1/2 cup (1 stick) butter or margarine
  • 2/3 cup HERSHEY’S Cocoa
  • 3 cups powdered sugar
  • 2 tablespoons Bailey’s Irish Cream
  • 4 to 5 tablespoons of milk (more or less as needed)
  • 1 teaspoon vanilla extract

DIRECTIONS:

  1. Preheat oven to 350°F. Line 24 cupcake cups with liners.
  2. Bring 1 cup stout and 1 cup butter to simmer in heavy large saucepan over medium heat. Add cocoa powder and whisk until mixture is smooth. Cool slightly.
  3. Whisk flour, sugar, baking soda, and 3/4 teaspoon salt in large bowl to blend. Using electric mixer, beat eggs and sour cream in another large bowl to blend. Add stout-chocolate mixture to egg mixture and beat just to combine. Add flour mixture and beat briefly on slow speed. Using rubber spatula, fold batter until completely combined. Divide batter among cupcake liners, filling them 2/3 to 3/4 of the way. Bake cake until tester inserted into center comes out clean, about 17 minutes.Rotate the pans front to back once halfway through baking.  Cool cupcakes on a rack completely. Makes 20 to 24 cupcakes.
  4. Make the frosting: Melt butter. Stir in cocoa. Alternately add powdered sugar and Irish Cream/milk, beating to spreading consistency. Add small amount additional milk, if needed. Stir in vanilla. Makes about 2 cups frosting.

ENJOY! 🙂

One Year Ago: Pineapple Butterscotch Bars – a different combination that’s surprisingly delightful!

12 Comments

Filed under chocolate, cupcakes

I Choo-Choo-Choose You!

Ralph Wiggum is my Valentine. I choo-choo-choose him. 🙂

Oops. I mean, Ralph is my four-fingered, animated, 2nd grader Valentine. Eric is my real life Valentine. I choo-choo-choose him first.

If you are a Simpsons fan and get this then I heart you. We should get together and talk in Ralph-isms over coffee.

“Me fail English? That’s unpossible!”

“I ated the purple berries! They taste like….burning.”

“The doctor said I wouldn’t have so many nosebleeds if I kept my finger outta there!”

🙂

And for you, all my lovely reader Valentines…CUPCAKES! Share them with your Valentine, even if your Valentine is Ralph Wiggum. Little cupcake buddies for you and all your four-fingered, animated friends.

See??

Moist, tangy and festive red velvet cupcakes topped with swirls of sweet, creamy cream cheese frosting and wearing a Valentine’s Day smile. They choo-choo-choose YOU to share their candy hearts with. 🙂

All it takes to turn these cupcakes from irresistible to adorable is a couple of squeeze bottles and a few squares of baking chocolate. The eyes, mouths and cherry stems are semi-sweet squares (3 to 4 ounces) and the cherries and hearts are white squares (4 ounces, divided) colored with gel food coloring. (Note: You can’t use liquid food coloring to color chocolate – it will seize.)

You can really make and shape you want out of chocolate to decorate your cupcakes – either by tracing the shape – like I did with cherries:

I picked out an image I liked, (Thank you, Microsoft Office and your wonderful array of free clipart) and then printed it several times across the page. I turned a baking sheet upside down (so the lip of the pan didn’t get in the way) and put a sheet of parchment over my images. It’s easy from there! Just trace over it with chocolate. To fill it in, I just put a couple dots of chocolate and then smoothed it with a toothpick. I clearly don’t have the steadiest hand in the world, but overall I was pleased with how they came out.

Or you can draw the design free hand – which is what I did for the eyes, smiles and hearts. If you do draw free hand, make sure to do way more than you’ll need to decorate. That way, you can choose the best ones  to top your cakes. 🙂

To set the shapes, place the cookie sheets in the refrigerator or freezer – then just peel them off! You’ll have extra. You’ll have to figure out something do with them. I’m sure you’ll think of something. 🙂

Now, let’s talk about the cakes themselves! I’ve made red velvet once before – I turned them Illini blue, but that doesn’t matter. They were good, but a tad dry. When I decided to make red velvet for Valentine’s Day, I knew I wanted to try a different recipe. This one from Kelsey at Apple a Day (who’s blog is WONDERFUL, by the way! Such creative and homey recipes!) seemed to be a favorite among the blogging world.

I have to say…these are phenomenal! SO moist, the perfect crumb, a great crown, amazing color. They are pretty much spot on. They have that great tangy flavor that is unmistakably red velvet. It’s kind of hard to explain how red velvet cake tastes, isn’t it? It’s for sure not chocolate – but it’s a different taste from a plain white cake too. Thanks so much for sharing this recipe, Kelsey! This will be my go-to red velvet from now on!

Cream cheese frosting is pretty traditional with red velvet. Feel free to use your favorite. I like the one in my Better Homes and Gardens cookbook. It has a great flavor and just has the perfect creamy consistency. It’s super easy to work with – pipes like a dream, if you will. 🙂

So, Happy Valentine’s Day from the Cupcake Buddies! Hope you got to spend it with all your favorite people. 🙂

RED VELVET CUPCAKES WITH CREAM CHEESE FROSTING (Recipe adapted  from: Cake Man Raven at Sauver.com, as seen at Apple a Day, Frosting from Better Homes and Gardens Cookbook)

INGREDIENTS:

  • 2 1/2 c. cake flour
  • 1 1/2 c. sugar
  • 1 tsp. baking soda
  • 1 TBSP cocoa powder
  • 1 tsp. salt
  • 2 eggs
  • 1 1/2 c. vegetable oil
  • 1 c. buttermilk
  • 2 TBSP (1 oz.) red food coloring
  • 1 tsp. vanilla extract
  • 1 tsp. white distilled vinegar

DIRECTIONS:

Preheat oven to 350°.

Sift together flour, sugar, baking soda, cocoa, and salt into a medium bowl.

Beat eggs, oil, buttermilk, food coloring, vanilla, and vinegar in a large bowl with an electric mixer until well combined. Add dry ingredients and beat until smooth, about 2 minutes.

Line two 12 cup muffin tins with paper liners and fill each one 2/3 full.

Bake cupcakes, rotating halfway through, until a toothpick inserted in the center of each cake comes out clean, 15 to 20 minutes. Let cakes cool 5 minutes, then remove to cooling rack. Let cool completely before frosting.

CREAM CHEESE FROSTING

**Note: I halved the cake recipe above to get 12 cupcakes – this frosting recipe makes about 4 cups, which was the perfect amount for laying it on pretty thick in piped swirls. If you make 24 cupcakes, you’ll probably need more frosting (this recipe is easily doubled), or check out the frosting recipe Kelsey has in her post. 🙂

  • 1 80z. package cream cheese, softened
  • 1/2 cup (1 stick) butter, softened
  • 2 teaspoons vanilla
  • 5 3/4 to 6 1/4 cups sifted powdered sugar

Beat cream cheese, butter and vanilla with an electric mixer until light and fluffy. Gradually add 2 cups of the powdered sugar beating well. Gradually beat in additional powdered sugar to reach desired consistency.

Gang’s all here! ENJOY! 🙂

One Year Ago: Rich, meaty and satisfying Short Ribs with Tagliatelle for a Valentine’s Day at home with my hubby. 🙂

12 Comments

Filed under cupcakes

Black Bottom Cupcakes…

You make the rockin’ world go round!

I channeled Freddie Mercury making these cupcakes. 🙂 All afternoon, I was singing about taking them home tonight and enjoying them beside the red firelight and how these sweet treats make the rockin’ world go round. Maybe we should just call these the QUEEN of all cupcakes.

ANYWAY. Black bottom cupcakes that make the rockin’ world go round. What are they and why should you care? Well, maybe they should make whoever came up this idea QUEEN for a day because it is GENIUS. Rich and tender chocolate cake surrounds a sweet, creamy, chocolate-studded cream cheese center.

Um. I’m listening. You had me at cake.

I kind of found this recipe by accident. It was meant to be! Last weekend, I grabbed a different cookbook out of the cabinet where I keep them in a jumbled, messy pile super neat and organized and my Jack Daniel’s book fell out. On my foot, actually. But that’s a different story. After I was done cursing, I looked down to see that the book had fallen open and this recipe for Black Bottom Cupcakes appeared. I picked it up and started reading. Turns out, I had everything I needed to make them on hand, including a bottle of Uncle Jack’s special sauce. Ah! I knew what I was baking that afternoon!

These are super easy to make and a chocolate lovers dream. I loved the warmth and spice the JD adds. The cake part is not overly sweet, so the cupcakes don’t seem super rich with the addition of chocolate chips. My only beef with the recipe is that it says it makes 18 and I only got 13. Yes, I baked one lonely cupcake all by itself in a big old pan. LOL. I probably over-filled my cups, which I tend to do. What can I say, I’m a giver when it comes to cupcake batter. I would not recommend filling the cups three-quarters of the way full…half may be a good place to start.

BLACK BOTTOM CUPCAKES (Recipe Source: Jack Daniel’s Spirit of Tennessee Cookbook)

INGREDIENTS:

  • 1 8-oz package of cream cheese, softened
  • 1 egg, beaten
  • 1/3 cup sugar
  • 1/8 tsp. salt
  • 1 cup semi-sweet chocolate chips
  • 1 1/2 cups all-purpose flour
  • 1 cup sugar
  • 1/4 cup cocoa
  • 1/2 tsp. cinnamon
  • 1 tsp. baking soda
  • 1/2 tsp. salt
  • 1/4 cup Jack Daniel’s Whiskey
  • 3/4 cup water
  • 1/3 cup vegetable oil
  • 1 tbs. vinegar
  • 1 tsp. vanilla

DIRECTIONS:

  1. Preheat oven to 350 degrees. Line muffin tins with paper cupcake liners.
  2. Beat together first 4 ingredients. Stir in chocolate chips. Set aside.
  3. Whisk together remaining dry ingredients in a separate bowl. In another bowl, stir together whiskey, water, oil, vinegar and vanilla. Add to dry ingredients and beat with an electric mixer until combined.
  4. Fill cupcake liners 3/4 (or maybe half…) full with batter. Drop 1 tablespoon cream cheese mixture into the center of each.
  5. Bake 35 to 40 minutes or until tester inserted in the center comes out almost clean. Makes 18 cupcakes (if you’re lucky. ;))
  6. Store leftovers in the fridge, but bring to room temp before serving. Or just eat ’em cold. They’re good like that too! 🙂

ENJOY! 🙂

One Year Later: Apple Peanut Butter Crumble Bars – I INVENTED these. Yes. Really. I was going to work with this recipe a bit more to work out some kinks but I haven’t yet. I need to get to that!

4 Comments

Filed under chocolate, cupcakes

Beat Cancer!

As you all know, October is Breast Cancer Awareness month. All month long, people show support for family, friends and survivors by sporting all things PINK!

It seems just about everyone knows someone personally who has been affected by breast cancer. I know I do. From family to friends to co-workers I have seen people fight and BEAT this disease. There is a wonderful, amazing sisterhood amongst survivors and it’s important that we all do our part to make sure there is a cure for all that are affected. Encourage you family and friends to do their monthly self exams and get regular mammograms. As they say – SAVE SECOND BASE! 🙂

I decided to make a pink treat to show my support. I’ll be entering these in the Power of Pink challenge hosted by Jen over at Beantown Baker. Thanks for raising awareness of this important cause, Jen! 🙂

Sometimes on quiet evenings when there’s not much going on, I’ll drag out cookbooks I’ve looked at million times and flip through them, just to remind myself what’s in there. I was glancing through my Hershey’s cookbook the other day and came upon adorable, pink-frosted mini cupcakes. Perfect for the month of October!

What intrigued me about these cupcakes was the addition of a stiffly beaten egg white to the chocolate cake batter. Different, eh? I thought so too. The end result was a light and almost spongy cake. Not bad – just not what you would expect. The interesting cake texture, coupled with the smooth creamy (PINK) frosting and the richness and crunch of chopped Hershey’s chocolate bars with almonds almost made me forget that these were actually cupcakes. They were pushed into the realm of…something other than cake! I’m not sure how to explain it, other than to say they are very interesting and delicious!

CHOCOLATE PINKS (Recipe Source: Hershey’s 1934 Cookbook)

INGREDIENTS:

  • 3 tablespoons butter, softened
  • 1/2 cup granulated sugar
  • 1 egg yolk
  • 1/2 teaspoon vanilla
  • 2/3 cup all-purpose flour
  • 1/4 teaspoon baking soda
  • 3 tablespoons Hershey’s cocoa
  • 1/2 cup milk
  • 1 egg white, beaten to stiff peaks
  • 2 Hershey’s Milk Chocolate Bars with Almonds (1.05 ounces each), chopped into small chunks

DIRECTIONS

  1. Cream butter and sugar together; add the egg yolk and vanilla, and beat well.
  2. Sift together flour, baking soda and cocoa; add with milk to other ingredients.
  3. Add stiffly beaten egg white.
  4. Bake in a very small buttered tins (1 3/4 inch muffin pan) in a 350 degrees for 15 minutes. Ice with Pink Butter Icing (recipe follows). Scatter candy over the cakes while icing is still soft. Makes 24 cakes.

PINK BUTTER ICING

  • 3 tablespoons butter
  • 1 1/2 cups confectioner’s sugar
  • 1 1/2 teaspoons vanilla
  • 1 tablespoon of milk
  • 4 drops red food coloring (I actually used pink gel food coloring. And too much of it at that. Pepto cakes, anyone?)

Beat butter and sugar; stir in vanilla and milk. Beat until icing is smooth and of spreading consistency. Makes about 1 cup.

A couple notes about the frosting:

  • You can use any vanilla buttercream recipe you like here. I found this particular recipe to be quite sweet. But since the cakes aren’t that sweet and there’s some texture with the almonds in the candy, I think it works here. I probably wouldn’t use this particular recipe on it’s own.
  • You may need to add a splash more milk. I found the frosting to be a bit stiff when I went to spread. I knew more milk would solve the problem, but I was already 4 or 5 in – wasn’t gonna turn back! I just kept on…silently cursing myself for not paying better attention the first place. Ha. 🙂

ENJOY! 🙂

One Year Ago:

2 Comments

Filed under chocolate, cupcakes

Surprise! A Stomachache!

When word got around to my family that I started this blog, saying they were merely surprised is a serious understatement. Shocked. Amazed. Baffled, is more like it.

“Erin has a blog about food?” They all asked, scratching their heads in confusion I’m sure. “Our Erin? But…but…but…SHE DOESN’T EAT ANYTHING!”

Their concerns are valid. It’s true. I don’t eat much. Surprised? I know, right? All these yummy treats, delectable dinners and I eat like a bird! It’s not that I don’t like food – clearly, that’s not the case. I love food. Making it and eating it. I think about food pretty much all the time. I just…can’t have very much of it at one time. I don’t know what it is about me, but I get full way quicker than any normal person probably should. At home, my portions are tiny. When we go out, I typically eat about a quarter of what’s on my plate and then I take the rest home. Waitresses are forever asking me if everything was okay. It must look like I hated my meal by how much I ask to take home (happened just the other night, actually.) It’s not you, Restaurant Meal…it’s me. I just physically cannot overeat.

Oh, don’t get me wrong – I’ll try to overeat every now and then. Well, not on purpose -that’s a bad idea. But sometimes it just kind of happens, especially when I have a free weekend day and I want to cram as much food-related fun into it as I possibly can. Oh, it’s fun all right…so much fun it comes that awful sick feeling that just ruins the rest of your day.

That’s what happened to me today. Why, oh, why do I do this to myself? It happens so rarely these days that it totally sneaks up on me.

Oh, man…my stomach hurts…I just can’t figure out why — oh wait, now I remember.

Just so everyone can laugh at my misfortune, I give you Erin’s Easy, 10-Step Guide to Giving Yourself a Wrenching Gut Ache. Got a dentist appointment you’d like to miss? Creepy neighbors want you to come over and watch a slide show of their two week vacation in Niagra Falls? No problem – just follow these simple instructions and prepare to call in sick. 🙂

  • Step 1: Go raspberry picking. Be sure to sample liberally while you pick – you want to make sure you are getting the best raspberries, after all.
  • Step 2: Decide that it’s pretty warm out and all that picking has left you hot and thirsty. Stop at Sonic. It’s on the way home.
  • Step 3: Go ahead and get the large Cranberry Limeade – it’s after 2:00 p.m. so it’s only a dollar. (For the record, no one really needs to get a large anything ever – small or medium will suffice.)
  • Step 4: Commence immediate chugging of limeade
  • Step 5: Make frosting for cupcakes when you get home. Be sure to lick beater completely clean.
  • Step 6: Continue sucking down that limeade
  • Step 7: Once cupcakes are frosted, take a giant bite out of one of them in the name of blog photography, as it would be helpful, at least this time around, for your readers to see the inside.
  • Step 8: Stare at half chewed cupcake for a second, decide there’s really nothing you can do with the damn thing besides eat it. Inhale the rest of the cupcake in approximately three seconds.
  • Step 9: Wash it all down with the last of that giant limeade.
  • Step 10: Wait about ten minutes. When tummy is thoroughly ablaze and face is sufficiently green, grab Pepto and pray for relief.

So, now that you are positively grossed out, on to the recipe! 😉 It was for sure eating all of that last cupcake that pushed me over the edge into Sickdom today. Two words, people: Worth. It.

I was craving fall flavors today, even though the way I got all sweaty raspberry picking proves that summer is not quite over. I just got way too excited to bake something with pumpkin – when I saw these pumpkin cupcakes with cream cheese frosting over at Smitten Kitchen, I was hooked!

These are phenomenal! Moist, tender, spicy and delicious! The cupcakes are a great orange color and the whole house smelled of fall while they were baking. I decided to add some mini chocolate chips to the batter because I like the combo of cinnamon/spicy things and chocolate. I think the chocolate helps cut some of the overwhelming pumpkin flavor and adds depth. I made a cinnamon cream cheese frosting to go on top instead of maple. Maple is not one of my favorite flavors and I didn’t want to have to hunt down real maple syrup (which is hard to find) and pay out the wazoo for it (it can be pricey.) I also added a splash of vanilla to frosting. Otherwise, I kept the cake recipe the same. I highly recommend these bad boys – it’s like fall in the palm of your hand!

Take it from me though, go easy. Pick the cupcake OR the cranberry limeade – don’t try to be the hero and do both. 🙂

PUMPKIN CUPCAKES WITH CINNAMON CREAM CHEESE FROSTING (Recipe Source: Smitten Kitchen, who adapted it from David Leite)

Before we move on – Like my super cute plaid cupcake liners? Do ya, do ya, do ya, huh, huh, huh??? Get thee to Hobby Lobby! They’ve got a TON of cute fall baking supplies. And…pssst… ::whispers:: they are including them in the 50% off sales on the fall decor items! YAHOO!

Note on the yield: The original recipe says it will make 17 or 18 cupcakes. I ended up with 22 and I think I overfilled a couple of my cups (I always do that…grrrr…) so I bet you could easily get 24 out the recipe.

INGREDIENTS:

  • 1 stick unsalted butter, room temperature
  • 1 cup firmly packed dark-brown sugar
  • 1/3 cup granulated sugar
  • 2 cups cake flour
  • 2 teaspoons baking powder
  • 1 teaspoon baking soda
  • 1 teaspoon ground cinnamon
  • 1 teaspoon ground ginger
  • 1/2 teaspoon ground nutmeg
  • 1/8 teaspoon ground cloves
  • 1/2 teaspoon salt
  • 1/4 teaspoon freshly ground black pepper
  • 2 large eggs
  • 1/2 cup buttermilk mixed with 1 teaspoon vanilla
  • 1 1/4 cups canned solid-pack pumpkin
  • 1 cup mini semisweet chocolate chips, tossed in 1 tsp. of flour (keeps them from sinking)

DIRECTIONS:

1. Preheat the oven to 350° (175°C). Line a cupcake pans with liners.

2. In a stand mixer, beat the butter and sugars on medium speed until fluffy, about 5 minutes. Meanwhile, sift the flour, baking powder, baking soda, cinnamon, ginger, nutmeg, cloves, salt, and pepper into a medium bowl.

3. Add the eggs 1 at a time to the mixer, scraping down the sides after each addition. Alternate adding the flour and milk mixtures, beginning and ending with the flour. Beat in the pumpkin until smooth. Fold in chocolate chips. Scoop the batter among the cupcake liners — filling about 3/4 of the way. Rap the filled pans once on the counter to release any air bubbles. Bake the cakes until a toothpick inserted into the center comes out clean, about 20 to 25 minutes. Cool the cupcakes on racks completely.

FOR THE FROSTING:

  • Two (8-ounce) packages cream cheese, softened
  • 1 stick unsalted butter, room temperature
  • 2 cups confectioners’ sugar
  • 1 tsp. vanilla
  • 1/2 tsp. ground cinnamon, plus more for sprinkling

Beat cream cheese and butter until fluffy. Beat in vanilla. Add sugar and cinnamon and beat until desired consistency. Pipe onto cooled cupcakes and sprinkle with additional cinnamon.

ENJOY! 🙂

6 Comments

Filed under cupcakes, fruit