Tag Archives: bread

Crave-worthy

People seem to like to ask this now quite obviously pregnant girl if I’m having any crazy cravings. You can almost see the disappointment in their faces when I tell them, no, I am not currently topping off my ice cream sundaes with a dill pickle instead of a cherry. Sorry to disappoint you, friend.

I’ve never really had strong food cravings and that doesn’t seem to be all that different now that I’m carrying around Baby Girl. Sure, I’ll have moments where I think, you know what sounds amazeballs right now? Cheese fries. But if all I have is carrot sticks and hummus, well, that’ll work too. Close enough, right?

There has been one thing I’ve had a hard time resisting over the last few months though. It’s the one thing that *always* sounds spot-on delicious to me. The good thing about this particular item is it’s not something I’m going to have lying around, it’s extremely unlikely I’m going to just whip this up on a whim, and I’d have to go out to get it. That means putting on real pants and shoes. Let’s face it, craving or not, laziness always wins out over having to put on real pants and shoes. Fact.

So what’s this mystery item I daydream about? Why, doughnuts, of course! Doughnuts and any and all of their assorted fried dough cousins – fritters, churros, hush puppies, beignets, corn dogs, etc., etc., and so on. Even funnel cake sounds good! And I don’t even *like* funnel cake! I don’t know what it is….I just have a hankering for hunks of golden brown, fried, carbohydrates these days.

Side note: how come pregnancy doesn’t make you like really crave kale? Or beets? Wouldn’t that be ideal?

I’ve only indulged in my fried dough craving a couple times over the last six months. Let’s just say I didn’t feel particularly stellar after I inhaled a giant apple fritter one Saturday morning that Eric ever-so-poignantly observed was as big as my face. It totally was too. He wasn’t trying to be mean. He was just surprised. Six months ago, I would have mowed down on about half of that thing, declared I was full and then handed the gnarled remains over to him to finish. Not anymore. The sheer amount of food I can put away these days surprises even me sometimes.

Dudes! What the heck? Who ate all this??

Oh. I did. Huh. Wonder how that happened?

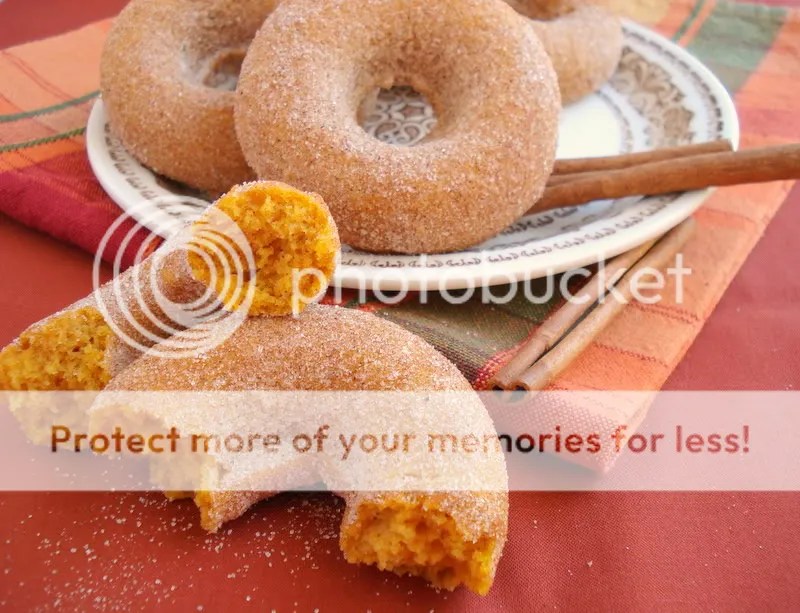
Anyway. Luckily when the doughnut craving gets a little too strong to ignore, I can whip up a quick batch of the baked variety here at home. These cinnamon sugar pumpkin doughnuts may just be my favorite to date. Bursting with warm, cinnamony fall spice and pumpkin flavor, these are about as close to bakery-fresh goodness as you can get. The crunchy, cinnamon sugar exterior makes them feel all the more indulgent. I whipped up these up quickly one chilly Sunday morning a few weeks ago, built myself a roaring fire (and by that I mean I flipped the switch on the wall and the gas fireplace came on), cuddled up under my favorite purple blanket and proceed to down two of these suckers in record time.

Out of the recipe, I got 12 full sized doughnuts and 12 “doughnut holes” (same batter baked in a mini-muffin tin). I will say, as with most baked doughnut recipes, these are best the day their made. After 24 hours or so, the coating just kind of melts into the doughnut leaving behind a slightly soggy, sticky cake product. They are not, however, any less edible that way. Believe me, I popped two or three of those minis just about every time I walked by. Craving satisfied.

BAKED CINNAMON SUGAR PUMPKIN DOUGHNUTS (Recipe Source: King Arthur Flour)

INGREDIENTS:

  • 1/2 cup vegetable oil
  • 3 large eggs
  • 1 1/2 cups granulated sugar
  • 1 (15 oz.) can pumpkin puree
  • 1-1/2 teaspoons pumpkin pie spice, or 3/4 teaspoon ground cinnamon plus a heaping 1/4 teaspoon each ground nutmeg and ground ginger
  • 1-1/2 teaspoons salt
  • 1-1/2 teaspoons baking powder
  • 1-3/4 cups + 2 tablespoons unbleached, all-purpose flour
  • Cinnamon-sugar, for coating

DIRECTIONS:

  1. Preheat oven to 350 degrees. Spray the wells of a doughnut pan (or muffin tin) with cooking spray.
  2. Combine all ingredients except flour and cinnamon sugar in an electric mixer and beat until smooth. Add the flour and stir until just combined. Do not overmix.
  3. Fill the wells the doughnut pan about 3/4 of the way full. Bake 15 to 18 minutes or until a toothpick inserted in the center comes out clean. Allow to cool for 5 minutes in the pan. Run a knife along the outer edge of each doughnut to loosen and remove to a wire rack to cool.
  4. When the doughnuts are cool enough to handle, but still warm, place a zip-top bag with cinnamon-sugar and shake to coat. Cool completely on a wire rack. Makes 15 to 18 doughnuts.

ENJOY! 🙂

7 Comments

Filed under bread, breakfast

Those Summer Nights

As my Dad would say – New Years Day is right around the corner.

Oh, you thought New Years Day occurred on January 1? The day we pull out our new day planners and calendars? When the holidays end and it’s cold and miserable outside and there seems to be nothing at all to look forward to for months on end?

Well, yes, there’s that New Years Day. And then there’s the other New Years Day: Opening Day. The start of a new baseball season. A day most cherished by both my dad and my husband. We won’t talk about how they cheer for rival teams. Could get ugly. 😉

Now, I’ve never attended a ball game in April myself, because, let’s be honest, I’m just not that much of a die hard. Even so, I start craving the long, luscious days of summer as soon as the season starts. There’s just something about baseball. It’s the essence of summer.

When I was younger, I got taken out to the ball game more times than I can count. Thanks to my Dad’s devotion the game, I spent many hours of my childhood summers at the ballpark. Or riding in the car to get the ballpark. So much so that as soon as I was old enough to decide for myself if I wanted to go, I pretty much quit all together. Now that I’m older, I appreciate the ritual of the game so much more. I look back on all that time sitting with my Dad at the ballpark very fondly and find going to games with my Dad is still one of my favorite things to do. And it just so happens, I married a big baseball fan so the tradition of summer nights at the ballpark continue.

Baseball is reserved exclusively for the best days of the year. The kind of days that melt into warm, twinkling twilight. The crack of the bat, the suspense of the ball dangling in midair, the explosion of the crowd. It’s the perfect combination of excitement and relaxation. Being at a ball game is like chilling on the patio in your own backyard. All your best buds, eats hot off the grill, ice cold brew. Sure there’s a game going on, but if most the 9 innings is spent laughing and socializing, that’s okay. You still win regardless of the score.

Forget the peanuts and Cracker Jack, when I get to the park, all I want is big soft pretzel complete with a tiny cup of overpriced, overprocessed liquid cheese concoction. Oh, and a cold beer. Carbs, washed down with more carbs = dinner. Those ballpark pretzels….I keep going back. Are they that great? No. When it’s gone do I look down at the wayward pretzel salt stuck to my lap and think “hm, I sure am glad I ate that”? Uh, no. But it’s part of the ritual.

The good news is you can recreate that summer pretzel ritual at home all year round. And have it taste a million times better than the lukewarm, doughy, previously frozen version you get at the park.

Homemade soft pretzels are super easy to make and a great introduction to the world of yeast if you’ve yet to venture into that whole realm. The dough mixes up in a snap, it’s easy to work with and shape and the scrumptious reward at the end is well worth the extra time it takes to do it from scratch. The boiling step can be a bit tedious, but again, well worth it in the end. This time around I fancied them up a bit with classic flavors of an everything bagel. Peppered with a mix of poppy seeds, sesame seeds, salt, onions and garlic, these pretzels pack a ton of flavor. They’re excellent with a bit of honey mustard and outstanding with a homemade cheese sauce. Any way you bake them, break them, dip them or scarf them, you’ll stand up and cheer. 🙂

EVERYTHING SOFT PRETZELS (Recipe Source: Alton Brown via Foodnetwork.com)

INGREDIENTS:

  • 1 1/2 cups warm (110 to 115 degrees F) water
  • 1 tablespoon sugar
  • 2 teaspoons kosher salt
  • 1 package active dry yeast
  • 22 ounces all-purpose flour, approximately 4 1/2 cups
  • 2 ounces unsalted butter, melted
  • Vegetable oil
  • 10 cups water
  • 2/3 cup baking soda
  • 1 large egg yolk beaten with 1 tablespoon water
  • Optional toppings: Poppy seeds, sesame seeds, course pretzel salt, dried minced onion, granulated garlic – all to taste

DIRECTIONS:

  1. Combine the water, sugar and kosher salt in the bowl of a stand mixer and sprinkle the yeast on top. Allow to sit for 5 minutes or until the mixture begins to foam. Add the flour and butter and, using the dough hook attachment, mix on low speed until well combined. Change to medium speed and knead until the dough is smooth and pulls away from the side of the bowl, approximately 4 to 5 minutes. Remove the dough from the bowl, clean the bowl and then oil it well with vegetable oil. Return the dough to the bowl, cover with plastic wrap and sit in a warm place for approximately 50 to 55 minutes or until the dough has doubled in size.
  2. Preheat the oven to 450 degrees F. Line 2 half-sheet pans with parchment paper and lightly brush with the vegetable oil. Set aside.
  3. Bring the 10 cups of water and the baking soda to a rolling boil in an 8-quart saucepan or roasting pan.
  4. In the meantime, turn the dough out onto a slightly oiled work surface and divide into 8 equal pieces. Roll out each piece of dough into a 24-inch rope. Make a U-shape with the rope, holding the ends of the rope, cross them over each other and press onto the bottom of the U in order to form the shape of a pretzel. Place onto the parchment-lined half sheet pan.
  5. Place the pretzels into the boiling water, 1 by 1, for 30 seconds. Remove them from the water using a large flat spatula. Return to the half sheet pan, brush the top of each pretzel with the beaten egg yolk and water mixture and sprinkle with desired toppings. Bake until dark golden brown in color, approximately 12 to 14 minutes. Transfer to a cooling rack for at least 5 minutes before serving.

ENJOY! Also…play ball! 🙂

2 Comments

Filed under appetizers, bread

Good Intentions

Many months ago, when Eric and I were getting ready to move, I had all sorts of grand plans for all the stuff I was going to get accomplished while I was off work and job hunting in our new location. House projects, kitchen projects, and craft projects. Oh, I was so looking forward to all that stuff.

Among things like the cool, crafty DIY wall art I’m still brainstorming to this day and the hot, healthy meals ready and on the table when Eric walked in the door, I thought I was going to bake bread. Tons of bread! There was going to be a fresh, beautiful, hand-formed, yeasted homemade bread in my kitchen at all times.

Um. Yeah. About that. I’m not really sure what happened but I guess there was this marathon of Dance Moms on TV and I sat down for a second and the next thing I knew SIX HOURS had gone by and well….  I’m pretty sure things like that didn’t happen everyday but…where in the world did those all those hours go?

I was off work for seven months. I made bread once. In the form of these hot dogs buns.

Housewife fail.

And now I’m back to work and working harder and longer hours than I’ve worked before in my life. We just ate the last of these buns from the freezer last week after I came home after a 12 hour day and didn’t feel like cooking.

Dang, I’m gonna miss these.

I mad at myself for not spending more time making things like these soft, delightful hot dog buns while I had the time. Ah, hindsight…all 20/20 and all. Now the challenge comes in having enough hours to string together to go from mixing to rising to baking to cooling before storing. I’m going to have to carve out a chunk of time here soon, because I’m pretty sure after eating our humble, little hot dogs inside one of these, I’m afraid we’ll never be able to go back to store bought. These were so wonderful paired with the cider-braised leek and apple dogs I made.

Annnnnnd. I’ve officially spoiled us. 😉

HOMEMADE HOT DOG BUNS (Recipe Source: As seen at Confections of a Foodie Bride, originally adapted from King Arthur Flour)

INGREDIENTS:

  • 1 Tbsp sugar
  • 2 1/4 tsp (1 pkg) yeast
  • 1/4 cup warm water
  • 1 cup warm milk
  • 1 Tbsp vegetable oil
  • 1 tsp salt
  • 3 to 4 cups flour
  • 1 egg
  • sesame seeds or poppy seeds, for topping (optional)

DIRECTIONS:

  1. In the bowl of a stand mixer, dissolve the sugar in the warm water. Sprinkle the yeast over the top and let sit for 10 minutes until the yeast is foamy.
  2. Add the milk, oil, salt and 3 cups of flour to the yeast mixture. Beat with the dough hook until combined. Add flour, about 1 tablespoon at a time, until the dough pulls away from the sides of the bowl. Knead 5-7 minutes, until the dough is elastic and smooth.
  3. Put the dough into an oiled bowl, turning to coat. Cover and let rise in warm place until doubled, about one hour.
  4. Turn the dough out onto a lightly oiled work surface. Divide the dough into 9 equal pieces (a kitchen scale is helpful if you have one!) Shape each piece into a ball. Roll the balls into ropes about 4 1/2-inches in length and flatten slightly. Place each bun on a lined baking sheet with the sides just barely touching.
  5. Cover with a light towel and let rise a second time until almost doubled, about 45 minutes.
  6. Meanwhile, preheat oven to 400.
  7. Just before baking, lightly brush the tops of the buns with the egg wash (1 egg beaten with 1 Tbsp water) and sprinkle with sesame or poppy seeds (if using). Bake for about 20 minutes or until golden brown. Transfer the buns from the pan to a wire rack to cool completely. Makes 9 buns.

ENJOY! 🙂


1 Comment

Filed under bread

Love and Laundry

I’m the one who gets to do all the exciting stuff around here. Like laundry. Oh boy, does laundry get my juices flowing. Cleaning the lint trap, accidentally throwing that expensive wool sweater into washing machine when it is clearly labeled dry clean only, chasing away those silly sock stealing gnomes, dropping a pair of underwear on the stairs that ends up going unnoticed for days – not to mention all that super fun folding and hanging.

Oh yes. I just LOVE laundry.

Hey Sarcasm. Say, have you seen Erin anywhere? Tell her we’re waiting on a recipe here. Thanks.

The only good thing about laundry is I get to decide when my husband’s gray pocket t-shirts have crossed over from Okay to Wear Out To Menards And Maybe Red Lobster If It’s Been A Long Day to Unacceptable For Anything Except Sleeping. These are the ones that are covered in stuff – paint, holes, burn marks (don’t ask, even he can’t explain that one). The collars are frayed, the hems are ripped, the pockets are hanging by a thread, all floppy and pathetic like. The fabric is stretched paper thin and soft from years of wearing and washing…

These are the most delicious sleeping shirts ever. I’d be lying if I said these snuggly pillows of shirt weren’t highly coveted by both of us for  their superb slumber time comfort qualities.

But *I* do the laundry. I load ’em and I fold ’em. That means I handle these shirts on a regular basis. When I find a perfectly worn, soft as silk, old t-shirt, I do a little jig of joy and promptly place it in the PJ drawer in my dresser. Sorry Eric, you’re out of luck. Occasionally I miss one, and a sleep shirt ends up back in Eric’s dresser by mistake but I always get it back. Oh yes. They belong to ME!

Sometimes, for just a second, I feel kind of bad for hoarding my husband’s t-shirts. It’s kind of selfish and mean. I’m sorry. I should be ashamed of myself. In my defense, he has plenty of other pocket tees to choose from…it’s not like he’s running around half naked. He can spare ’em. 😉

I do make up for it though by feeding him hot dogs wrapped in pretzel dough. This man clearly doesn’t have anything to complain about, right? 😉 Every now and then, I take a break from veggie-sneaking and just make something for Eric I know he will love. Nothing funny, nothing fancy.

Soft pretzel dough is insanely simple to make. Seriously, in about 15 minutes, you’ll have a lovely ball of dough rising away. If you’ve got a mixer with a dough hook, it does all the work for you! Now, the shaping and boiling step does take a bit of time and then there’s the agonizing 15 minute wait while they bake. While these pretzel dogs are little involved for a weeknight endeavor, you can easily make them ahead and reheat later.

These little nuggets of deliciousness did not disappoint. I’d be lying if I said we didn’t eat these two nights in a row. The pretzel dough is perfectly golden, salty and chewy. Paired with the meaty, juicy bite of an (all beef) hot dog and nice spicy brown mustard- they are totally addicting. Perfect party food or as an occasional treat for kids, I promise you’ll be coming back to these again and again!

PRETZEL DOGS (Recipe source: As seen at  Fake Ginger, originally from A Dash of Sass)

INGREDIENTS:

  • 1 1/2 cups warm water
  • 1 tablespoon sugar
  • 2 teaspoons kosher salt
  • 1 package dry active yeast
  • 4 1/2 cups all-purpose flour
  • 2 tablespoons unsalted butter, melted and cooled
  • 10 cups water
  • 2/3 cup baking soda
  • 1 large egg yolk, beaten with 1 tablespoon water
  • Pretzel salt, kosher salt and/or poppy seeds, for topping (Hey. I come from Chicago – the bread product that surrounds a hot dog has poppy seeds on it. Always.)
  • 8 hot dogs, cut in half

DIRECTIONS:

  1. Combine the warm water, sugar and kosher salt in the bowl of a stand mixer and sprinkle the yeast on top. Let the mixture sit for about 5 minutes, until the yeast is foamy and begins to smell of yeast.
  2. Add the flour and butter to the yeast mixture. Attach the dough hook to the stand mixer and, on medium-low speed, combine the mixture until the dough pulls away from the sides of the bowl and appears shiny, roughly 4 to 5 minutes.
  3. Spray a large bowl with non-stick spray (or lightly grease with vegetable oil) and place dough in greased bowl. Cover with plastic wrap. Place bowl in a warm area and let dough rise until doubled in size, about 1 hour.
  4. Preheat oven to 450 degrees. Line two cookie sheets with parchment paper. Spray parchment paper with non-stick spray. Set aside. Meanwhile, bring the 10 cups of water and the baking soda to a roiling boil in a large pot.
  5. Place the dough on a greased surface, and divide into 16 equal pieces. Roll each piece into a long rope, roughly 12 inches long. Carefully wrap each piece around a half hot dog. Pinch the ends together to seal.
  6. Boil the shaped pretzels and pretzel dogs, one at a time, in the baking soda water for 30 seconds each. Using a slotted spatula, remove each pretzel dog from the water and place it on a drying rack to allow any extra baking soda mixture to drip off.
  7. Place the boiled pretzel dogs back on a parchment lined baking sheets. Brush with beaten egg yolk and sprinkle with desired toppings. Bake until golden brown, roughly 14 to 15 minutes. Transfer pretzel dogs to a cooling rack for a few minutes before serving. Makes 16 pretzel dogs.

ENJOY!

One Year Ago: Quiche Lorraine with Simple Salad
Two Years Ago: Chicken Piccata

10 Comments

Filed under appetizers, bread, sausage

Play Dough

I need to make more bread. Not because I need to stuff my pie hole with even more carbs than I already do (definitely not because of that) but because, get this, bread is FUN!

See, growing up, I always had a lot of heart when it came to art class but never a lot of talent. I could color inside the lines with the best of them, had that down pretty good. But my drawing never progressed past the square house with the little puff of curly smoke coming out the chimney and a couple assorted stick figures. I made the most mangled and lopsided clay pots. Bless the heart of my dear mother, who displayed them quite proudly, even though they were far from impressive.

Hey, I tried hard. And it would be pretty heartless to fail a 9 year old in art class.

Bread dough is kind of like clay for the slightly domesticated. You can smush it. You can smash it. You can toss it in the air. You can mold it into pretty shapes. Even if you nearly failed art with your sad excuse for a pot like I did, you can turn a ball of yeast, flour and water into something pretty amazing.

Seriously, if I can make these lovely rosette-shaped dinner rolls, ANYONE can.

These easy dinner rolls are a snap to put together. If you’re nervous about yeast, this is a great starter recipe. The dough is easy to work with and although the shaping is a bit time consuming, I had a great time turning balls of dough into long thin ropes and twisting them into flower shapes. I may or may not have squealed with delight a few times. I do that. Squeal when I’m cooking. Don’t you?

Anyway, these rolls are kissed with a light onion and herb flavor which make for a soft, flavorful treat. The perfect accompaniment for everything from a bowl of chili to a roast chicken. Eric was ready to forget the rest of meal and just eat these bad boys for dinner last night. I don’t blame him, that would be this carb-lover’s dream come true!

HERB ONION ROSETTE DINNER ROLLS (Recipe Source: Better Homes and Gardens Cookbook)

INGREDIENTS:

  • 3 1/4 to 3 3/4 cups all-purpose flour
  • 1 package active dry yeast
  • 1 cup milk
  • 1/4 cup sugar
  • 1/3 cup butter
  • 3/4 teaspoon salt
  • 1 tablespoon dried minced onion
  • 1 teaspoon your favorite dried herbs (oregano, basil, rosemary, Italian seasoning, etc.)
  • 1 beaten egg

DIRECTIONS:

1. Stir together 1 1/4 cups of the flour and yeast. In a medium saucepan heat and stir, milk, sugar, butter, salt, onion and herbs until just warmed (120 to 130 degrees) and the butter almost melts. Add to the flour mixture along with the egg. Beat with an electric mixer on low for 30 seconds. Scrape down the side of the bowl and then beat on high for 3 minutes more. Using a wooden spoon, stir in as much of the remaining flour as you can.

2. Turn the dough out onto a lightly floured surface. Knead in enough of the remaining flour to make a moderately stiff dough that is smooth and elastic (about 6 to 8 minutes – just eyeball it. It should feel smooth in your hands and no longer be sticky.) Shape the dough into a ball. Place in a bowl sprayed with cooking spray, turn once to coat all sides of the dough. Cover and let rise in  a warm place until doubled in size, about 1 hour.


This is my dough-coverin’ towel. It looks like a towel that would cover dough doesn’t it?

3. Punch dough down and turn out onto a lightly flour surface. Divide dough in half. Cover and let rest of 10 minutes. Meanwhile, lightly grease a baking sheet.

4. Divide each portion of the dough into 12 to 16 pieces depending on how many rolls you want.

5. On a lightly floured surface, roll each piece into a 12-inch long rope.

6. Tie each rope into a loose knot, leaving two long ends.

7. Tuck the end on the top under the knot and the end on the bottom into the top center of the knot.


This is the part where I squeal. Look how cute they are!!

8. Place two to three inches apart on prepared baking sheet. Cover and let rise in a warm place until nearly doubled in size (about 30 minutes)

9. Brush rolls with a little milk, beaten egg or melted butter for a shiny crust, if desired. Bake in a 375 oven for 15 to 18 minutes or until rolls sound hollow lightly tapped. Immediately remove from pan and cool on wire racks. Makes 24 to 36 rolls.

ENJOY! 🙂

One Year Ago: Slow Cooked Sesame Country Style Ribs
Two Years Ago: Tomato Soup with Pasta and Basil

27 Comments

Filed under bread

A Woman Scone-d

We’re cruising through this sweet corn celebration! The good news is, it’s ALMOST Friday. There is light at the end of the work week!

I typically don’t get real ambitious with breakfast. In fact, we’ve been married over 4 years and I don’t think I’ve ever made a big breakfast for us. No waffles, no pancakes, no bacon and eggs. I am such a bad wife! I just don’t have it together in the morning. Even on the weekend! My husband calls my morning alter-ego “Angry Erin.” He will go to extreme measures to avoid her. Smart man.

The scone is perfect answer to the homemade breakfast for the morning challenged. Make at a time when you are more coherent, toss in the freezer and then bake as you want them. Perfect! I actually hadn’t made scones until this past weekend, but after making a Sweet Corn and Rosemary variety, I can’t wait to experiment with other flavors. The subtle sweetness and rich butter flavor make them the perfect breakfast treat.

This particular recipe has a sweet flavor from the corn, a slight crunch from the cornmeal and a great floral flavor from the rosemary. I topped mine off with a glaze of apricot preserves and honey and it was the perfect sweet compliment. Another unexpected and fun way to use up those plentiful ears of corn!

SWEET CORN AND ROSEMARY SCONES (Recipe adapted from: GroupRecipes.com)

INGREDIENTS:

  • 2 cups all-purpose flour
  • 1/2 cup yellow cornmeal
  • 2 teaspoons baking powder
  • 2 tablespoons sugar
  • 1/2 teaspoon salt
  • 6 tablespoons butter, cold and cut in 1/4 inch slices
  • 2 teaspoons grated lemon zest
  • 1 tablespoon fresh chopped rosemary
  • 3/4 cup fresh corn kernels (cut from about two ears)
  • 1 egg
  • 3/4 cups half and half
  • Egg wash
  • Apricot-Honey Glaze (optional)

DIRECTIONS:

  1. Preheat oven to 400.
  2. In large mixing bowl, combine flour, cornmeal, baking powder, sugar, and salt. Mix with fork.
  3. Add butter and blend with fingertips or pastry blender until butter is evenly mixed in chunks.
  4. Blend in lemon zest and rosemary and corn kernels.
  5. Beat egg in small bowl with half and half. Pour into flour mixture and stir with wooden spoon.
  6. Turn out onto floured board and lightly knead.
  7. Lightly roll our dough to form 12-inch circle. Using a biscuit cutter or plain 3-inch cookie cutters, cut out dough or cut into triangles (I cut mine into 8 triangles).
  8. Transfer to ungreased baking sheet and brush tops with egg wash.
  9. Bake 15 minutes or until golden brown. Remove to wire rack to cool slightly.
  10. Make the glaze: In a small bowl microwave two parts apricot preserves and one part honey until warmed through and loose, about 15 seconds. Drizzle over scones. Serve warm. Makes 12.

ENJOY! 🙂

5 Comments

Filed under bread, breakfast

All Puffed Up

Sometimes it’s kinda fun to make a meal out of something that technically isn’t a meal. Like cereal. Is cereal dinner? From a balanced nutrition standpoint, probably not. But when it’s late or you’re tired or you just don’t feel like turning on the oven and dirtying up a bunch of pots and pans, cereal totally hits the spot. And I don’t know about you guys, but whenever Eric and I go on vacation, we always find a local ice cream parlor and make big ol’ sundaes dinner at least once. Ice cream for dinner is a vacation MUST!

Obviously this is not an every day thing, but every once a while it feels nice to forgo all the rules about what makes a balanced meal and just have fun with food.

Eric really likes finger food type stuff. Anything bite-sized that he can just pop into his mouth is always going to be a hit with him. The guy has been working extra hard lately and needed a little bit of cheering up. Let’s face it – if he needs cheering up, then I need cheering up. If he’s blue, I’m blue. I must love the guy or something. Huh. How about that. 😉

So on Saturday, I decided we’d have a non-dinner dinner. Not a balanced meal? Meh. So what. It’s Saturday. For dinner, we had bread, cheese and meat. In tiny puff form that made it extra easy to eat way too many. Success. Although, for the record, I did cut up some raw veggies to eat on the side. So, I did do SOMETHING right. 🙂

These little babies are super easy to make and a lot of fun. They are the perfect make-ahead snack for a game day or an appetizer spread. They are light, fluffy and cheesey with a great hint of crunch around the edges (which I just cannot resist. EDGES RULE!) The pepperoni gave them great flavor. Really these are pretty customizable. Perhaps bacon, cheddar and scallions for your next brunch spread or Parmesan, garlic and herb for a side on lasagna night. Any veggies, cheese or meat you desire can be mixed into this puffy batter. The combinations are endless!

PEPPERONI PIZZA PUFFS (Recipe Source: Everyday with Rachael Ray)

INGREDIENTS:

  • 3/4 cup flour
  • 3/4 teaspoon baking powder
  • 3/4 cup whole milk (I used 1% with fine results)
  • 1 egg, lightly beaten
  • 4 ounces mozzarella cheese, shredded (about 1 cup)
  • 4 ounces pepperoni, cut into small cubes (about 1 cup)  (I used turkey pepperoni)
  • 1/2 cup store-bought pizza sauce (I used Newman’s Own marinara – my preferred jar sauce!)
  • 2 tablespoons finely chopped fresh basil

DIRECTIONS:

  1. Preheat the oven to 375°. Grease a 24-cup mini-muffin pan. In a large bowl, whisk together the flour and baking powder; whisk in the milk and egg. Stir in the mozzarella and pepperoni; let stand for 10 minutes.
  2. Stir the batter and divide among the mini-muffin cups. Bake until puffed and golden, 20 to 25 minutes.
  3. Meanwhile, microwave the pizza sauce until warmed through, then stir in 1 tablespoon basil. Sprinkle the puffs with the remaining 1 tablespoon basil. Serve the puffs with the pizza sauce for dipping. Serves 4.

Note: These can be made ahead of time. Place baked puffs on a baking sheet and put in the freezer until frozen. Transfer to a storage bag. When ready to eat, preheat oven to 350 degrees, place puffs on a baking sheet, and bake for 8 to 10 minutes until warm.

ENJOY! 🙂

8 Comments

Filed under appetizers, bread, muffins, pizza

House Rules

My kitchen comes with several rules. Some are generally pretty easy to follow:

  1. The flour and sugar containers belong in the cabinet above the stove.
  2. The person responsible for taking the garbage out to the garage is always Eric. (This one is really, really easy for me to follow. For Eric….mmmm….takes some gentle coaxing every now and then but overall he’s pretty good.)
  3. At the kitchen table, I sit in the chair with my back to the window. Eric faces the window.

Some rules are not as easy to follow. For example:

  1. Always washing my pots and pans (and other hand-washables) immediately following the meal instead of leaving them in the sink until the next day. (I do PRETTY well with this one. I’d say I have about an 85% success rate following this rule most of the time – a nice, solid B average. In the words of George Costanza: “not showin’ off…not fallin’ behind.” Ha. )
  2. Finding ways to sneak vegetables into my husband’s mouth. Sometimes it’s easier to just give up….and eat my own broccoli raw on the side instead of cooking it and adding it our meal.
  3. Only baking once a week.

Oooo. Number 3 is extra hard, isn’t it? I always have the urge to take flour, sugar and butter and turn it into something golden brown and delicious. The other problem is I have the urge to EAT all things flour, sugar and butter-laden pretty much all the time. If I gave in to every urge I had to bake, I’d eat everything in sight and then, well….let’s just say these cute skinny jeans I’ve been rockin’ lately would have to be retired.

And so I created the Bake Only Once a Week rule. This means I pick out one baked good a week and make enough for Eric and I to share (example: 12 cupcakes – not 30. 2 dozen cookies, not 5) The item is reserved specifically for after dinner and is not packed in lunches or eaten as snacks. If someone (ahem – me.) goes overboard and decimates said baked good in three days, well, then that’s it…it’s gone and there’s no more homemade goodness until the weekend rolls around again. The incentive is there to make it last. Oh yes. Because if I don’t have my little fix of something sweet after dinner…I go a little loony and start doing crazy things. Like eating these nasty orange slice candy things Eric brings home from Farm & Fleet that I DON’T EVEN LIKE! If I’m going to waste calories on sweets, which, please, is a total given – I would much rather it be on something I’m really going to enjoy. Yes. I’m pretty good at making it last.

Where I run into trouble with this rule is when it comes to bread. If I make bread, does that count as my once a week baking or not? Well, if I made a healthy whole grain bread, I would probably say no and go ahead and whip up a batch of cookies after that. The problem is…when I get the urge to make bread it is never of the whole grain variety. It’s of the white and packed with cheese variety. Dang!

See, this why I rarely make bread. I’m not intimidated, I don’t think it’s hard – I would just rather have the cookies or brownies or whatever. Every so often, I’ll forgo my sweet treat for a week in favor of white bread. It’s rare, but it does happen.

A couple weeks ago, I was browsing the King Arthur Flour website. The actual reason I was there was because I am interested in getting started in using more whole grain in baking. Really!  King Arthur has great offering of whole grain flours and fun recipes that use them so I was perusing what’s out there. I admit I haven’t ventured into this realm much yet but since I’ve already decided I’m not going to be able to quit it with the stupid cookies or whatever, the very least I can do is add a tiny bit of nutritional value to each one. Like whole wheat flour totally negates butter. And sugar. And eggs. Mmm hmm. Right. All of us sugar addicts will just keep telling ourselves that.

Anyway, I got totally sidetracked and stumbled upon this recipe for No-Fuss Foccacia. It looked so simple and yummy, I skipped my usual sweet baking that weekend and made this instead. It could not be easier. In less than two hours with no kneading and no mess, I had hot, fresh, cheesy bread with a nice thin crust and a light and fluffy interior. Mmmmm. Empty, white bread calories. Worth forgoing the cookies for a week.

Now, the more I look at this recipe the more I think rapid-rise yeast does not equal instant yeast. Am I correct in this assumption? Instant yeast sounds like a specialty product. At any rate, the rapid-rise yeast I used worked like a charm. After 60 minutes of resting, I did in fact have a nice puffy dough, so I assumed all was well and tossed it in the oven. Came out great! My only other note about this recipe is that you don’t need 1 to 2 tablespoons of olive oil for the bottom of your baking dish. That’s way too much. About half a tablespoon will work just fine – just spread it around evenly with a pastry brush.

I’m sure you’re wondering what I did for my sweet fix since I didn’t do any other baking when I made this bread. That’s what open bags of chocolate chips are for. 🙂

NO-FUSS FOCACCIA (Recipe adapted from: King Arthur Flour)

INGREDIENTS:

  • 1 1/2 cups warm water
  • 3 tablespoons olive oil (plus additional for drizzling)
  • 1 1/4 teaspoons salt
  • 3 1/2 cups unbleached all-purpose flour
  • 1 tablespoon instant yeast (I used quick rise yeast and it worked fine)
  • Dried herbs of your choice or pizza seasoning, optional (I used Italian seasoning)
  • 1/2 cup shredded cheese, optional (I used Parmesan cheese)

DIRECTIONS:

  1. Lightly grease a 13×9 inch baking pan. Drizzle 1 to 2 tablespoons of olive oil on the bottom. (I used about 1/2 tablespoon, spread evenly with a pastry brush.)
  2. Combine all the ingredients, and beat on high with an electric mixer for 60 seconds.
  3. Scoop the sticky batter into the prepared pan, cover, and let rise at room temperature for 60 minutes, or until dough becomes puffy.
  4. Preheat oven to 375 degrees.
  5. Gently poke the dough all over with your finger.
  6. Drizzle lightly with olive oil and sprinkle with dried herbs, pizza seasoning or cheese, if desired.
  7. Bake until golden brown, about 35 to 40 minutes
  8. Remove from the oven, wait 5 minutes, then turn out onto a cooling rack. Serve warm or at room temperature.

ENJOY! 🙂

One Year Ago: Potato Chip Cookies – My grandma’s recipe! An old family favorite

1 Comment

Filed under bread

Love that Babka!

Would you believe me if I said my husband has had a bit of a Babka Obsession for at least the last six months? It’s true. The man has been bugging me about babka since last spring!

A while back, (quite a while, if I’m being honest), Eric and I were enjoying a quiet evening at home with our favorite show – Seinfeld! If you’re a fan, then you remember the infamous “Dinner Party” episode. The gang stops off a cake and bottle of wine before heading to a dinner party for the evening. Hilarity ensues.

Elaine insists on getting a chocolate babka – only to find she misses the last one because she didn’t take a number before getting in line at the bakery. She’s stuck with the “lesser babka.” The cinnamon. There’s a hair involved.

In other words, it’s hilarious.

So Eric looks over at me and says: You should make babka.
Me: Okay.
Pause, pause. Blink, blink.
Eric: What’s a babka?
Me: Um. I’m not sure.

Commence scratching of head.

Luckily there was a laptop nearby. Google to the rescue! We learned that babka was a cross between a yeast bread and sweet cake. A sweet, buttery yeast dough is folded around a sweet filling (such as chocolate or cinnamon).We also learned that this delicious bread is a favorite of Jewish families at Hanukkah.

His eyes went wide – like a little kid in a candy store. “I want that!” He declared. YUM. I was intreguied too. I love trying new things and learning about other’s traditions. And it’s always and honor and pleasure to try them in my own home, even if I’m not all that familiar. I love expanding my knowledge and my palate. I made a mental note to make Eric a babka.

And so began the Great Babka Obession of 2009. He’s been asking and asking me to make one. And asking. Again and again and again. I kept telling him I would but I just never got around to it. When I opened my December issue of Cooking Light and it fell right to a chocolate babka recipe, I figured it was a sign – time to make my husband his babka. And since the holidays are just around the corner, I decided this was the perfect time to try it!

Two words: Oh. My. Delicious! Absolutely delicious. Eric watched with excitement as I sliced into the buttery, golden brown exterior…

To reveal the swirls of chocolately goodness inside. Oh, it’s just so good. Perfect for dessert or a decadent holiday breakfast. A loaf of this along with some specialty coffee or tea would make a delightful and special homemade gift this season.

The best part of all, is it’s pretty easy to make. A little time consuming, but really, this is an easy to dough to make and even easier to work with! It rolled like a dream. The chocolate filling isn’t overly sweet and I loved the subtle hint of spiciness from the cinnamon. And it’s oh-so pretty.

Don’t wait months and months to try this like I did….you will not be disappointed!

CHOCOLATE BABKA (Recipe Source: Cooking Light, December 2009)

**Note** When rolling the dough around the filling, really roll it and pinch it tight. As tight as you can. I don’t think I rolled mine quite tight enough (see the gaps in the photo…) Also, if you want clean, nice slices where you can really see the swirl inside, it is essential you let the bread cool completely before cutting into it. It’s so soft and delicious, it will smoosh and turn to mush if you try to cut it when it’s warm. Just try to resit the warm, chocolatey goodness. It will be hard. You’ve been warned. 🙂

Dough:

  • 1  teaspoon  granulated sugar
  • 1  package dry yeast (about 2 1/4 teaspoons)
  • 3/4  cup  warm 1% low-fat milk (105° to 110°)
  • 6  tablespoons  granulated sugar
  • 1/2  teaspoon  vanilla extract
  • 1/4  teaspoon  salt
  • 1  large egg yolk, lightly beaten
  • 7.5  ounces  all-purpose flour (about 1 2/3 cups), divided
  • 5.85  ounces  bread flour (about 1 1/4 cups)
  • 5  tablespoons  butter, cut into pieces and softened
  • Cooking spray

Filling:

  • 1/2  cup  granulated sugar
  • 3  tablespoons  unsweetened cocoa
  • 1/2  teaspoon  ground cinnamon
  • 1/4  teaspoon  salt
  • 4  ounces  semisweet chocolate, finely chopped

Streusel:

  • 2  tablespoons  powdered sugar
  • 1  tablespoon  all-purpose flour
  • 1  tablespoon  butter, softened

DIRECTIONS:

1. Dissolve 1 teaspoon granulated sugar and yeast in warm milk in the bowl of a stand mixer; let proof for 5 minutes. Stir in 6 tablespoons granulated sugar, vanilla extract, 1/4 teaspoon salt, and egg yolk. Weigh or lightly spoon flours into dry measuring cups; level with a knife. Add 6 ounces (about 1 1/3 cups) all-purpose flour and bread flour to milk ; beat with dough hook at medium speed until well blended (about 2 minutes). Add 5 tablespoons butter, beating until well blended. Scrape dough out onto a floured surface (dough will be very sticky). Knead until smooth and elastic (about 10 minutes); add 1.5 ounces (about 1/3 cup) all-purpose flour, 1 tablespoon at a time, to prevent dough from sticking to hands (dough will be very soft).

2. Place dough in a large bowl coated with cooking spray, turning to coat. Cover and let rise in a warm, draft free place for about 1 1/2 hours or until doubled in size. (Gently press two fingers into dough. If indentation remains, dough has risen enough.) Punch dough down; cover and let dough rest 5 minutes.

3. Line the bottom of a 9 x 5–inch loaf pan with parchment paper; coat sides of pan with cooking spray.

4. For the filling, combine 1/2 cup granulated sugar, cocoa, cinnamon, salt, and chocolate in a  bowl; set aside.

5. Place dough on a heavily floured surface; roll dough out into a 16-inch square. Sprinkle filling over dough, leaving a 1/4-inch border around edges. Roll up dough tightly, jelly-roll fashion; pinch seam and ends to seal. Holding dough by ends, twist dough 4 times as if wringing out a towel. Fit dough into prepared pan. Cover and let rise 45 minutes or until doubled in size.

6. Preheat oven to 350°.

7.  For the streusel, combine powdered sugar, 1 tablespoon all-purpose flour, and 1 tablespoon softened butter, stirring with a fork until mixture is crumbly; sprinkle streusel evenly over dough. Bake at 350° for 40 minutes or until loaf is browned and sounds hollow when tapped. Cool bread in pan 10 minutes on a wire rack; the remove. Cool bread completely on wire rack before serving.

ENJOY! 🙂

One year ago: I was baking up a storm for an event at work. Click to see all the holiday goodies I made – all the recipes are linked there!

5 Comments

Filed under bread, chocolate

Where the boys are

I often find myself wondering what happens in other homes when husband’s friends come to stay for the weekend. I have a few guesses – 48 hours of video games, anyone? Maybe two full days full of nothing but beer and sports. Perhaps they get the old band back together and play music. Or maybe they don’t stay home at all and immediately jet off for a long motorcycle ride or hunting trip. Or head off to the nearest campsite, hiking trail or bike path. Seems pretty accurate. Manly. The things life long Bromances are made of.

But, how many  homes are filled with the smell of fresh paint and stain when husband’s friends visit? Or the sounds of a hammer on nails or a power saw whirring. How many wives overhear their husband’s tell their friends on the phone to bring “work clothes and boots” when discussing the weekend’s plans?

This is what happens at our house. I am seriously beginning to questions whether or not this is normal. Is this normal? Really, I want to know. When your husband’s friends come to stay for the weekend does he put them straight to work? Because my husband does. Weird, right? Yeah.

Oh, don’t get me wrong, I’m not complaining. The fact that it was Eric’s two high school buddies painting doors and trim on Saturday and not me totally made me do a little dance of joy. I guess I just don’t know WHY anyone would want to drive 300 plus miles to do manual labor at someone else’s house. I mean, no one has any shortage of that kind of stuff around their own house, why in the world would they want to go to someone else’s and do it?

Oh well. They don’t seem to mind. And I certainly don’t mind. Everyone wins!

Eric had his buddies hard at work this weekend, so I figured I could do my part and make dinner. What to feed three growing boys that have been working hard all day. Hm. Can’t go wrong with chili! And my favorite beer bread.

I make this bread pretty frequently. Anytime there’s a chili or hearty soup to be had, I usually whip this up to go along side it because it literally takes minutes to throw together. It is insanely delicious. It’s one of those things that’s so common around here, I didn’t even think to ever put it in my blog. It’s like it’s not special enough – it’d be like blogging tacos made with a seasoning packet or a boxed pasta salad (both of which I do make and enjoy very much. Ha. Don’t you judge me!) But, really, it IS special – because it’s so very good! It does deserve a place in my blog after all. With a slight kick from sauteed onion and garlic and great cheesy surprise, it bakes up light and tender. Check out all those little pockets of cheesy deliciousness! (that’s a technical culinary term.) It’s so flavorful inside and crunchy and yummy outside.

Shout out to all my fellow edge piece fans out there in Blogland! Every piece has that satisfying crunch of “edge” to be enjoyed. Love me some edges. Holla! 🙂

BASIC BEER-CHEESE BREAD (Recipe Source: Cooking Light, November 2008)

INGREDIENTS:

  • 1  tablespoon  olive oil
  • 1/2  cup  finely chopped yellow onion
  • 1/4  teaspoon  freshly ground black pepper
  • 1  garlic clove, minced
  • 13.5  ounces  all-purpose flour (about 3 cups)
  • 3  tablespoons  sugar
  • 2  teaspoons  baking powder
  • 1  teaspoon  salt
  • 1  cup  (4 ounces) shredded Monterey Jack cheese
  • 1  (12-ounce) bottle lager-style beer (such as Budweiser)
  • Cooking spray
  • 2  tablespoons  melted butter, divided

DIRECTIONS

1. Preheat oven to 375°.

2. Heat oil in a small skillet over medium-low heat. Add onion to pan; cook 10 minutes or until browned, stirring occasionally. Stir in pepper and garlic; cook 1 minute.

3. Weigh or lightly spoon flour into dry measuring cups; level with a knife. Combine flour, sugar, baking powder, and salt in a large bowl, stirring with a whisk; make a well in center of mixture. Add onion mixture, cheese, and beer to flour mixture, stirring just until moist.

4. Spoon batter into a 9 x 5–inch loaf pan coated with cooking spray. Drizzle 1 tablespoon butter over batter. Bake at 375° for 35 minutes. Drizzle remaining 1 tablespoon butter over batter. Bake an additional 25 minutes or until deep golden brown and a wooden pick inserted into the center comes out clean. Cool in pan 5 minutes on a wire rack; remove from pan. Cool completely on wire rack.

ENJOY! 🙂

One year ago:

5 Comments

Filed under bread